1. Introduction
Niord (Nautical Information Directory) is a system for producing and publishing Navigational Warnings (NW) and Notices to Mariners T&P (NM).
It was originally developed as part of the EfficienSea2 EU project and subsequently implemented as a production system for the Danish Maritime Authority.

Some of the main features of Niord area:
-
Niord provides an advanced and highly customizable production system for NW and NM T&P.
-
It includes a plug-in architecture for NW and NM message promulgation via e.g. mailing lists and Twitter.
-
Niord also integrates with the Maritime Cloud by defining a Maritime Cloud Service Specification and making NW & NM messages accessible via a Public REST API
-
The combined NW & NM message model adopted by Niord has been devised to make data future-compatible with the upcoming IHO S-124 specification.
2. Administrators Manual
A user in Niord always works in the context of a current domain. Domains are used to separate NW & NM messages into more manageable lists - you could e.g. have a domain for NW messages, a domain for NM messages, a domain for firing exercises (also NWs), or indeed domains for separate regions with separate time-zones, etc.
A user has separate roles in each domain. The available roles are:
-
User: The user role can be assigned to e.g. case officers that should have access to see, proof-read and comment on un-published NW and NM messages.
-
Editor: Editors compose and manage the life cycle of an NW or NM message.
-
Admin: An administrator of a domain will have additional access to e.g. manage the base data (sea charts, publications, etc.) of the Niord system.
-
Sysadmin: A very special role that should be held only by the person(s) actually setting up and managing the Niord system.
The roles listed above are hierarchical in the sense that a sysadmin can do anything an admin can do, who in turn can do anything an editor can do, and so forth.
This document serves as a user manual for administrators of a domain.
| Please use a newish Chrome, Safari or Firefox browser when using Niord. |
3. Admin Page
The Admin page of Niord only become available if you log in as an administrator or system administrator.
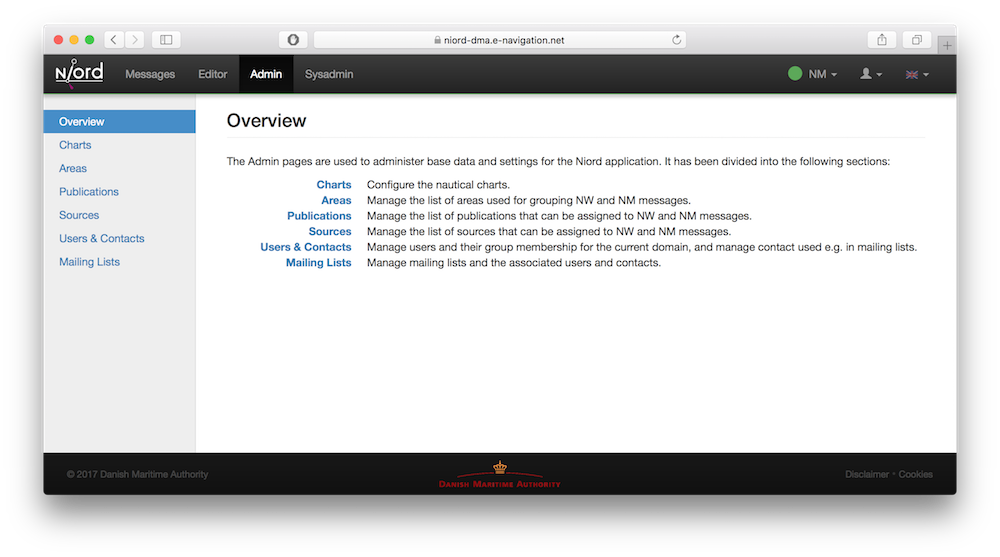
The Admin page allows administrative users to manage base data such as charts, areas, publications, users, etc.
There are some quirks to be aware of when assigning users to become administrators. A user can in theory be an administrator in one domain, e.g. "NW", and only an editor in another domain, e.g. "NM". Since some base data, such as charts and areas, are shared between domains, this means that the user can manage the charts when in the "NW" domain, but not when in the "NM" domain.
In reality this is hardly a problem, since the typical modus would be for an administrator of one domain to be administrator of all domains. However, it is something to be aware of…
4. Charts
The Charts page allows an administrator to manage the list of nautical charts that may be associated with notices to mariners and navigational warnings, and can be used for filtering message search results.
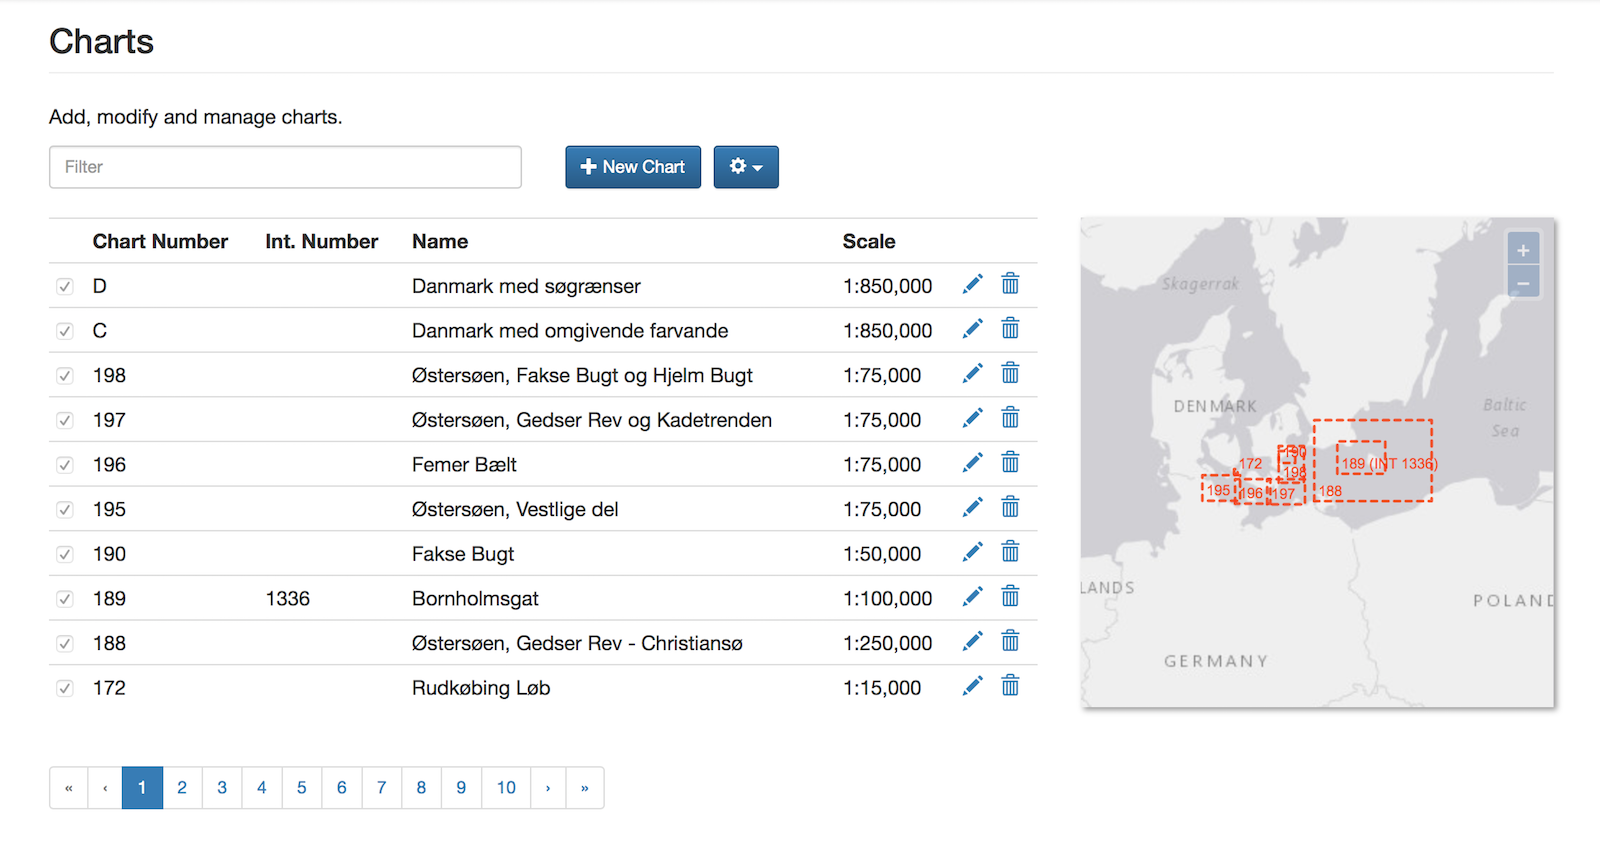
The list of charts is divided into pages of 10 charts, and may be navigated using the pagination control below the chart list. Alternatively, the user may filter the list of charts by typing a term into the Filter input field above the chart list. The term is matched against the name and number of the charts.
The map at the right side of the page depicts the extents of the charts currently displayed.
4.1. Adding or Editing a Chart
The user can add a new nautical chart by clicking the "New Chart" button, or edit a chart by clicking the pencil symbol next to the chart.
This will open the Chart Edit Page:
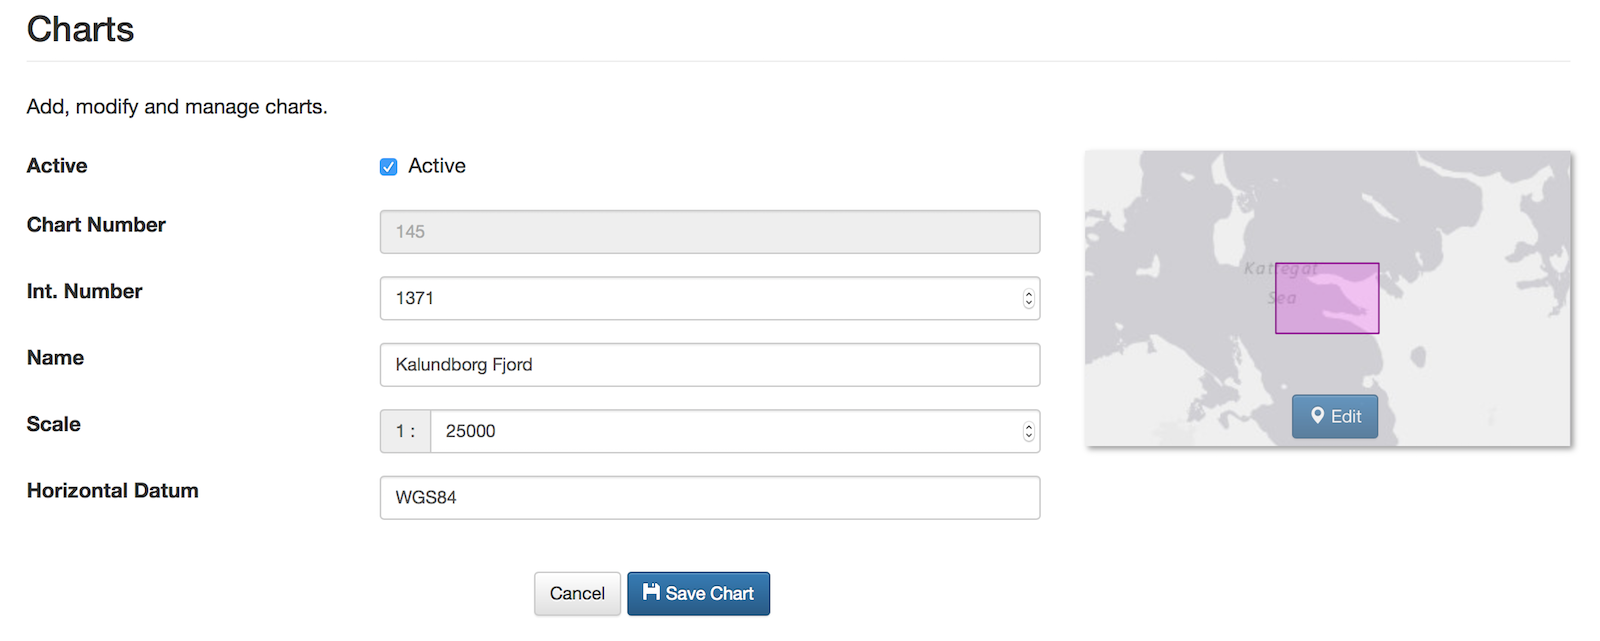
Most chart attributes are pretty straight forward:
| Chart Attribute | Description |
|---|---|
Active |
Only an active chart can be assigned to a message. |
Chart Number |
The chart number is the national number of the chart. It must be unique. |
Int. Number |
The international number of the charts. Only some charts have international numbers. |
Name |
The national name of the chart. |
Scale |
The scale of the chart. Can be used for sorting the charts assigned to a messages. |
Horizontal Datum |
The horizontal datum of the chart. Typically WGS84. This attribute is currently not used in Niord. |
The geographical extent of a chart can be edited by clicking the "Edit" button at the map. This will open a graphical editor and allow the user to define the extent by one or more polygons (rectangles)
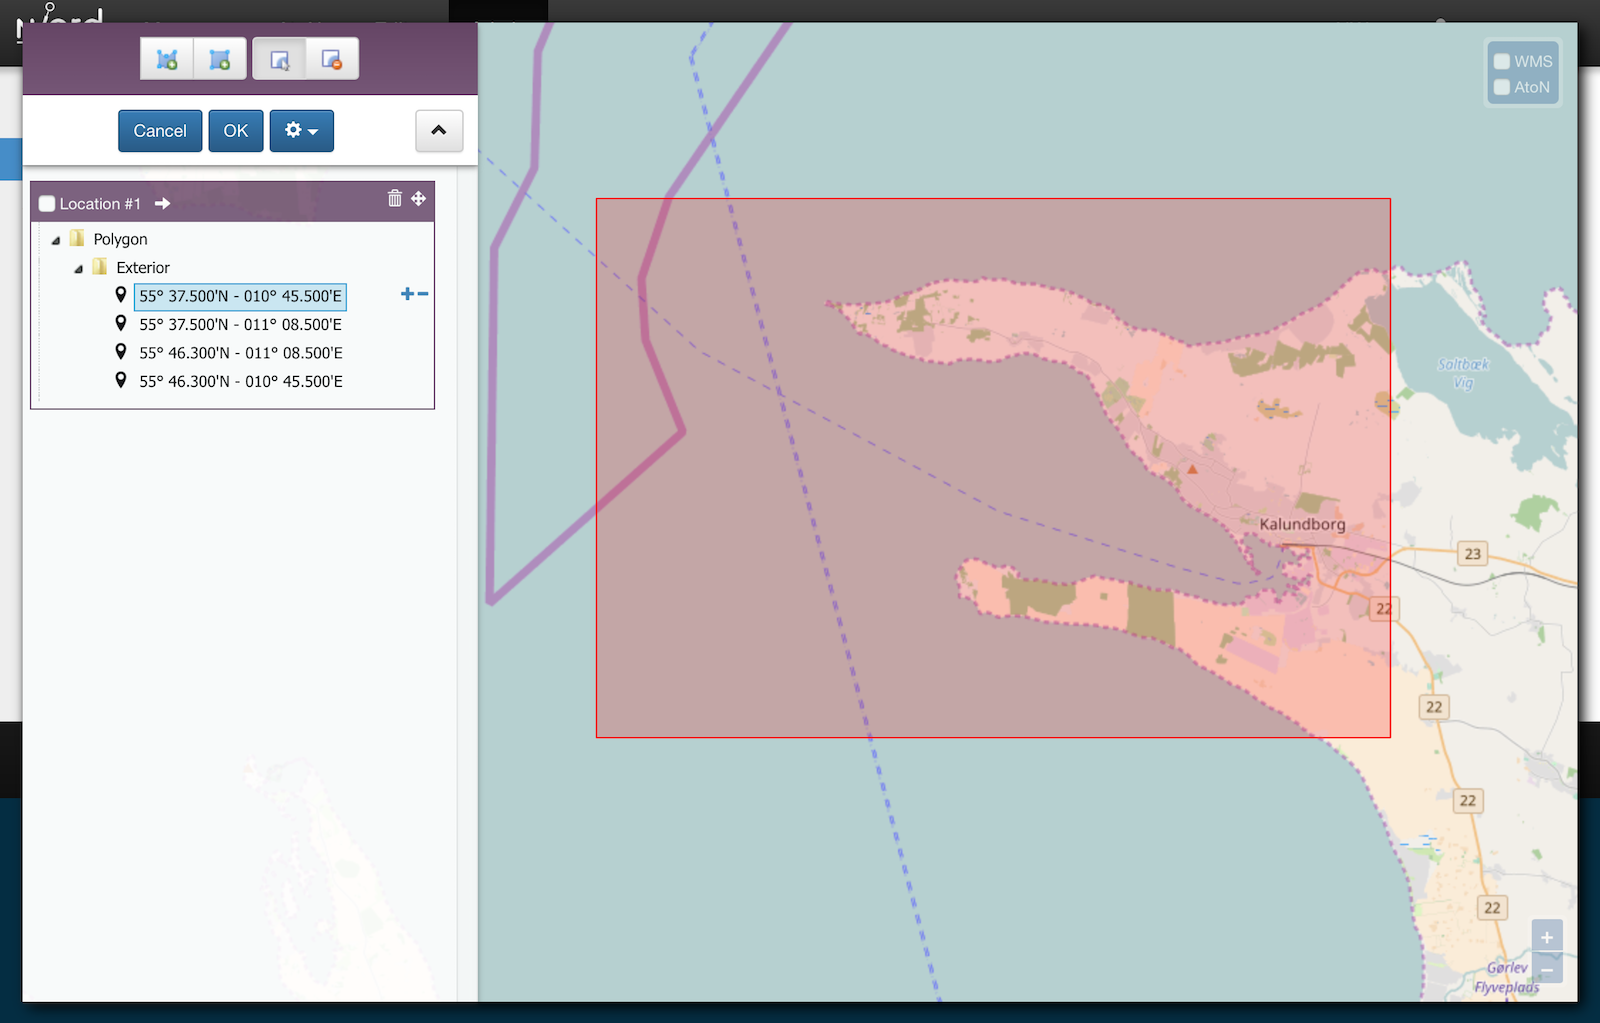
The functionality of the graphical editor is described in more detail in the User Manual for Editors.
4.2. Deleting a Chart
Charts can be deleted by clicking the trash icon next to them. However, this only works if the chart being deleted has never been assigned to a message.
If a chart has indeed been assigned to a message, the user should deactivate the chart instead.
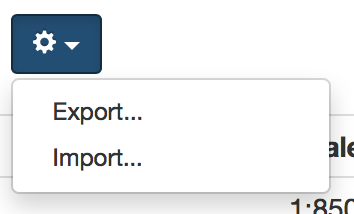
4.3. Importing and Exporting Charts
The administrator can export and import charts from the charts action menu:
The export/import file format is based on a JSON representation of the SystemChartVo class.
Example:
[
  {
    "chartNumber": "198",
    "active": true,
    "scale": 75000,
    "name": "Østersøen, Fakse Bugt og Hjelm Bugt",
    "geometry": {
      "type": "Polygon",
      "coordinates": [
        [
          [ 12.0, 54.74166667 ],
          [ 12.76666667, 54.74166667 ],
          [ 12.76666667, 55.38333333 ],
          [ 12.0, 55.38333333 ],
          [ 12.0, 54.74166667 ]
        ]
      ]
    },
    "horizontalDatum": "WGS84"
  },
  ...
]
Importing a chart JSON file will trigger the chart-import batch job. Batch jobs can be monitored and managed by system administrators.
As an alternative to manually uploading a chart import JSON file on the Charts admin page, the file can be copied to the $NIORD_HOME/batch-jobs/chart-import/in folder.
5. Areas
The Areas page allows an administrator to manage the hierarchical tree of areas that may be associated with notices to mariners and navigational warnings, and can be used for filtering message search results.
The area tree is navigated like a file system directory. Additionally, the user may filter the areas by typing a term into the Filter Areas input field above the area tree. The term is matched against the name of the areas.
5.1. Adding or Editing an Area
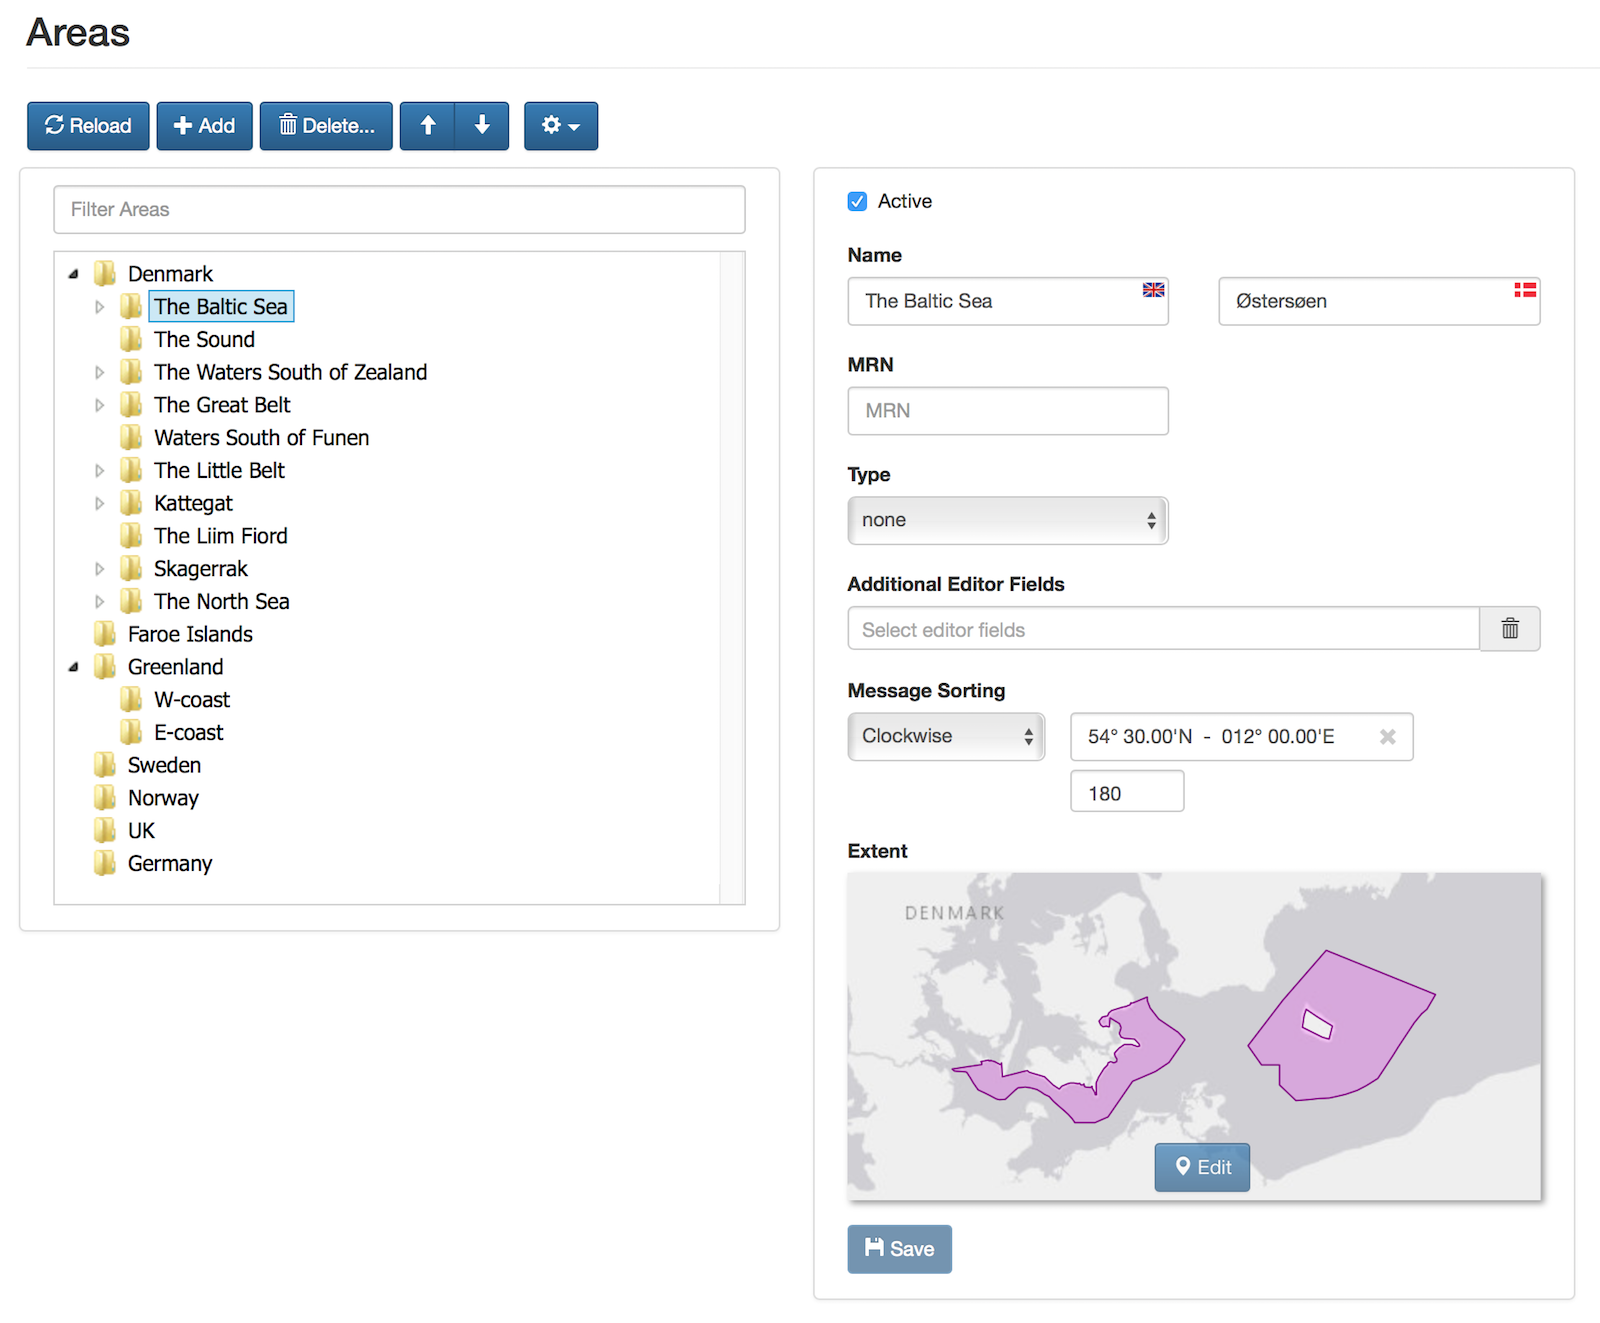
The user can add a new area by clicking the "Add" button, or edit an area by selecting it in the area tree.
When adding a new area, it will be a child-area of the currently selected area in the area tree. If no area is selected, the new area will become a new root area.
The details of the new or edited area will be present in the Area Editor Panel next to the area tree (see screenshot above).
The simple editable attributes of an area are listed below:
| Area Attribute | Description |
|---|---|
Active |
Only an active area can be assigned to a message. |
Name |
The name of the area in all supported model languages. |
MRN |
Optionally, specify a Maritime Resource Name (a unique URN) for the area. Defining MRNs for areas will facilitate better integration between Niord systems of different countries. |
Type |
Optionally, specify the area type. Currently, "Country" and "Firing Area" are the only supported types. |
Additional Editor Fields |
Can be used to enable extra fields in the message editor when the area is assigned to the message. As an example, if a firing practice area is assigned to a navigational warning, it might make sense to show the "Signals" editor field, not normally enabled for navigational warnings, in the message editor. |
5.1.1. Message Sorting Editor Field
The Message Sorting editor field determines how to sort messages, when the message list is sorted by area. The valid options are:
| Message Sorting | Description |
|---|---|
Area order |
This is the default behaviour. The order of messages assigned to an area, or any of its sub-areas, is determined by the area order. So, in the example above, "Denmark" is e.g. sorted before "Faroe Islands", and within "Denmark", "The Baltic Sea" is sorted before "The Sound", etc. |
North-South |
Messages associated with an area sorted "North-South", or any of its sub-areas, will be sorted North-to-South by the latitude of their geometrical center. |
South-North |
Reverse order of "North-South". |
East-West |
Messages associated with an area sorted "East-West", or any of its sub-areas, will be sorted East-to-West by the longitude of their geometrical center. |
West-East |
Reverse order of "East-West". |
Clockwise |
If an area is flagged as sorting "Clockwise", then messages associated with the area, or any of its subareas, will be sorted in clockwise order around the given position, starting at the given bearing. |
Counter-Clockwise |
Reverse order of "Clockwise". |
This automated sorting of messages by area can subsequently be overridden manually, as described in the Sort Area Action chapter.
5.1.2. Extent Editor Field
The geographical extent of an area can be edited by clicking the "Edit" button at the Extent editor field map. This will open a graphical editor and allow the user to define the geographical extent.
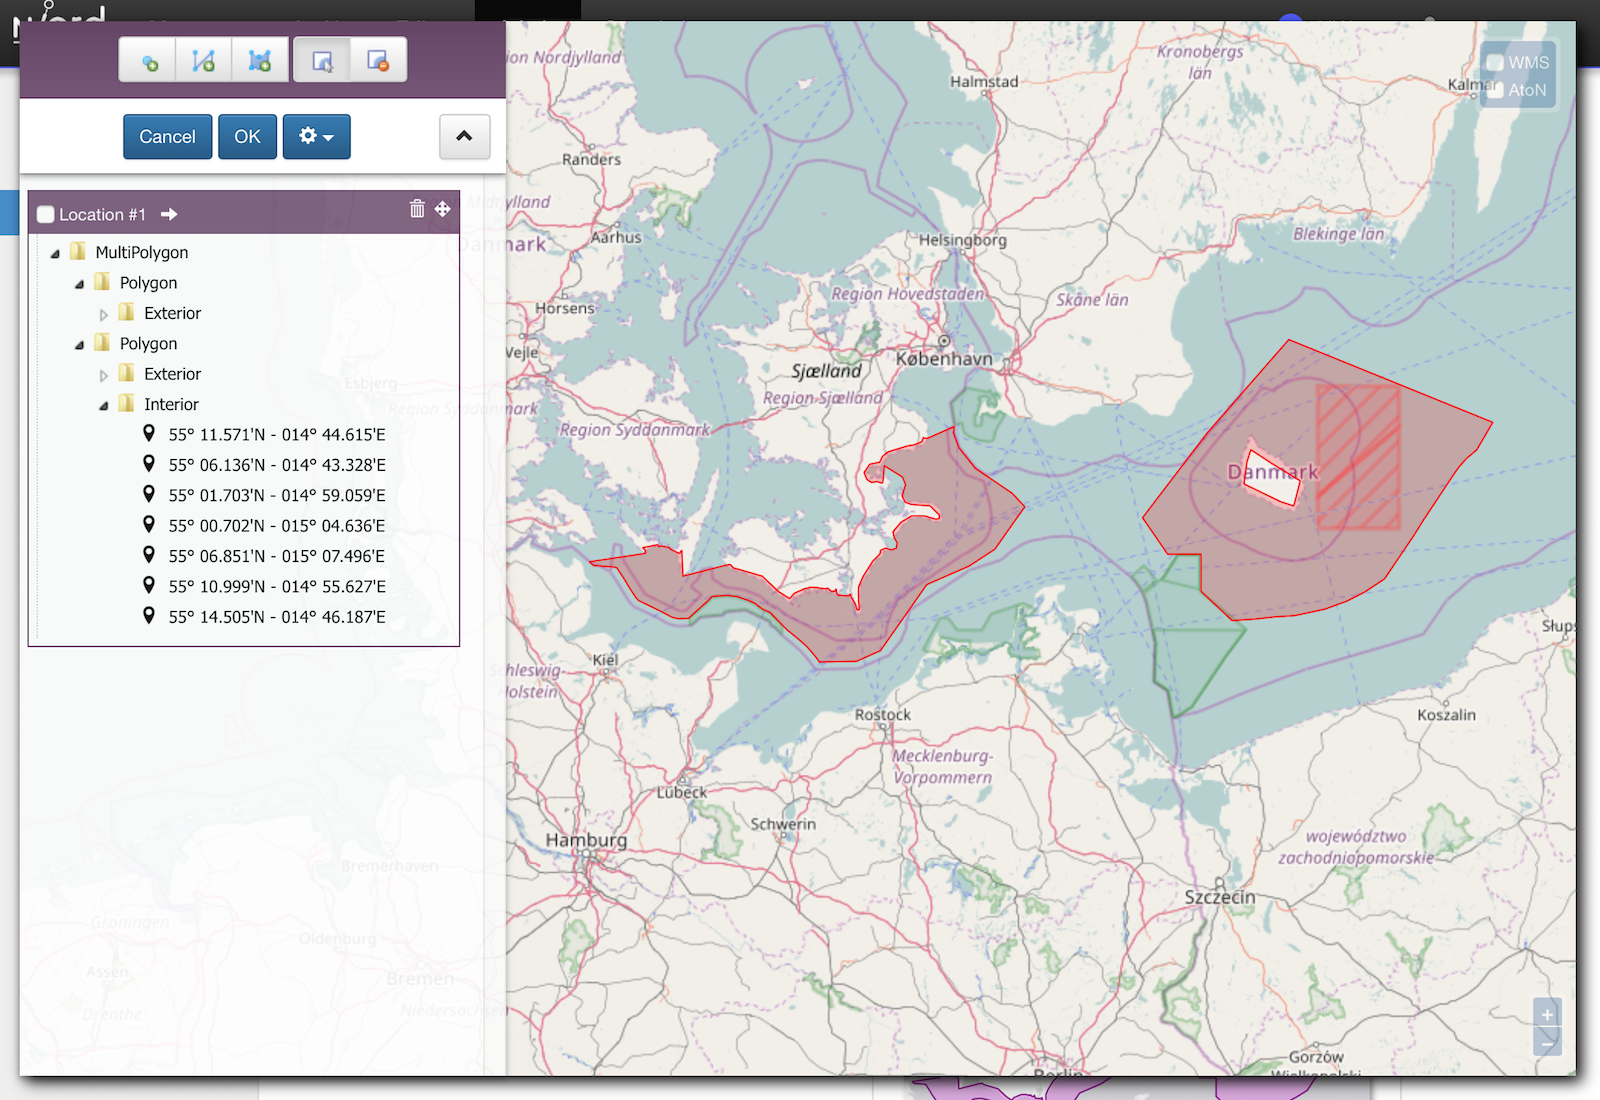
The functionality of the graphical editor is described in more detail in the User Manual for Editors.
5.2. Reorganizing Areas
The hierarchical order of the areas are updated in two ways:
-
To move an area to a different parent area, use drag-and-drop.
-
To move an area to another position under the same parent area, use the up- and down-arrow buttons above the area tree.
5.3. Deleting an Area
An area, including all its sub-areas, can be deleted by selecting it and then click the "Delete" button above the area tree. However, this only works if neither the selected area, nor any of its sub-areas, have ever been assigned to a message.
If the area has indeed been assigned to a message, the user should instead deactivate the area.
5.4. Importing and Exporting Areas
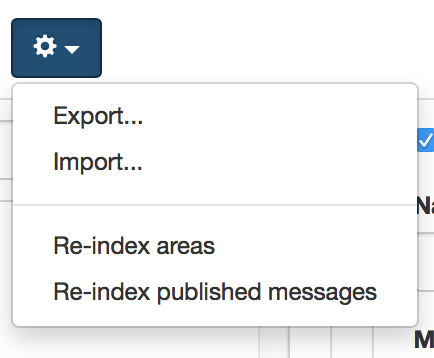
The administrator can export and import areas from the area action menu:
The export/import file format is based on a JSON representation of the SystemAreaVo class. The data file should define root areas at the top level, and the recursively define sub-areas in the children field of the parent area.
The imported data is merged into the existing area tree. If an MRN is defined for an imported area, this is used to search for existing areas in the area tree. Alternatively, the name of the area (in all supported languages) is used to search for existing matches.
Example:
[
  {
    "mrn": "urn:mrn:iho:country:dk",
    "active": true,
    "descs": [ { "name": "Danmark",  "lang": "da" }, { "name": "Denmark", "lang": "en" }
    ],
    "type": "COUNTRY",
    "geometry": {
      "type": "MultiPolygon",
      "coordinates": [ ... ]
    },
    "children": [
      {
        "active": true,
        "descs": [ { "name": "Østersøen", "lang": "da" }, { "name": "The Baltic Sea", "lang": "en" } ],
        "geometry": {
          "type": "MultiPolygon",
          "coordinates": [ ... ]
        },
        "children": [ ... ],
        "messageSorting": "CW",
        "originLatitude": 54.5,
        "originLongitude": 12.0,
        "originAngle": 180
      },
      ...
    ]
  },
  ...
]
Importing an area JSON file will trigger the area-import batch job. Batch jobs can be monitored and managed by system administrators.
As an alternative to manually uploading an area import JSON file on the Areas admin page, the file can be copied to the $NIORD_HOME/batch-jobs/area-import/in folder.
6. Publications
The Publications page allows an administrator to manage a list of publications. Publications represents a very extensive topic, because they are used for many different purposes, and in many different forms.
Two of the main purposes are:
-
All navigational warnings and notices to mariners in Niord maintain a list of publications relevant to the message. Or rather, two lists; one for internal publications such as the journal number or Aids to Navigation numbers relevant to the message; and a list of external publications, such as the List of Wrecks, or List of Lights, referenced by the message.
-
Publications that are produced by Niord, such as the weekly Notices to Mariners. These are publicly available via a public REST API.
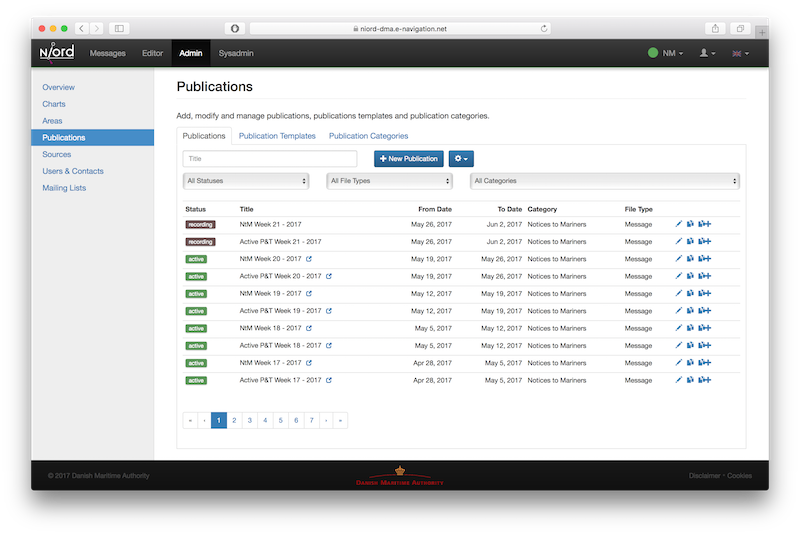
The Publications page is actually divided into three different sub-pages: Publications, Publication Templates and Publication Categories, detailed below in reverse order.
6.1. Publication Categories Tab
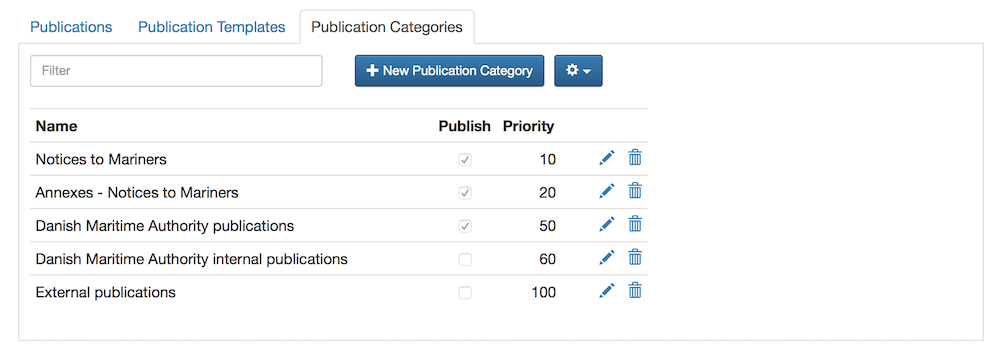
All publications must be assigned a publication category. Publication categories are thus used to group publications in a prioritized order, and will determine which publications are published to end-user facing websites via a public REST API.
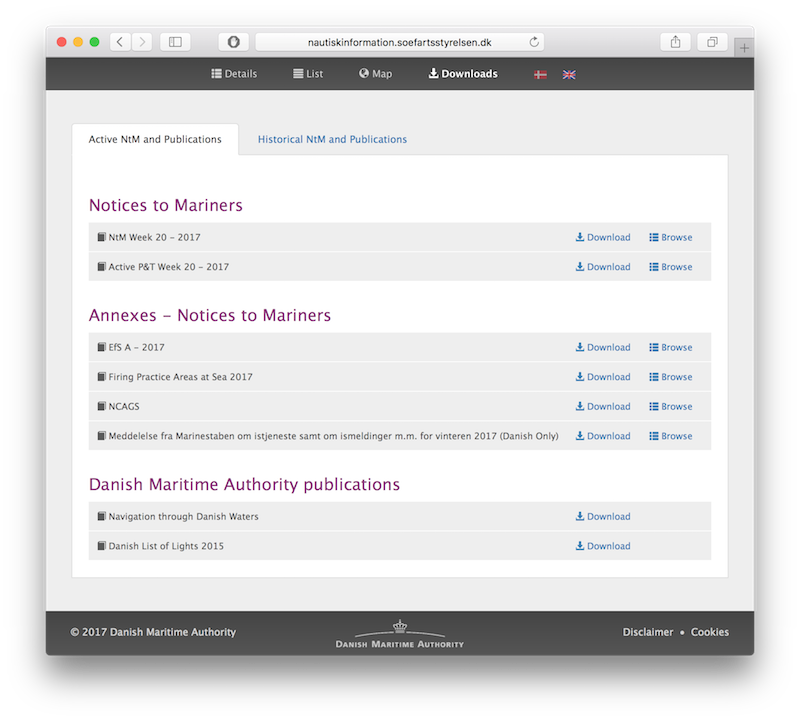
In the example above, the three publication categories flagged as published, is reflected in the end-user facing Niord-Proxy website, https://nautiskinformation.soefartsstyrelsen.dk, displaying publications grouped accordingly:
6.1.1. Adding or Editing Publication Categories
The user may add a new publication category by clicking the "New Publication Category" button above the categories list, or edit an existing publication category by clicking the pencil icon next to it.
This will open the Publication Category Editor Panel:

The editable attributes of a publication category are listed below:
| Category Attribute | Description |
|---|---|
ID |
All publication categories must be assigned a unique ID. |
Name |
The name of the publication category in all supported model languages. |
Description |
Optionally, a more detailed description of the publication category in all supported model languages. |
Publish |
If checked, all publications of the publication category will be published via a public REST API available to external clients, such as an end-user facing Niord-Proxy website. |
Priority |
The priority of the publication category. May be e.g. used by end-user facing websites displaying Niord publications. |
6.1.2. Importing and Exporting Publication Categories
The administrator can export and import publication categories from the action menu above the categories list.
The export/import file format is based on a JSON representation of the PublicationCategoryVo class.
Example:
[
  {
    "categoryId": "dk-dma-weekly-nm-publications",
    "priority": 10,
    "publish": true,
    "descs": [
      {
        "name": "Efterretninger for Søfarende",
        "lang": "da"
      },
      {
        "name": "Notices to Mariners",
        "lang": "en"
      }
    ]
  },
  ...
]
Importing a publication categories JSON file will trigger the publication-category-import batch job. Batch jobs can be monitored and managed by system administrators.
As an alternative to manually uploading a publication categories JSON file on the Publication Categories tab, the file can be copied to the $NIORD_HOME/batch-jobs/publication-category-import/in folder.
6.2. Publication Templates Tab
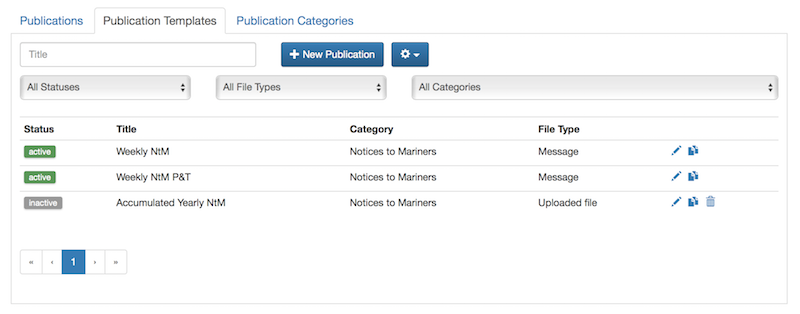
Publication Templates are essentially identical to Publications, give or take a few attributes. Configuration of a publication can be quite extensive, in particular for tasks such as producing a weekly Notices to Mariners digest. However, when basing a publication on a publication template, only a few fields, such as publication dates need to be filled out.
The list of publication templates can be filtered using a "Title" text input field, or by filtering on the status, file type and publication category of the publication templates.
6.2.1. Adding or Editing Publication Templates
The user may add a new publication template by clicking the "New Publication" button above the template list, or copy or edit an existing publication template by clicking the copy or pencil icon next to it.
This will open the Publication Template Editor Panel:
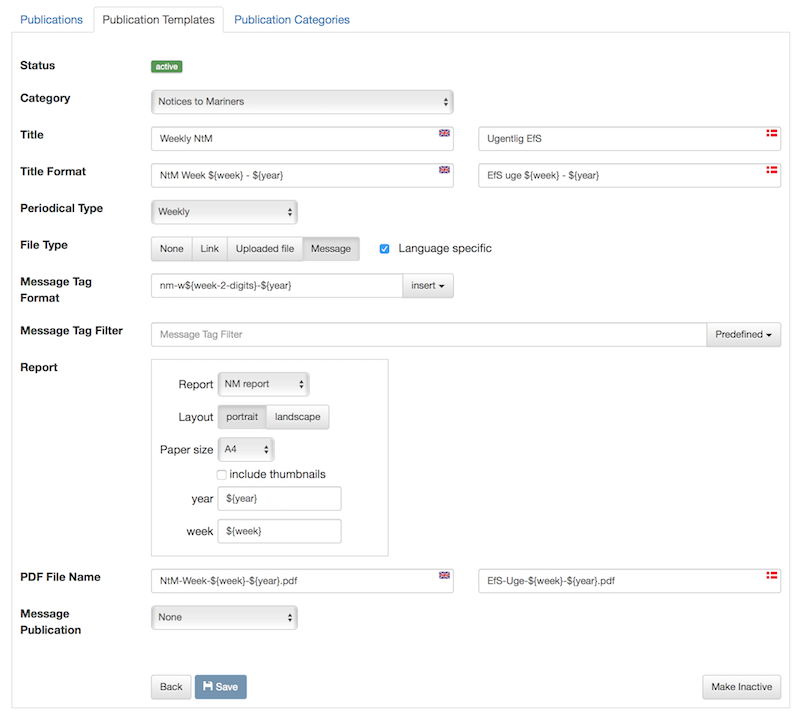
Publication templates can make use of replacement tokens in the textual fields. This is typically used to inject the year or calendar week into the titles of publications that are based on the template. Available replacement tokens:
-
"${year}" : The full year, e.g. "2017".
-
"${year-2-digits}" : The last two digits of the year, e.g. "17".
-
"${week}" : The calendar week, e.g. "8".
-
"${week-2-digits}" : A two-digit version of the calendar week, e.g. "08".
The date used for expanding the replacement tokens is the publish start date of the publication that is based on the publication template.
The common editable attributes of a publication template are listed below:
| Template Attribute | Description |
|---|---|
Status |
A publication template can be in a Draft, Active or Inactive status. Only Active templates can be used for new publications. Allowed status transitions are from Draft to Active and from Active to Inactive. |
Category |
All publication templates must be assigned a publication category. |
Title |
The title of the publication template in all supported model languages. |
Title Format |
The format used for generating the titles of the publications based on this publication template in all supported model languages. This typically involves replacement tokens, such as in "NtM Week ${week} - ${year}" |
Periodical Type |
Some publications are periodicals. This make it even easier to create a new publication, say, the next weekly NtM, by copying an old version and adding one week to the publish date interval. Available values are Daily, Weekly, Monthly and Yearly. |
File Type |
The file type attribute of publication defines the actual type of the publication. This is treated in more detail in the next sub-sections. |
Language Specific |
If the Language Specific option is checked, it will signal that the actual publication file is language specific, and a separate link or file (depending on the File Type) is defined for each model language. If the Language Specific option is not checked, only a single link or file is defined. |
Message Publication |
The Message Publication option is used to define if the publication is selectable in the Publications editor field of the message editor, and whether the publication is selectable for internal or external message publications. This is treated in more detail below. |
"None" File Type
When the "None" file type is selected for a publication template, no actual link of file will be associated with the publications based on the template.
"Link" File Type

When the "Link" file type is selected for a publication template, a URL link, possible to an external publication, need be specified for publications based on the template. Depending on the Language Specific setting, there will be a single link or a link per model language.
"Uploaded File" File Type

When the "Uploaded File" file type is selected for a publication template, an actual publication file (e.g. a PDF) must be uploaded for publications based on the template. Depending on the Language Specific setting, only a single file should be uploaded, or a file per model language.
"Message" File Type
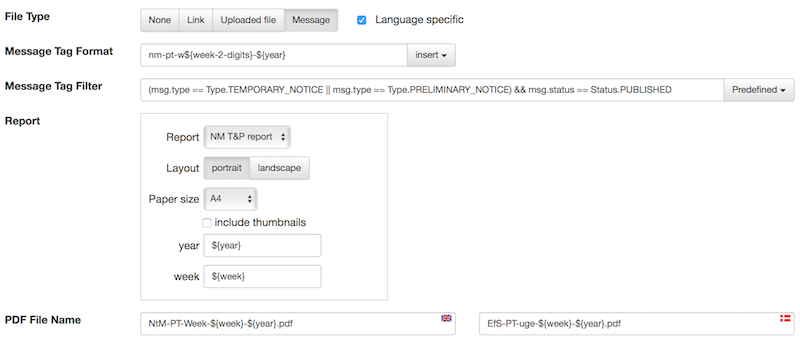
By far, the most complex and powerful publication file type option is "Message". The overarching idea is to associate publications of this file type with a message tag - please refer to the Message Tags topic.
Additionally, a message report, such as the "NM T&P report" above, must be specified along with the file name of the generated report files. Depending on the Language Specific setting, a single PDF file will be generated, or one per model language.
Messages can be associated with the message tag in two ways. Either the user can manually assign the messages to the message tag, or the publication can be in a "Recording" status, where messages matching the Message Tag Filter will automatically be added to the message tag. Conversely, if a message does not match the filter, it will be removed from the message tag.
At first, when the user starts recording, all currently published messages of the domain for which the publication is defined, will be subjected to the Message Tag Filter. The messages that matches the filter will automatically be added to the message tag. Subsequently, for as long as the publication is in the recording status, all messages of the publication domain that change status will be subjected to the Message Tag Filter, and added or removed from the message tag accordingly.
Example 1: The following filter will assign all T&P messages to the message tag that are already published when the user starts recording og gets published whilst recording. If a message is cancelled or expires whilst recording, it is removed from the message tag. This is very useful for e.g. a weekly NM T&P in-force publication.
(msg.type == Type.TEMPORARY_NOTICE || msg.type == Type.PRELIMINARY_NOTICE) && msg.status == Status.PUBLISHED
Example 2: The following filter is the default message tag filter, i.e. the filter used if none is specified. It ignores all published messages when the user starts recording. Subsequently, when a message changes status to published, it is added to the message tag. However, it is not removed again if it was already in the message tag. This is very useful for e.g. a weekly NM publication, where you wish to include all NMs produced throughout the week, even if they have already been cancelled.
data.phase == 'msg-status-change' && (msg.status == Status.PUBLISHED || data.isIncluded)
6.2.2. Message Publication

As previously mentioned, the Message Publication option is used to define if the publication is selectable in the Publications editor field of the message editor, and whether the publication is selectable for internal or external message publications.
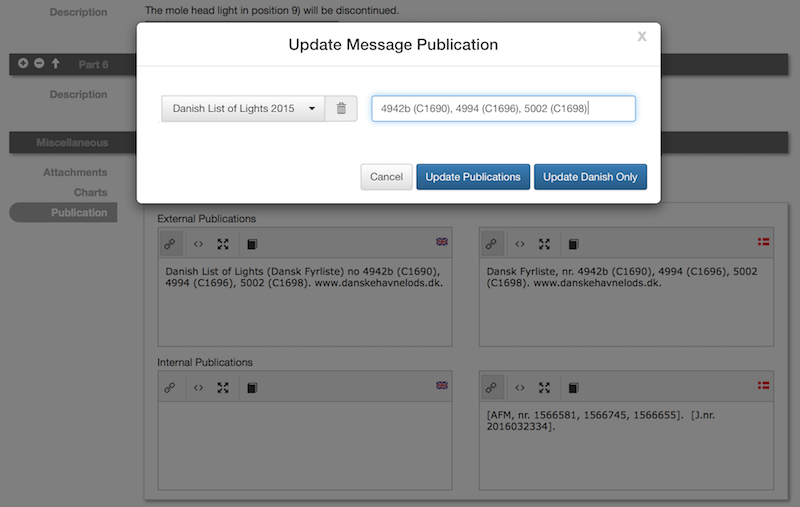
Only the external publications of a message will be displayed to end-users, whereas internal publications will be viewable to registered users of Niord as well.
When the "Internal" or "External" Message Publication option is selected, text fields allows the user to define the actual text inserted into the localized message publication fields in the message editor. In the example above, "Danish List of Lights (Dansk Fyrliste) no ${parameters}" is used for the English-language message publication format. The "${parameters}" replacement token allows the user to input parametrized values, such as light numbers, into the Publications field of the message editor, as exemplified below:
6.3. Publications Tab
Publication are essentially identical to Publications Templates, give or take a few attributes. Configuration of a publication can be quite extensive, in particular for tasks such as producing a weekly Notices to Mariners digest. However, when basing a publication on a publication template, only a few fields, such as publication dates need to be filled out.
When reading this section, it is assumed that you have already read the Publication Templates Tab section, and overlapping documentation is left out.
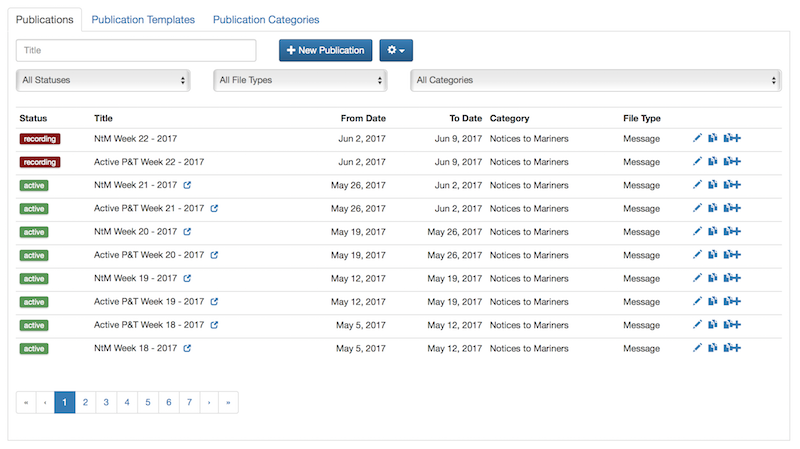
The list of publication can be filtered using a "Title" text input field, or by filtering on the status, file type and publication category of the publication templates. Since there may be lots of publications in the system, the resulting publication list is paged and can be navigated using the pagination control below the list.
6.3.1. Adding or Editing Publication
The user may add a new publication template by clicking the "New Publication" button above the publication list, or copy or edit an existing publication by clicking the copy or pencil icon next to it.
This will open the Publication Editor Panel:
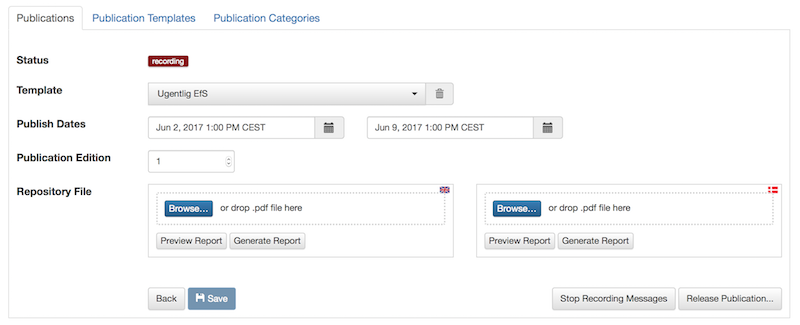
This publication is based on the "Weekly NtM" publication template, and thus, only a few fields are left to fill out.
| Publication Attribute | Description |
|---|---|
Status |
A publication can be in a Draft, Recording, Active or Inactive status. Only Active publications withing the specified Publish Date interval will be selectable in the message editor or published to external clients via the public REST API. Allowed status transitions are from Draft to Recording or Active. From Recording back to Draft, and from Active to Inactive. |
Publish Date |
The date interval where an Active publication is selectable in the message editor or published to external clients via the public REST API. |
Publication Edition |
A publication can be released in multiple editions. For instance, a yearly "Firing Practice Areas" publication may have to be updated if the firing areas are changed mid-year. In that case, copy the old publication, adjust the end publish date of the old publication, and the start publish date of the new publication to be the cut-over date. Also, increase the edition of the new publication, and re-generate or upload updated repository files as appropriate. |
Repository File |
These fields are present when the template has file type "Message" (see previous section). Here, you can preview and generate the actual repository files associated with the publication. |
6.3.2. Releasing Publications
A special "Release Publication…" option is available to message reports-based publications that are in the Recording status.
Enacting the function will perform multiple steps at once:
-
Stop recording.
-
Generated repository files for all supported languages.
-
Make the publication active.
-
Generate next issue of the publication.
-
Start recording for the next issue publication.
6.3.3. Importing and Exporting Publications
The administrator can export and import publications including publication templates from the action menu above the publication list.
The export/import file format is based on a JSON representation of the SystemPublicationVo class.
Example:
[
  {
    "category": {
      "categoryId": "dk-dma-weekly-nm-publications"
    },
    "type": "MESSAGE_REPORT",
    "publishDateFrom": 1496401200000,
    "publishDateTo": 1497006000000,
    "descs": [
      {
        "title": "EfS uge 22 - 2017",
        "fileName": "EfS-Uge-22-2017.pdf",
        "lang": "da"
      },
      {
        "title": "NtM Week 22 - 2017",
        "fileName": "NtM-Week-22-2017.pdf",
        "lang": "en"
      }
    ],
    "revision": 1,
    "mainType": "PUBLICATION",
    "status": "RECORDING",
    "template": {
      "publicationId": "a8e661ee-49b8-45ea-a176-952e99253fec"
    },
    "domain": {
      "domainId": "niord-nm"
    },
    "periodicalType": "WEEKLY",
    "edition": 1,
    "messageTagFormat": "nm-w22-2017",
    "messageTag": {
      "tagId": "73a50a0a-0d65-4a6f-8a17-1af9b3e8fbf9"
    },
    "messagePublication": "NONE",
    "languageSpecific": true,
    "printSettings": {
      "report": "nm-report",
      "pageSize": "A4",
      "pageOrientation": "portrait",
      "mapThumbnails": false
    },
    "reportParams": {
      "year": "2017",
      "week": "22"
    },
    "publicationId": "0128ff8f-910f-4204-a1ce-13c48d3d5ffb",
    "created": 1483269014000,
    "updated": 1495792436000
  },
  ...
]
Importing a publications JSON file will trigger the publication-import batch job. Batch jobs can be monitored and managed by system administrators.
As an alternative to manually uploading a publications JSON file on the Publications tab, the file can be copied to the $NIORD_HOME/batch-jobs/publication-import/in folder.
7. Sources
The Sources page allows an administrator to manage a list of sources, so that they can be assigned to messages in the message editor in a consistent and localized manner, using the proper abbreviations.
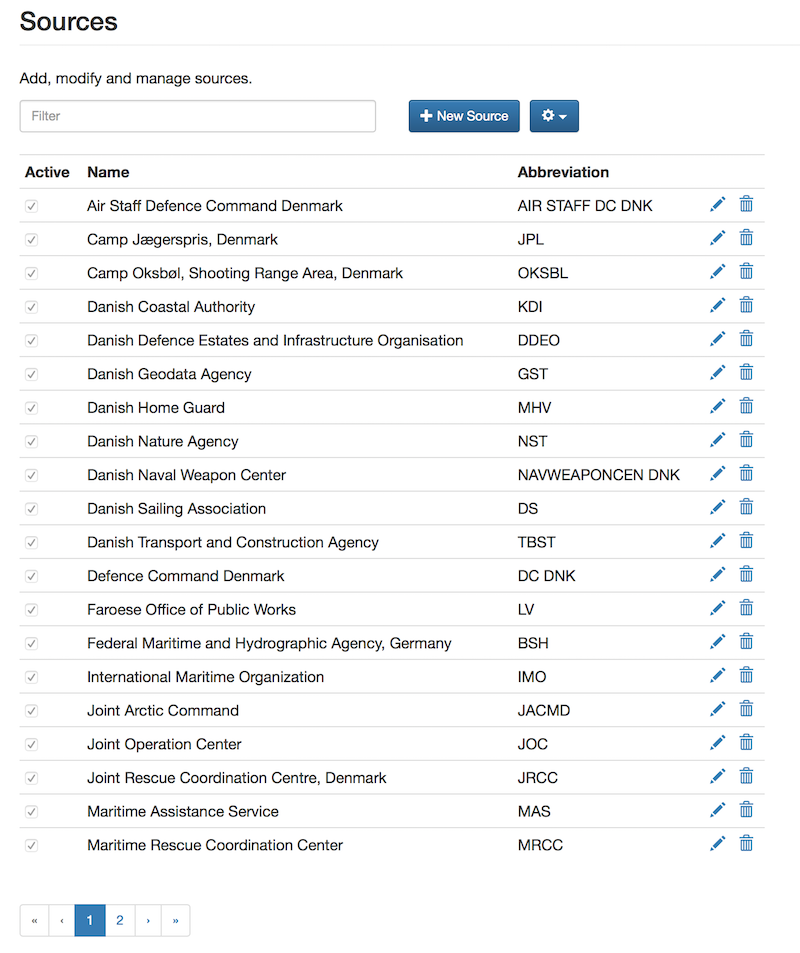
The list of sources is divided into pages of 20 sources, and may be navigated using the pagination control below the source list. Alternatively, the user may filter the list of sources by typing a term into the Filter input field above the list. The term is matched against the name and abbreviation of the source.
7.1. Adding or Editing Sources
The user may add a new source by clicking the "New Source" button above the sources list, or edit an existing source by clicking the pencil icon next to it.
This will open the Source Editor Page:
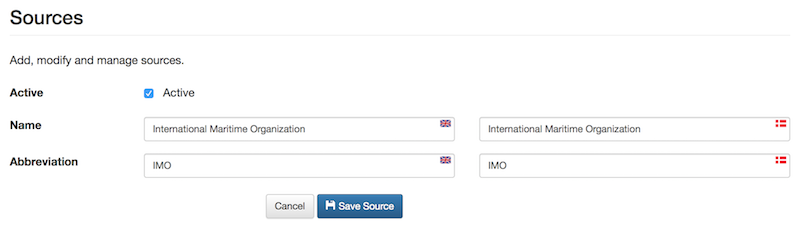
The editable attributes of a source are listed below:
| Source Attribute | Description |
|---|---|
Active |
Only active source may be assigned to a message in the message editor. |
Name |
The name of the source in all supported model languages. |
Abbreviation |
The official abbreviation of the source in all supported model languages. |
7.2. Deleting a Source
A source can be deleted by clicking the trash icon next to it.
7.3. Message Editor Source Field
In the message editor, source abbreviations can be added to a message in the Sources editor field by clicking the "Add sources" button.
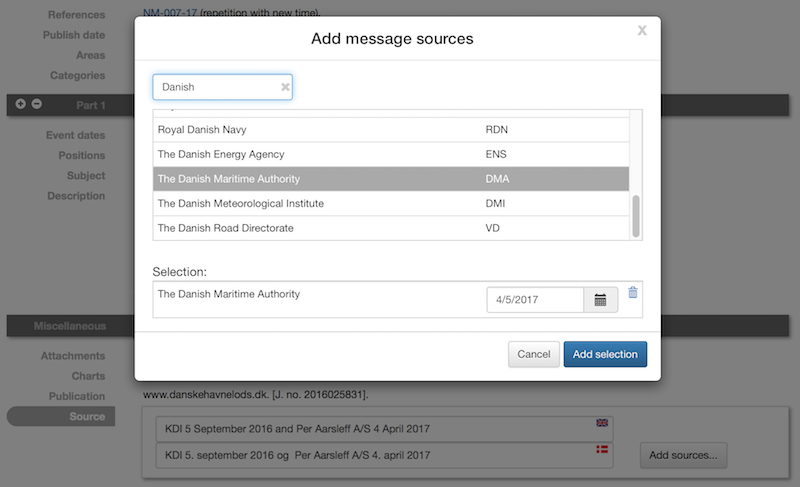
This will open a dialog and allow the user to search and select the sources to add along with the date of the source interaction.
7.4. Importing and Exporting Sources
The administrator can export and import sources from the action menu above the sources list.
The export/import file format is based on a JSON representation of the SourceVo class.
Example:
[
  {
    "active": true,
    "descs": [
      {
        "lang": "da",
        "name": "Arktisk Kommando",
        "abbreviation": "AKO"
      },
      {
        "lang": "en",
        "name": "Joint Arctic Command",
        "abbreviation": "JACMD "
      }
    ]
  },
  ...
]
Importing a source JSON file will trigger the source-import batch job. Batch jobs can be monitored and managed by system administrators.
As an alternative to manually uploading a source JSON file on the Sources page, the file can be copied to the $NIORD_HOME/batch-jobs/sources-import/in folder.
8. Users & Contacts
The Users & Contacts page allows administrators to manage users and contacts in the Niord system.

The main difference between users and contacts is that users can actually log in and work in Niord, whereas contacts are solely maintained in Niord as recipients of mailing lists.
8.1. Users Tab
The Users tab can be used to add and manage users, and, in particular, assign users to the proper user groups to grant them various levels of access in the different domains of Niord.
The list of users can be filtered by typing a term in the Filter input field above the user list, which will be matched against the users' name and e-mail address.
8.1.1. Adding or Editing a User
Depending on how Niord has been configured, some types of users should not be added manually in Niord, but are created automatically via integration with other identity registries.
For instance, in the set-up used by the Danish Maritime Authority (DMA), Niord is integrated with the DMA Active Directory Federation Service, and hence, the first time a DMA employee clicks the "DMA" link on the log-in page and logs in using her usual work credentials, she will automatically be created as a user in Niord.
However, the new user still needs to be assigned proper user roles by a Niord administrator, and the administrator must also create users that are not employees as described next.
An administrator can add a new user by clicking the "Add" button, or edit an existing user by clicking the pencil symbol next to the user.
This will open the User Details Panel:
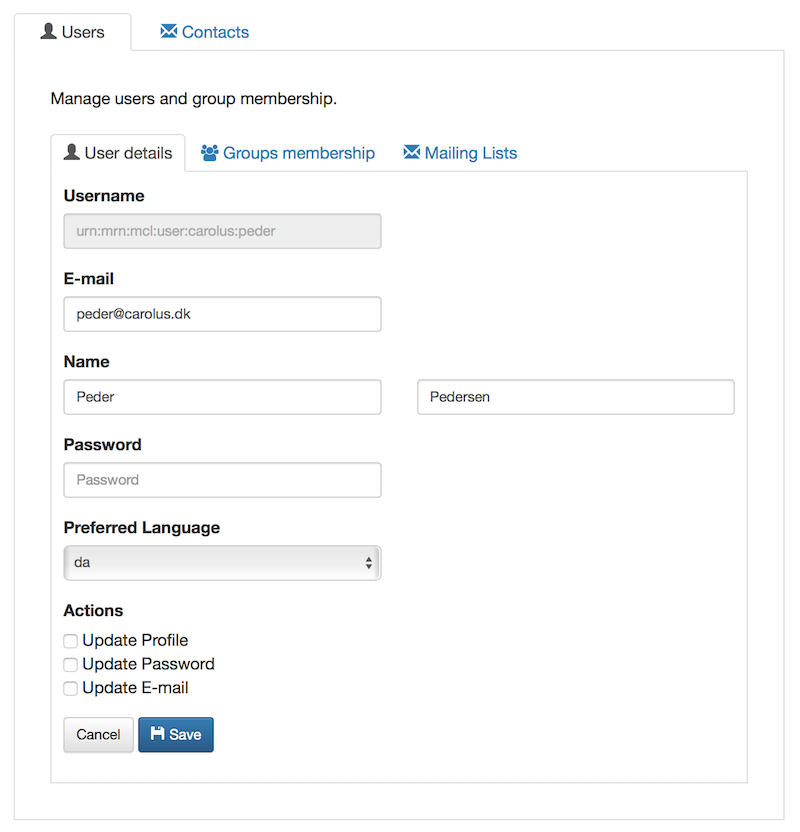
The user attributes that can be edited are as follows:
| User Attribute | Description |
|---|---|
Username |
A user must have a unique user name, that they can use when logging in. |
A user must have a unique e-mail address. |
|
Name |
The name of the user. |
Password |
The user password. |
Preferred Language |
The preferred language is used in the mails sent out via mailing lists. |
Update Profile |
If the Update Profile flag is checked, the user will be asked to revise and update their user profile upon next log-in. |
Update Password |
If the Update Password flag is checked, the user will be asked to update their password upon next log-in. |
Update E-mail |
If the Update E-mail flag is checked, the user will be asked to update their e-mail address upon next log-in. |
8.1.2. Managing User Group Membership
As described in the Administrators Manual chapter, all users have different roles in different domains. The available roles are User, Editor, Admin and Sysadmin; and with a good handful of domains in Niord, this leaves a lot of user-role relationships to maintain.
To simplify user management, Niord instead let administrators assign users to user groups, where each user group in turn defines a set of roles for all domains.
The configuration of user groups is handled by system administrators, and will seldom change. At the Danish Maritime Authority, the following user groups are defined, at the time of writing:
-
Sysadmin: Members of the "Sysadmin" user group will have the Sysadmin role in all domains.
-
Admins: Members of the "Admins" user group will have the Admin role in all domains.
-
Editors: Members of the "Editor" user group will have the Editor role in the "NW", "NM", "Firing Areas", "NM Almanac", "NM Annex" and "NW Greenland" domains.
-
Case Officers: Members of the "Case Officers" user group will have the User role the "NW", "NM", "Firing Areas", "NM Almanac", "NM Annex" and "NW Greenland" domains.
-
FE Editors: Members of the "FE Editors" user group will have the Editor role in the "Firing Areas" domain.
The place to manage group membership for a user is the Group Membership tab of the User Details Panel.
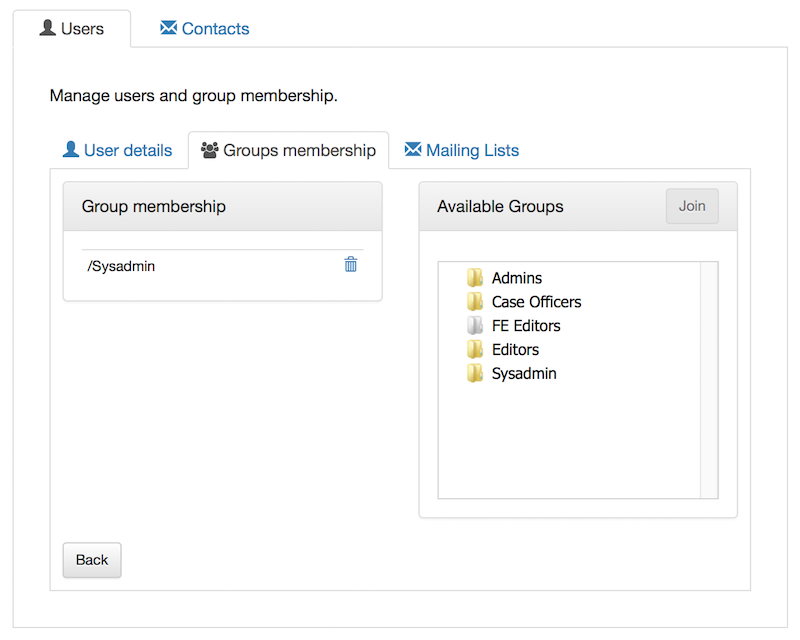
The "Group Membership" panel at the left side will list all user groups that the user is currently member of. The administrator can click the trash icon to remove the user from a group.
The available user groups are in the "Available Groups" panel at the right side. The administrator can select a group and click the "Join" button to make the user member of the selected group.
Note however, that some of the available groups may be disabled (gray), and thus, cannot be selected. This is because the administrator may not have access-rights to assign members to those groups. For instance, an administrator that is herself member of the "Admins" group, should never be allowed to assign anybody (including herself) to the "Sysadmin" group. Similarly, the selectable user groups may depend on the currently selected domain, since the administrator may be the administrator in the current domain, but not in the domain that a user groups would give access rights to.
8.1.3. Managing User Mailing Lists
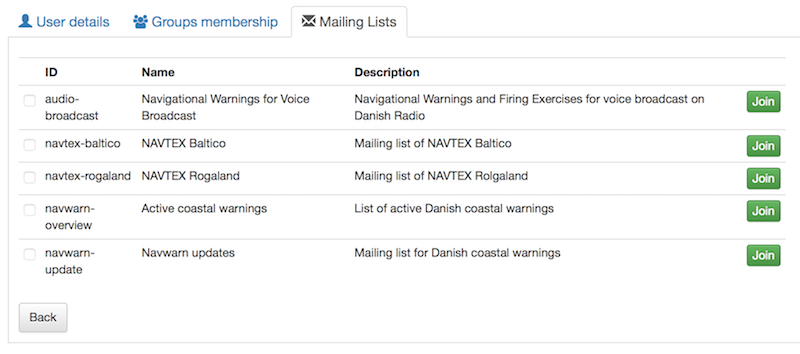
An administrator can also manage the mailing lists for a user via the Mailing Lists tab of the User Details Panel.
For each available mailing list, the administrator can either click the "Join" button to add the user as a recipient, or click the "Leave" button to remove the user as a recipient.
8.1.4. Deleting a User
A user can be deleted by clicking the trash icon next to the user in the user list. However, this will only work if the user has no revision history, that is, has never created or edited messages or comments.
If the user does have a revision history, the administrator can instead reset the users password and remove the user from all user groups.
8.2. Contacts Tab
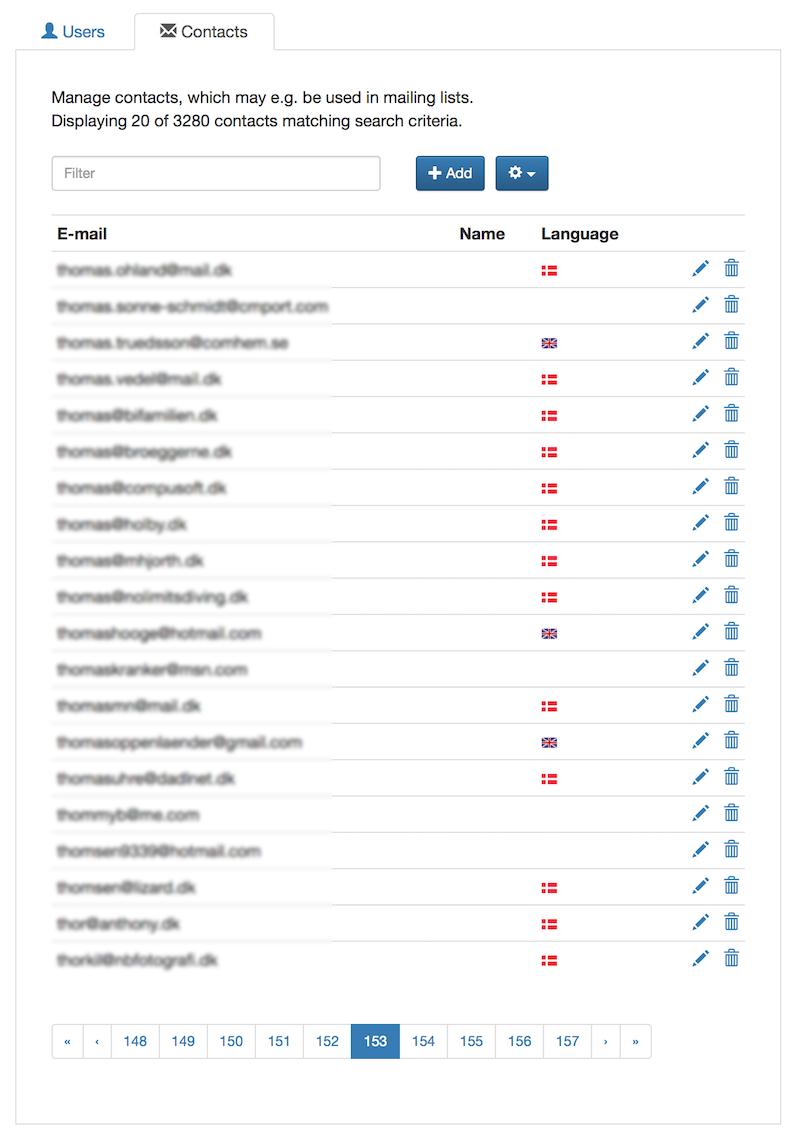
The Contacts tab can be used to add and manage contacts.
The list of contacts may be long and is thus divided into pages of 20 contacts. The pages can be navigated using the pagination controls below the contact list.
Furthermore, the contacts can be filtered by typing a term in the Filter input field above the contact list, which will be matched against the contacts' name and e-mail address.
8.2.1. Adding or Editing a Contact
An administrator can add a new contact by clicking the "Add" button, or edit an existing contact by clicking the pencil symbol next to the contact.
This will open the Contact Details Panel:
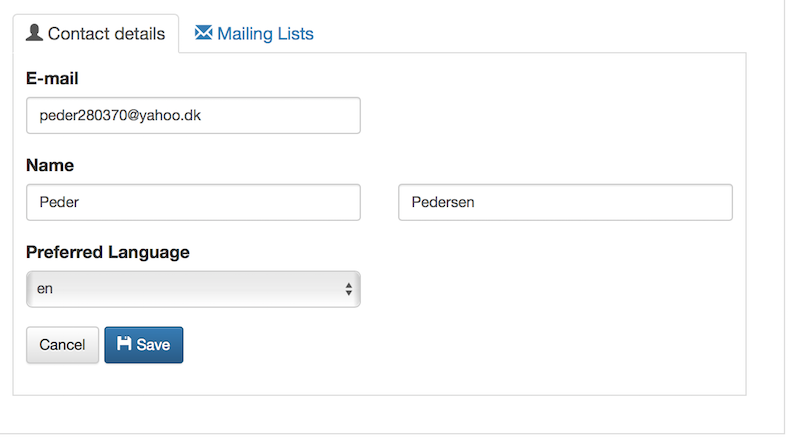
The contact attributes that can be edited are as follows:
| Contact Attribute | Description |
|---|---|
A contact must have a unique e-mail address. |
|
Name |
The name of the contact. |
Preferred Language |
The preferred language is used in the mails sent out via mailing lists. |
8.2.2. Managing Contact Mailing Lists
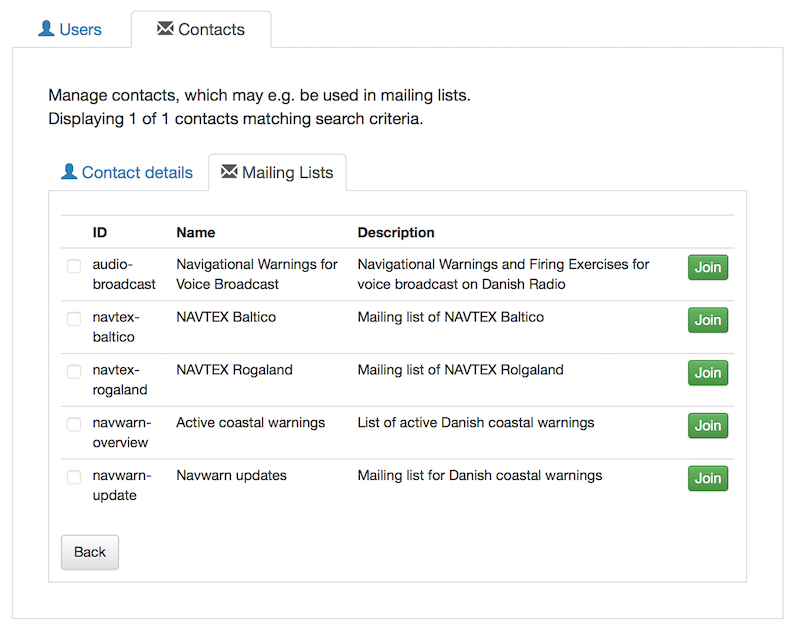
An administrator can also manage the mailing lists for a contact via the Mailing Lists tab of the Contact Details Panel.
For each available mailing list, the administrator can either click the "Join" button to add the contact as a recipient, or click the "Leave" button to remove the contact as a recipient.
8.2.3. Deleting a Contact
A contact can be deleted by clicking the trash icon next to the contact in the contact list.
8.3. Importing and Exporting Contacts
The administrator can export and import contacts from the action menu above the contact list.
Enacting the Export function will generate a text file in a comma-separated format with fields for e-mail, first name, last name and preferred language.
Enacting the Import function, will prompt the administrator to type a comma-, semicolon- or newline-separated list of e-mail addresses into a text-field, and import these contacts. Existing e-mail addresses will be ignored. The newly imported contacts should - in time - be updated with proper names and preferred language selection.
9. Mailing Lists
The Mailing Lists page allows an administrator to manage the recipients of the mailing lists.
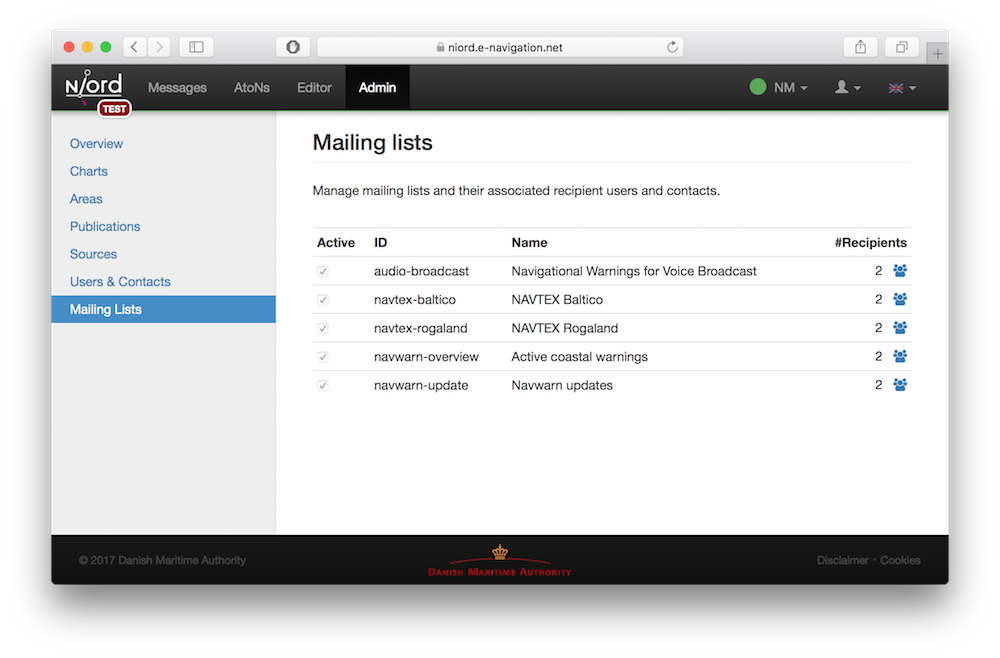
| The Mailing Lists page has a lot more functionality for system administrators, who can create and manage the mailing lists, define the triggers that cause mailing lists to execute, and create the reports that generate the actual mail contents. This is detailed in the Mailing Lists chapter of the system administration manual, whereas this chapter only details the functionality for normal administrators. |
9.1. Manage Mailing List Recipients
The administrator manages the recipients of a mailing list by clicking the recipient icon next to the mailing list.
The will open the mailing list Recipients Panel:
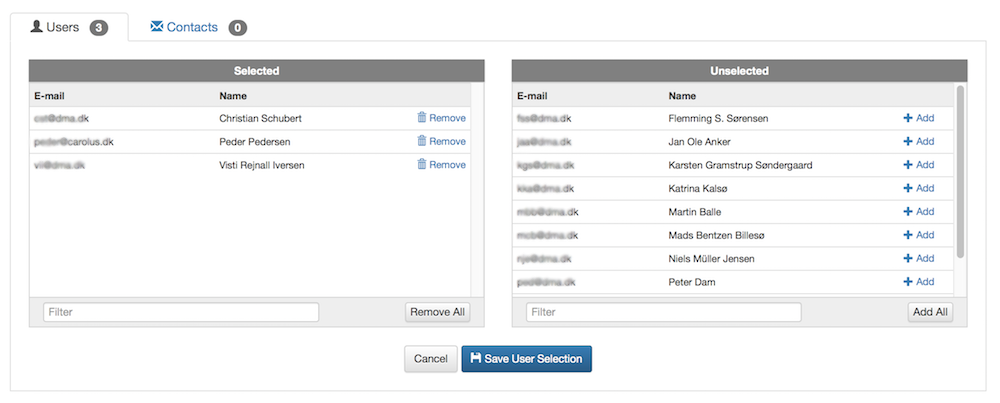
There are two main types of recipients; users and contacts. The two tabs look identical, except that the former is for managing the users that should be mailing list recipients, and the latter is for managing the contacts that should be mailing list recipients. Hence, only the Users tab is detailed in this section.
The "Selected" panel in the left side displays the list of users currently assigned to the mailing list. The "Unselected" panel in the right side displays all remaining users.
Users can be removed from the selection by clicking the "Remove" link next to them. Similarly, they can be added to the selection by clicking "Add". Clicking "Remove All" will clear the selection, whereas clicking "Add All" will select all users.
The lists of users in both panels can be filtered by typing a term into the "Filter" input field, which will be matched against a users' name and e-mails address.
No changes the list of recipient users is persisted until the "Save User Selection" button is clicked. Clicking "Cancel" will discard all changes and return to the main mailing list page.