1. Introduction
Niord (Nautical Information Directory) is a system for producing and publishing Navigational Warnings (NW) and Notices to Mariners T&P (NM).
It was originally developed as part of the EfficienSea2 EU project and subsequently implemented as a production system for the Danish Maritime Authority.

Some of the main features of Niord area:
-
Niord provides an advanced and highly customizable production system for NW and NM T&P.
-
It includes a plug-in architecture for NW and NM message promulgation via e.g. mailing lists and Twitter.
-
Niord also integrates with the Maritime Cloud by defining a Maritime Cloud Service Specification and making NW & NM messages accessible via a Public REST API
-
The combined NW & NM message model adopted by Niord has been devised to make data future-compatible with the upcoming IHO S-124 specification.
2. System Administrators Manual
A user in Niord always works in the context of a current domain. Domains are used to separate NW & NM messages into more manageable lists - you could e.g. have a domain for NW messages, a domain for NM messages, a domain for firing exercises (also NWs), or indeed domains for separate regions with separate time-zones, etc.
A user has separate roles in each domain. The available roles are:
-
User: The user role can be assigned to e.g. case officers that should have access to see, proof-read and comment on un-published NW and NM messages.
-
Editor: Editors compose and manage the life cycle of an NW or NM message.
-
Admin: An administrator of a domain will have additional access to e.g. manage the base data (sea charts, publications, etc.) of the Niord system.
-
Sysadmin: A very special role that should be held only by the person(s) actually setting up and managing the Niord system.
The roles listed above are hierarchical in the sense that a sysadmin can do anything an admin can do, who in turn can do anything an editor can do, and so forth.
This document serves as a user manual for system administrators of a domain.
| Please use a newish Chrome, Safari or Firefox browser when using Niord. |
3. Sysadmin Page
The Sysadmin page of Niord only become available if you log in as a system administrator.
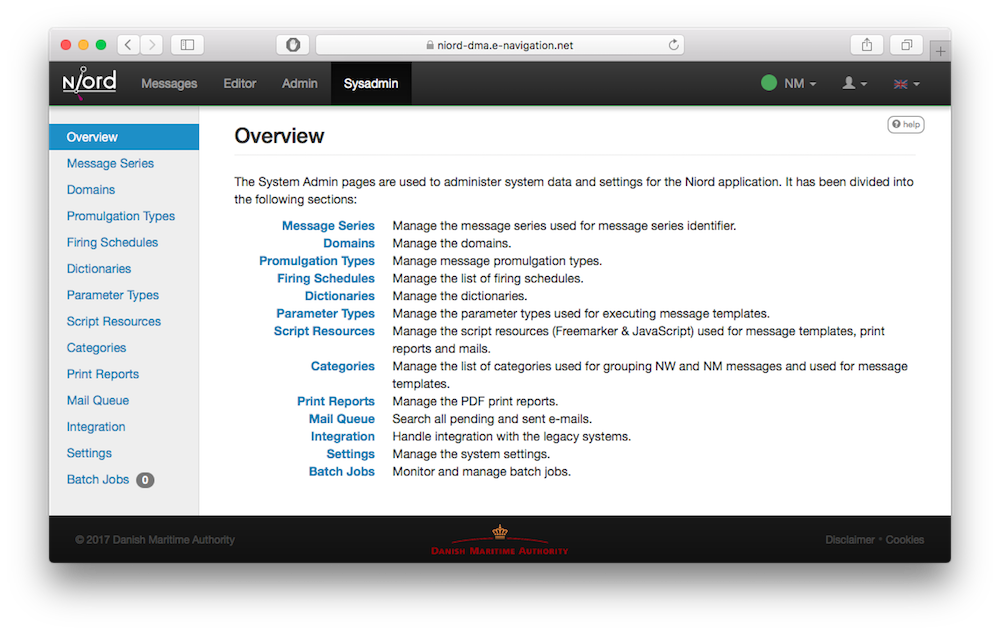
The Sysadmin page allows system administrators to manage and configure the Niord system.
In general a user that is system administrator in one domain should be system administrator in all domains, since all the setup and configuration they can manage on the Sysadmin pages applies to all domains.
4. Message Series
The Message Series page allows a system administrator to manage the list of message series used throughout Niord. A message series define the types of messages that can be assigned to the message. It also defines how messages are numbered and the format of their IDs.
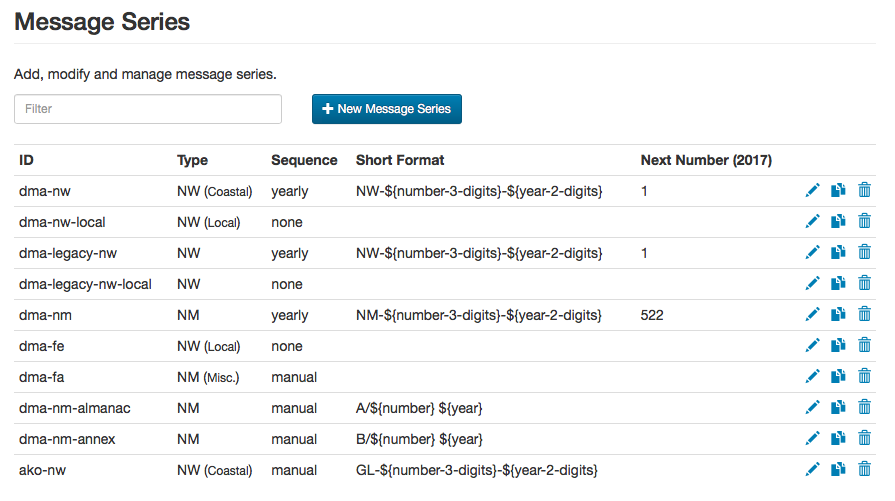
The sysadmin may filter the list of message series by typing a term into the Filter input field above the message series list. The term is matched against the ID of the message series.
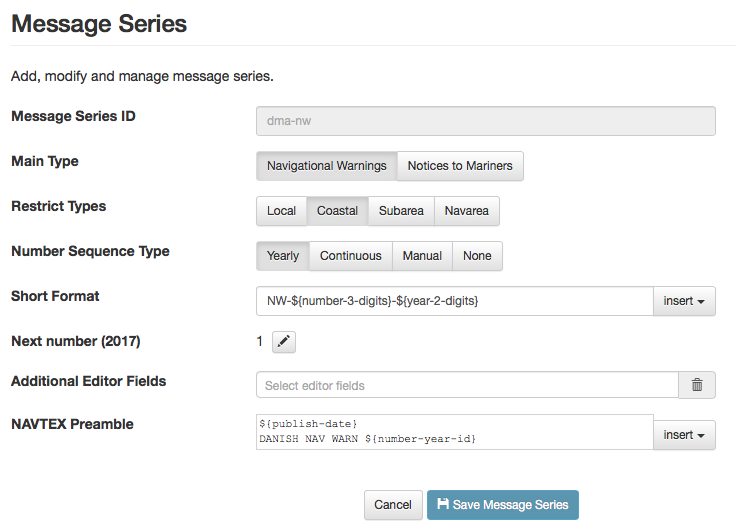
4.1. Adding or Editing a Message Series
The sysadmin can add a new message series by clicking the "New Message Series" button, or edit an existing message series by clicking the pencil symbol next to the series.
This will open the Message Series Edit Page:
The message series attributes:
[ cols="30,70", options="header" ]
Series Attribute |
Description |
Message Series ID |
A unique ID for the message series. Should be globally unique. |
Main Type |
The main type, i.e. Navigational Warnings or Notices to Mariners, of the messages assigned to the message series. |
Type |
Optionally, the sysadmin may specify the specific types (sub-types of the main type) of the messages assigned to the message series. If the current main type is Navigational Warnings, the possible types include Local, Coastal, Subarea and Navarea. If the main type is Notices to Mariners, the possible types include Preliminary, Temporary, Permanent and Miscellaneous. If none of the types have been selected, all types are valid for the given messages series. |
Number Sequence Type |
The Number Sequence Type defines how numbers get assigned (or not) to a message when the message is published. If the type is Yearly, the first message published every year will be assigned the number "1", and subsequent message will be numbered consecutively from that. If the type is Continuous, the first message published will be assigned the number "1", and subsequent message will be numbered consecutively from that. If the type is Manual, the editor will get to assign a number manually to a message in the message editor. Please refer to the Editor Guide. If the type is None, no number will be assigned to the messages belonging to this message series. |
Short Format |
The Short Format attribute defines the format of the short ID that gets assigned to a message upon publication (except if the Number Sequence Type is None). The format will typically contain replacement tokens that gets substituted with real values. Valid replacement tokens can be inserted into the field via the insert menu, and include tokens such as "${number}", "${number-3-digits}", "${year}", "${year-2-digits}", etc. |
Next Number |
The Next number field allows the sysadmin to manually specify the next number to assign to a message upon publication. This can be used for all message series with a Number Sequence Type of Yearly or Continuous. |
Additional Editor Fields |
As described in the Editors Manual, the set of editor fields used by default when editing a message depends on e.g. the main type of the message, the category, etc. It is also possible to enable non-standard editor fields per message series using the Additional Editor Field. As an example, if a message series is used exclusively for firing exercise navigational warnings, the sysadmin could enable the "Signals" editor field for that message series. |
NAVTEX Preamble |
The NAVTEX Preamble field is only enabled for Navigational Warnings-related message series. It allows for the specification of a standardized NAVTEX preamble to be used for NAVTEX promulgations associated with the message. Please refer to the Editors Guide about promulgations. |
4.2. Deleting a Message Series
A message series can be deleted by clicking the trash icon next to them. However, this only works if the message series being deleted has never been assigned to a message.
If a message series has indeed been assigned to a message, the sysadmin should instead remove the message series from the relevant domain.
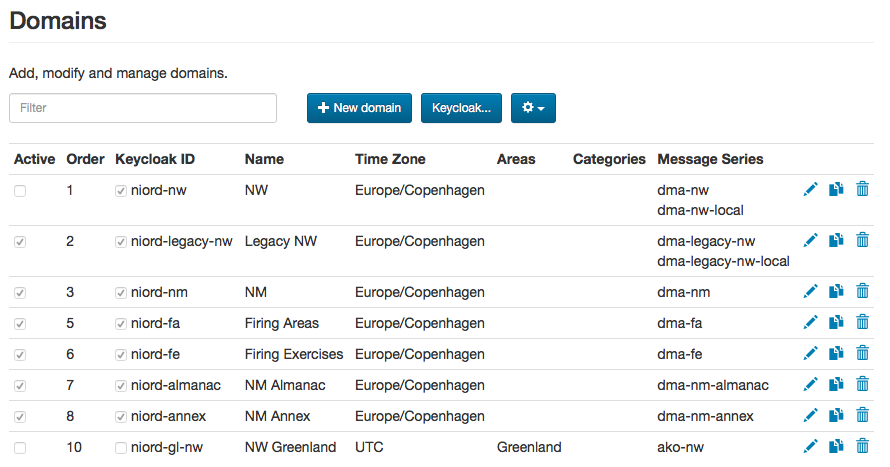
5. Domains
The Domains page allows a system administrator to manage the list of domains in Niord.
As described in the [System Administrators Manual] section, a Niord user always works in the context of a current domain. Domains are used to separate NW & NM messages into more manageable lists - such as a specific domain for NW messages, a domain for NM messages, a domain for firing exercises (also NWs), or indeed domains for separate regions with separate time-zones, etc.
Domains also plays a central role in [Keycloak Integration]. Each domain is created as an application client in Keycloak.
The sysadmin may filter the list of domains by typing a term into the Filter input field above the domain list. The term is matched against the ID and name of the domains.
5.1. Adding or Editing a Domain
The sysadmin can add a new domain by clicking the "New domain" button, or edit an existing domain by clicking the pencil symbol next to the domain.
This will open the Domain Edit Page:
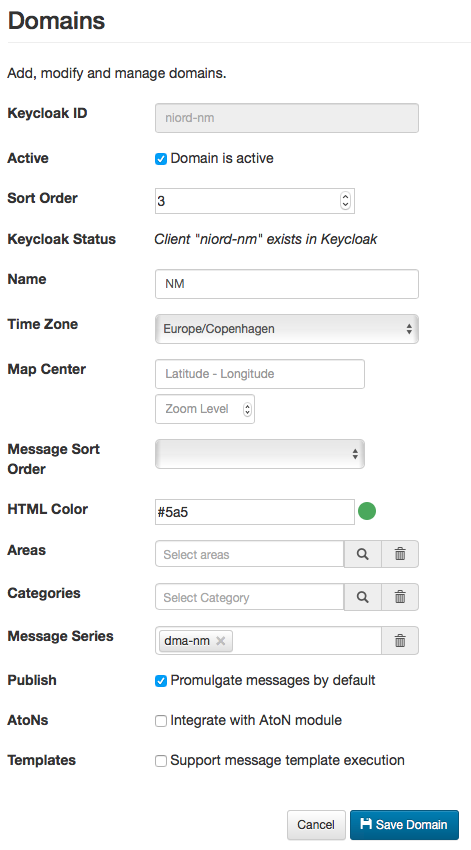
The domains attributes:
[ cols="30,70", options="header" ]
Domain Attribute |
Description |
Keycloak ID |
A unique ID for the domain. The ID is also used as an application client in Keycloak. |
Active |
Only active domains is available in the domain selector in the main menu of Niord. |
Sort Order |
The domain sort order. Controls the order of the domains in the domain menu. |
Keycloak Status |
If the corresponding Keycloak client does not exist in Keycloak, there will be a button to create it. |
Name |
The human readable name of the domain. |
Time Zone |
The time-zone of the domain. The domain time zone will be used at various placed where the editor specifies dates, such as the publication dates of a message. |
Map Center |
Optionally, a map center and zoom level can be specified. This will be used whenever a map is opened with empty contents, such as when opening the Position Editor. |
Message Sort Order |
The default sort order of messages in the domain. The sort order may be either by message area, ID or event dates, in ascending or descending order. |
HTML Color |
If an HTML color is defined for the message, this color will be displayed in the main menu of Niord when the domain is the currently selected domain. Any valid HTML color code can be used, such as "red", "#ff0000", etc. |
Areas |
The Areas field can be used to restrict the areas that may be assigned to messages of that domain. If e.g. "Denmark" is selected, then only "Denmark" or any of the sub-areas of "Denmark" can be assigned to a message of that domain. |
Categories |
The Categories field can be used to restrict the categories that may be assigned to messages of that domain. If e.g. "Firing Exercises" is selected, then only "Firing Exercises" or any of the sub-categories of "Firing Exercises" can be assigned to a message of that domain. |
Message Series |
The Message Series field must define the valid message series to use in the domain. |
Publish |
If the Publish flag is checked, then the messages of the domain is included by default, when using the public Niord REST API to fetch messages. In effect, this means that third party clients will receive messages of the domain by default. |
AtoNs |
If the AtoNs flag is checked, then the "AtoN" domain will be turned on when the domain is the currently selected domain. The AtoN module is a prototype module, that integrates an AtoN registry with Niord. Since it is not complete, it is not yet documented, and not turned on by default. |
Templates |
If the Templates flag is checked, then the message template mechanism described in the Message Template Execution chapter will be enabled. |
5.2. Deleting a Domain
A domain can be deleted by clicking the trash icon next to them. However, this only works if there is not related data associated with the domain.
Instead the system administrator can choose to in-activate the domain.
5.3. Importing and Exporting Domains
The system administrator can export and import domains from the action menu.
The export/import file format is based on a JSON representation of the DomainVo class.
Example:
[
  {
    "domainId": "niord-nw",
    "active": true,
    "sortOrder": 1,
    "name": "NW",
    "timeZone": "Europe/Copenhagen",
    "messageSeries": [
      {
        "seriesId": "dma-nw",
        "mainType": "NW",
        "shortFormat": "NW-${number-3-digits}-${year-2-digits}",
        "navtexFormat": "${publish-date}\nDANISH NAV WARN ${number-year-id}",
        "numberSequenceType": "YEARLY"
      },
      {
        "seriesId": "dma-nw-local",
        "mainType": "NW",
        "numberSequenceType": "NONE"
      }
    ],
    "publish": false,
    "templates":true
  },
  ...
]
Importing a domain JSON file will trigger the domain-import batch job. Batch jobs can be monitored and managed by system administrators.
As an alternative to manually uploading a domain import JSON file on the Domains sysadmin page, the file can be copied to the $NIORD_HOME/batch-jobs/domain-import/in folder.
6. Promulgation Types
The Promulgation Types page allows a system administrator to manage the list of promulgation types in Niord.
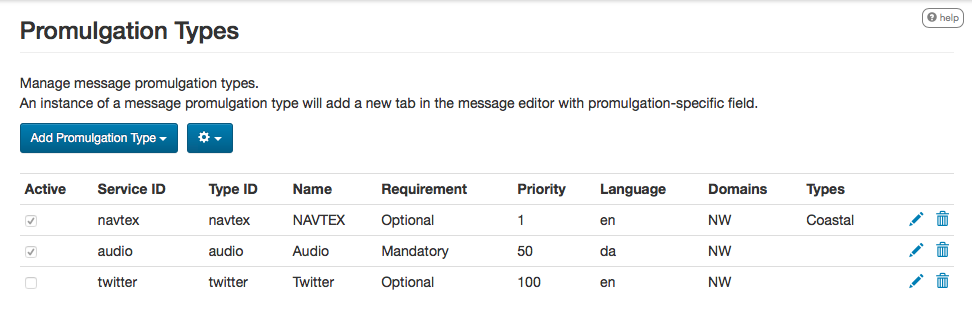
For Navigational Warnings in particular, there may be a need to promulgate specialized versions of a message to external channels. Niord has a plug-in architecture for adding new promulgation types. By default, it supports distributing NAVTEX and SafetyNET versions of navigational warnings via mailing lists, and support for posting messages at Twitter upon publication.
Furthermore, the Danish version of Niord supports generating an Audio promulgation for navigational warnings. This will promulgate a verbose textual version of the messages, suitable to be read up on radio by non-maritime personal, to a mailing list.
The integration of promulgation types in the message editor is detailed in the Promulgation Editor Field chapter of the Editors Manual.
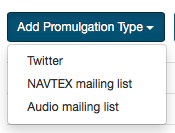
6.1. Adding or Editing a Promulgation Type
The sysadmin can add a new instance of a promulgation type by clicking the "Add Promulgation Type" button, which will allow the sysadmin to select which promulgation type to add:
Similarly, an existing promulgation type can be edited by clicking the pencil symbol next to the promulgation type.
Adding or editing a promulgation type will open the Promulgation Type Edit Page:
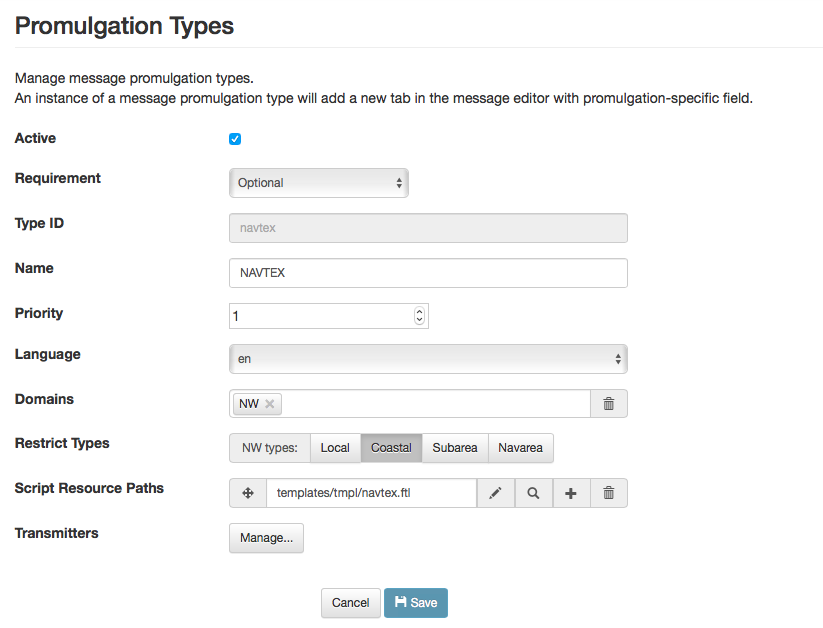
All editable attributes, except the bottom-most one, are common to all promulgation types:
[ cols="30,70", options="header" ]
Promulgation Type Attribute |
Description |
Active |
Only active promulgation types are used when creating a new message. |
Requirement |
Select the promulgation type requirements for qualifying messages. The Optional requirement means that message promulgations of this type are not turned on by default. The Default requirement means that message promulgations of this type are turned on by default. The Mandatory requirement means that message promulgations of this type are always turned on. |
Type ID |
The unique ID of the promulgation type. |
Name |
The name of the promulgation type. |
Priority |
The sort order of the promulgation type in the message editor. |
Language |
Some promulgation types may be tied to one of the message model languages. For instance, the NAVTEX promulgation type should always be tied to English. |
Domains |
The list of domains for which the promulgation type will be included in the message editor. |
Restrict Types |
Depending on the Domains selection above, the messages that will be assigned promulgations of the promulgation type can be either NW (navigational warnings) or NM (notices to mariners), or both. The Restrict Types field will allow the sysadmin to restrict the promulgation type to a selection of NW or NM sub-types. As an example, NAVTEX should be associated with Coastal Warnings, not Local Warnings. |
Script Resource Paths |
Optionally, the sysadmin can specify one or more script resources that will be enacted when an editor chooses to generate promulgations by executing message templates. As an example, the NAVTEX promulgation type runs a Freemarker script that adds the currently selected message area as a preamble NAVTEX line. Script Resources is an advanced topic detailed in the [Script Resources] chapter. |
6.1.1. Promulgation Type Specific Editor Fields
Each promulgation type may have custom editor fields at the bottom of the Promulgation Type Edit Page. This may be used for editing promulgation type-specific settings.
NAVTEX
The NAVTEX promulgation type has a button for managing the available transmitters (NAVTEX stations). Clicking the button will open the Transmitters dialog:
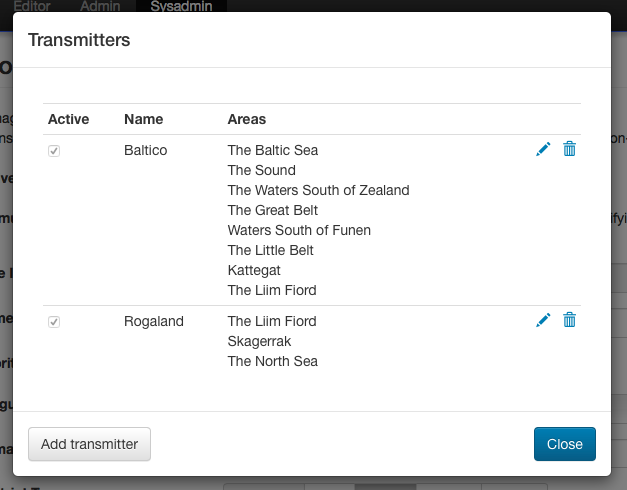
For each transmitter added via this dialog, the sysadmin can specify which areas the transmitter covers. This will facility automatic selection of the correct transmitters when a new message is created by executing a message template.
SafetyNET
The SafetyNET promulgation type has a button for managing the available distribution areas. Clicking the button will open the Areas dialog:
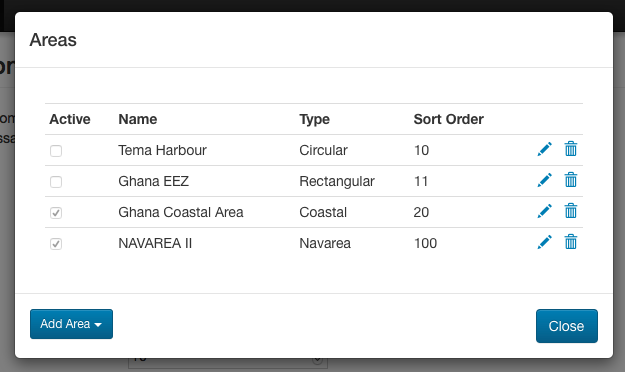
Here, you can add either circular, rectangular, coastal or NAVAREA areas, as defined in the IMO International SafetyNET Manual. Rather than typing in the C-codes of the SafetyNET standard, the format used is that of the Inmarsat MMS system, which is e.g. used by SHOM (NAVAREA II coordinator) to promulgate SafetyNET.
The defined (active) SafetyNET areas will be available for selection in the message promulgations.
Twitter Settings
The Twitter promulgation type has an "Update Settings" button that opens a dialog used for managing the format of the generated tweets, and the OAuth credential used when submitting a tweet to Twitter:
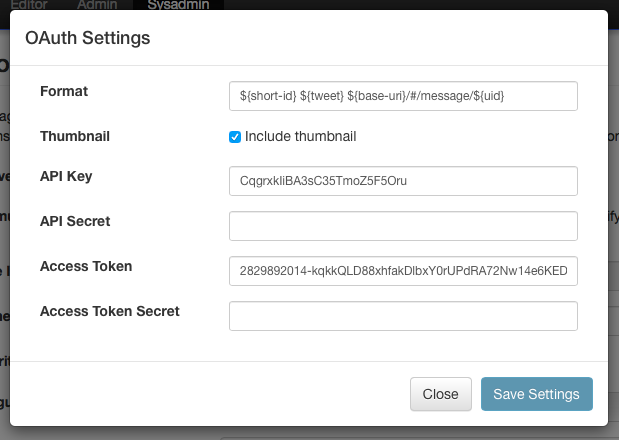
The Format field may contain replacement tokens such as "${short-id}", "${tweet}" "${base-uri}" and "${uid}". The tokens will be replaced with real values when a message is published.
As a example, the format "${short-id} ${tweet} ${base-uri}/#/message/${uid}" will generate a tweet similar to the example below, that contains the message short id, the actual message-specific tweet (title line of the message), and a link to open the full message in Niord:
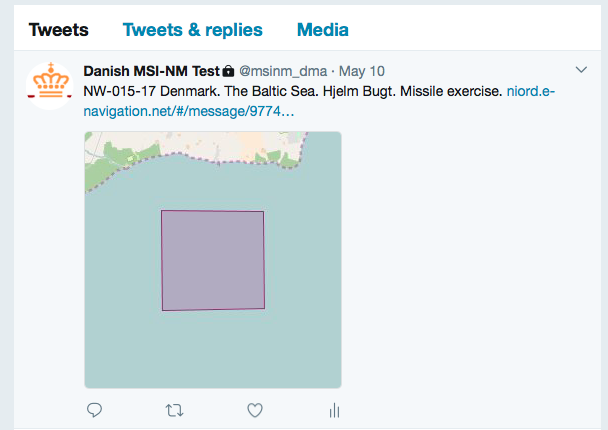
When the Thumbnail option is turned on, as in the example above, a thumbnail image will be generated and submitted with the tweet.
The API Key and Access Token fields must be filled out with the corresponding values defined at https://apps.twitter.com.
6.2. Deleting a Promulgation Type
A promulgation type can be deleted by clicking the trash icon next to them. However, this only works if there is not related data associated with the promulgation type.
Instead the system administrator can choose to in-activate the promulgation type.
6.3. Importing and Exporting Promulgation Types
The system administrator can export and import promulgation types from the action menu.
The export/import file format is based on a JSON representation of the PromulgationTypeVo class.
Example:
[
  {
    "active": true,
    "domains": [
            { "domainId": "niord-client-nw" }
    ],
    "language": "en",
    "messageTypes": [
      "COASTAL_WARNING"
    ],
    "name": "NAVTEX",
    "priority": 1,
    "promulgateByDefault": false,
    "scriptResourcePaths": [
      "templates/tmpl/navtex.ftl"
    ],
    "serviceId": "navtex",
    "typeId": "navtex"
  },
  ...
]
Please note, this data format does not include support for the promulgation type-specific attributes such as the NAVTEX transmitters. These attributes must be handled manually.
Importing a promulgation type JSON file will trigger the promulgation-type-import batch job. Batch jobs can be monitored and managed by system administrators.
As an alternative to manually uploading a promulgation type import JSON file on the Promulgation Types sysadmin page, the file can be copied to the $NIORD_HOME/batch-jobs/promulgation-type-import/in folder.
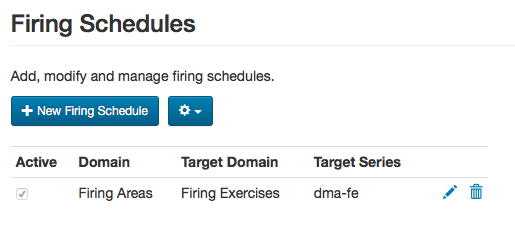
7. Firing Schedules
The Firing Schedules page allows a system administrator to configure one or more firing schedules in Niord.
7.1. Firing Exercises System Setup
Before configuring a schedule on the Firing Schedules system admin page, the Niord system must be configured with the proper firing areas base data and the domains for firing areas and exercises.
The overarching idea is as follows:
-
Firing areas must be defined as base data on the Admin Areas page. Each firing area implicitly has an associated firing schedule.
-
In a separate domain, "Firing Areas", editors will create a Miscellaneous NM message for each firing area, which provides details about the firing area, contact information, signals, prohibition, etc.
-
The "Firing Areas" domain also has a special "Schedule" sub-page that provides a UI for easily scheduling firing exercises per firing area.
-
The firing area messages and firing area schedule will be combined to create firing exercise Local Warning messages in a separate domain, "Firing Exercises".
The schedules configured on the Firing Schedules system admin page provide the underlying engine that generates firing exercise message based on firing areas and firing area schedules.
The steps outlined above are described in more details below.
7.1.1. Configuring Firing Area Base Data
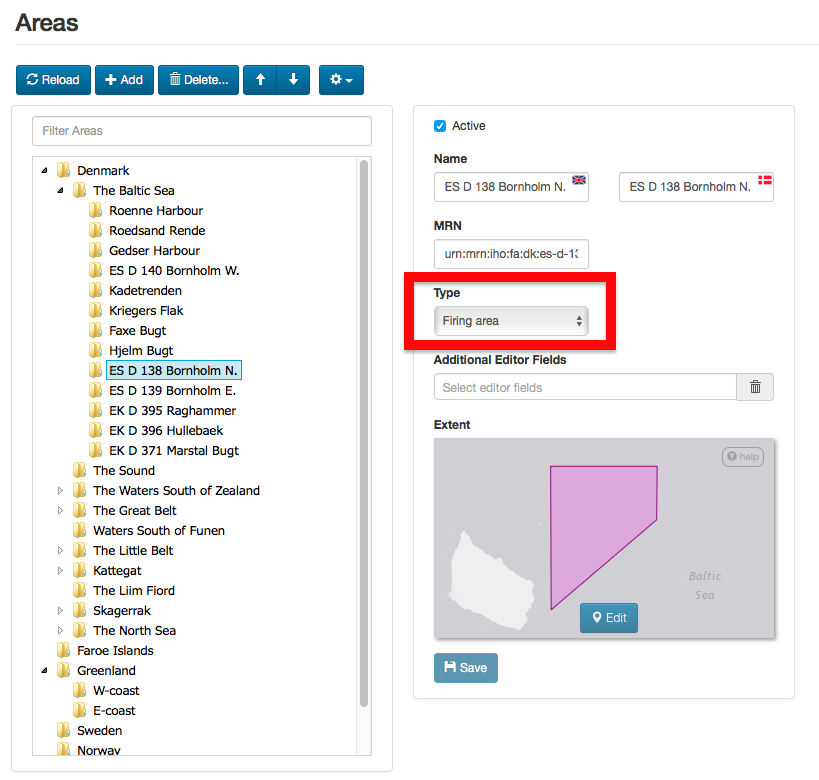
Administrators must define all firing practice areas in the country on the Admin Areas page. Each of these areas should have their type set to "Firing area". This will trigger that a firing schedule can be associated with the areas.
7.1.2. Create a Firing Areas Domain
There should be a separate domain, e.g. "Firing Areas", where editors should create Miscellaneous NM messages for each firing area.
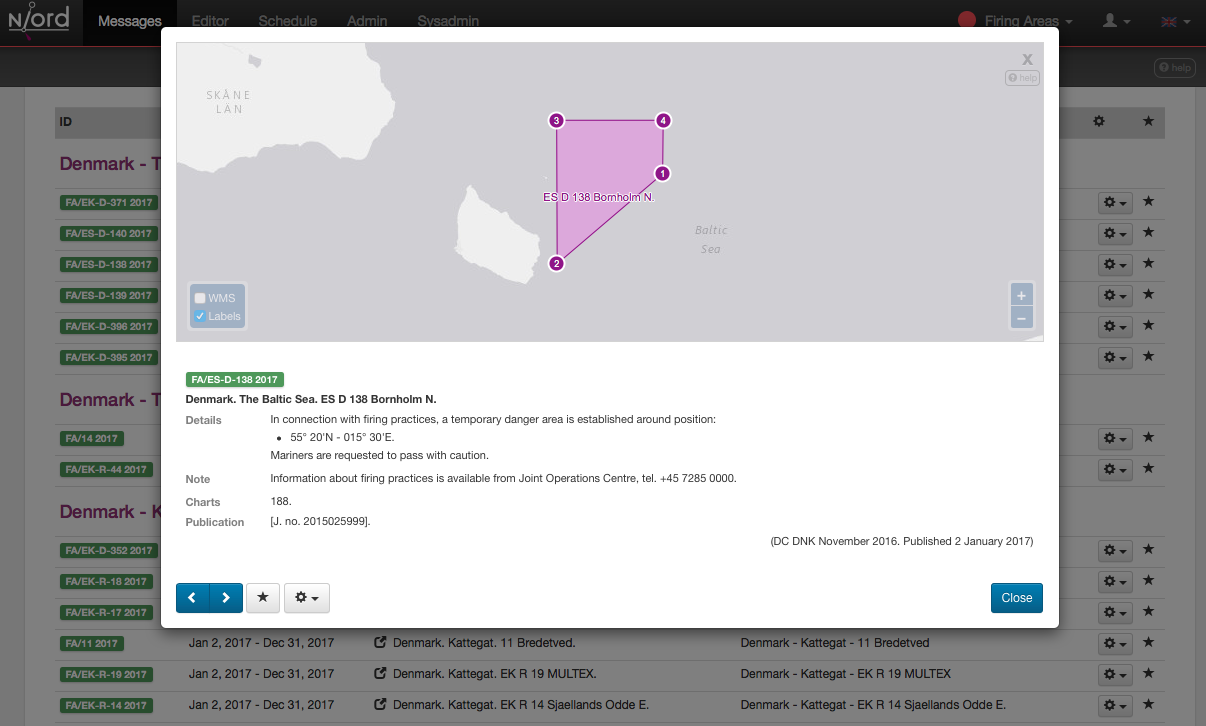
The messages should provide details about the firing areas, contact information, signals, prohibition, etc.
| A common task for Notices to Mariners departments is to publish a yearly publication with firing practice areas. The message list of the "Firing Areas" domain is ideally suited to form the basis for one such publication. The publication can be defined as described in the Publications chapter of the administrator manual. Indeed, Niord ships with a report, "fa-list", that can be used for this publication. |
7.1.3. Maintain Firing Exercise Schedule
Once everything has been configured, a new sub-page, "Schedule", will become available in the "Firing Areas" domain:
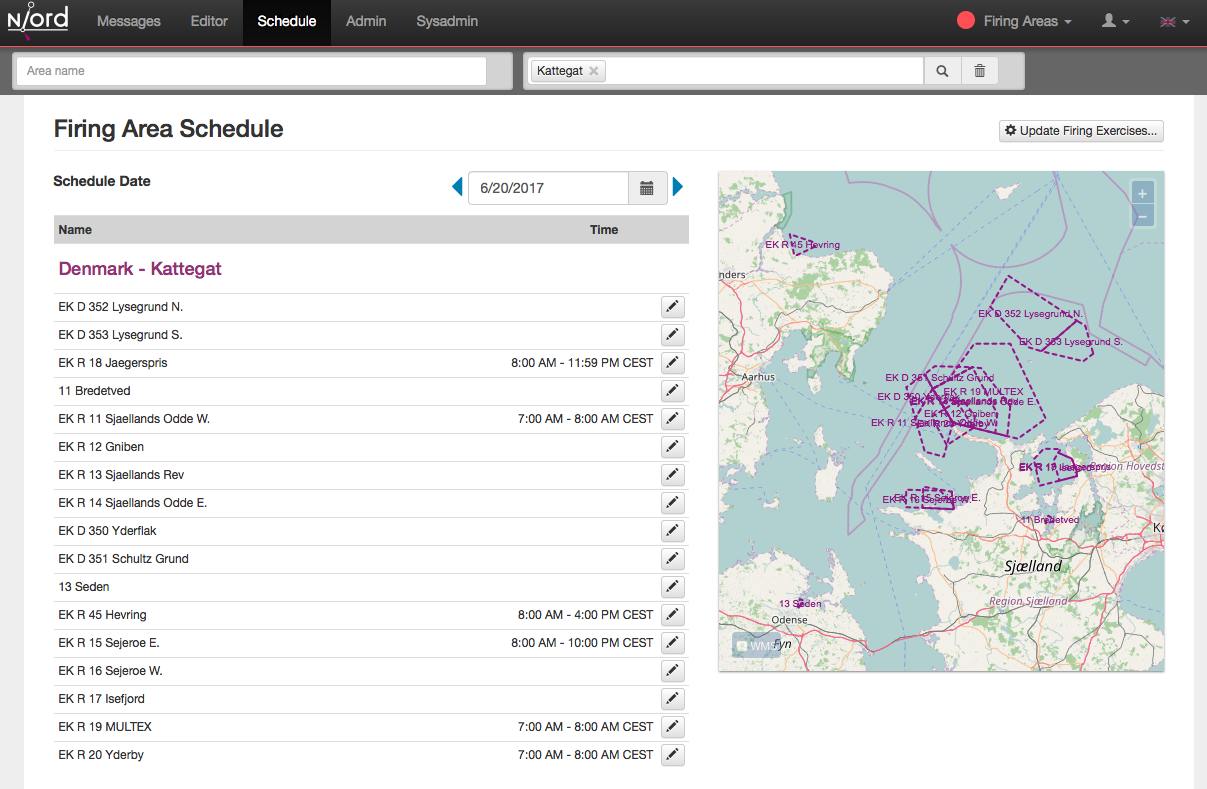
Editors can maintain the firing exercise schedule on this page. Firstly, they select a date in the Schedule Date field. The firing practice schedule of that date will be displayed below for all available firing areas.
The editor can add and modify the firing period for a given area by clicking the pencil symbol next to the area.
Clicking the "Update Firing Exercises" button will directly update firing exercise messages from the updated schedule. This operation is also called periodically by the system.
7.1.4. Generating Firing Exercises
Once everything has been configured, the firing area messages and firing exercise schedule maintained in the "Firing Areas" domain will be combined to created firing exercise messages in a new domain, e.g. "Firing Exercises".
No editor should have access rights to edit messages in the "Firing Exercises" domain, since these are generated by the system.
7.2. Adding or Editing a Firing Schedule
A prerequisite for the firing exercise-generating mechanism to work, and for the schedule page to become available in the "Firing Areas" domain, is that a firing schedule has been defined on the Firing Schedules system admin page.
The sysadmin can add a new schedule by clicking the "New Firing Schedule" button, or edit an existing schedule by clicking the pencil symbol next to the schedule.
This will open the Firing Schedule Edit Page:
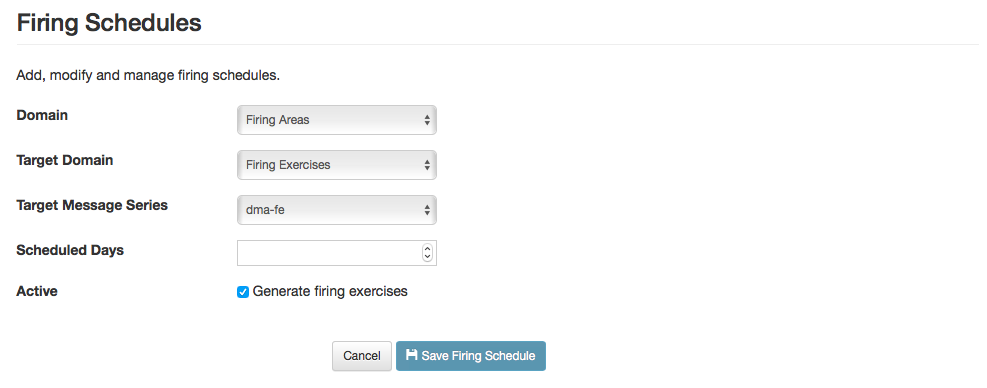
The schedule attributes:
[ cols="30,70", options="header" ]
Schedule Attribute |
Description |
Domain |
The domain that is used for maintaining the firing area messages. The domain selected in this field will automatically sport a "Schedule" page, used for maintaining the firing schedule as described above. |
Target Domain |
The target domain, where the generated firing exercise messages will be created. |
Target Message Series |
The message series of the target domain, that will be assigned to the generated firing exercise messages. |
Schedule Days |
The number of days into the future that will be included in the generated firing exercises. |
Active |
Firing exercise messages will be created automatically only when the Active flag is checked. |
7.3. Deleting a Firing Schedule
A firing schedule can be deleted by clicking the trash icon next to them.
8. Dictionaries
The Dictionaries page allows a system administrator to manage the named dictionaries used in Niord. The dictionaries contain translatable text used in the Niord website, in PDF reports, e-mails, template parameter lists, etc.
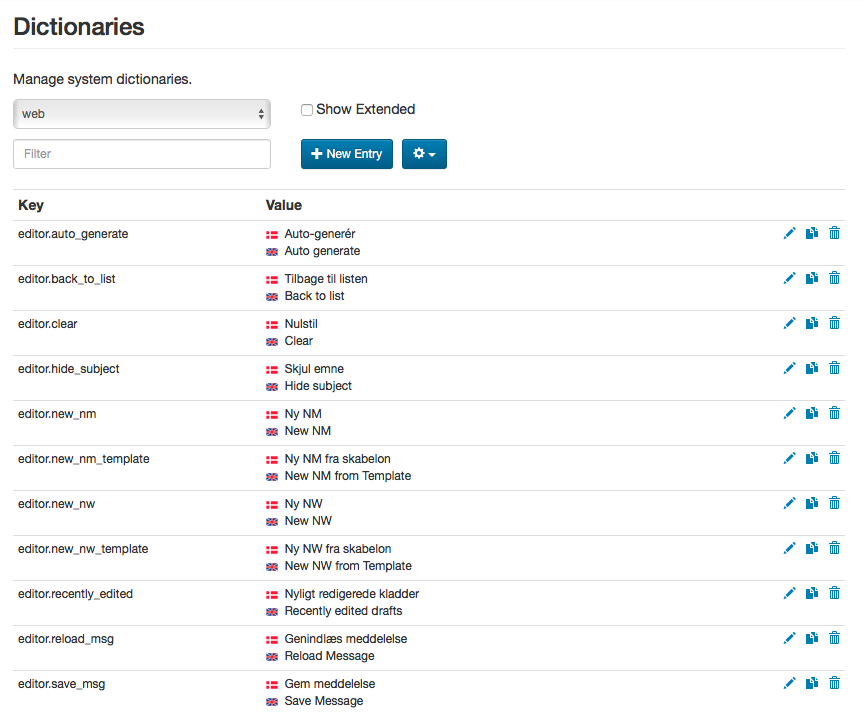
The topmost menu is used to select the currently selected dictionary.
The sysadmin may filter the list of dictionary entries, displayed for the currently selected dictionary, by typing a term into the Filter input field. The term is matched against the key of the dictionary entries.
8.1. Standard Dictionaries
Niord defines a set of standard dictionaries, that are initially loaded from resource bundles in the Niord distribution. The standard dictionaries are:
[ cols="30,70", options="header" ]
Dictionary |
Description |
web |
The "web" dictionary contains much of the text actually displayed on the Niord website. |
message |
The "message" dictionary contains many of the terms used for NW and NM messages, and is used in the Niord website, PDF reports, e-mails, etc. |
The "mail" dictionary contains additional translatable terms used in e-mails. |
The "pdf" dictionary contains additional translatable terms used in PDF reports. |
template |
The "template" dictionary contains additional translatable terms used when executing message templates. |
8.2. Extended Dictionaries
Niord also supports importing extended dictionaries, as detailed in the [Importing and Exporting Dictionaries] section.
The entries of these dictionaries have an extra translatable long value field, which can be viewed and edited by checking the "Show Extended" option, next to the dictionary menu:

One such dictionary is the "aton" dictionary, which contain parameter list entries used in the message template function - please refer to the Message Template Execution chapter.
8.3. Adding or Editing a Dictionary Entry
The sysadmin can add a new dictionary entry to the currently selected dictionary by clicking the "New Entry" button, or edit an existing dictionary entry by clicking the pencil symbol next to the entry.
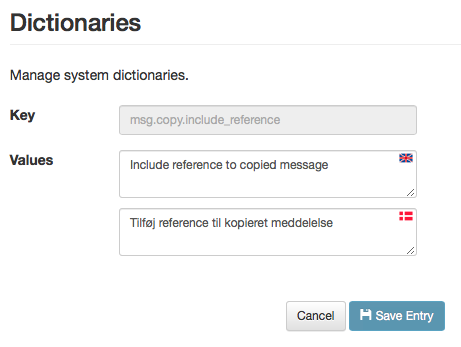
This will open the Dictionary Entry Edit Page:
The standard dictionary entry attributes:
[ cols="30,70", options="header" ]
Entry Attribute |
Description |
Key |
A unique key for the dictionary entry |
Values |
The textual values for all supported languages. |
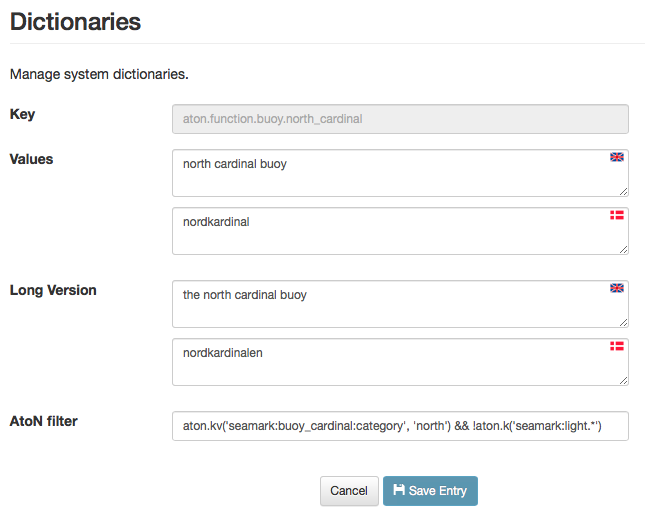
For extended dictionaries - i.e. when the "Show Extended" option is checked - there are a couple of additional attributes. These entries are typically used in parameter lists when executing message templates - please refer to the Message Template Execution chapter.
[ cols="30,70", options="header" ]
Entry Attribute |
Description |
Long version |
A secondary version of the dictionary entry for all supported languages. |
AtoN filter |
The AtoN filter is not currently used in production, but it ties in with the Aids to Navigation module of Niord. There, you can start by selecting an AtoN and then execute a message template based on the AtoN data. The AtoN filter attribute can be used to facilitate pre-selection of the correct parameters in the message templates. For instance, in the example above the "north cardinal buoy" entry matches AtoNs according to the filter: "aton.kv('seamark:buoy_cardinal:category', 'north') && !aton.k('seamark:light.*')". AtoNs are defined in an OpenStreetmap (OSM) Seamark format, and thus, the filter states that the AtoN should be a north cardinal buoy, but not a light buoy. |
8.4. Deleting a Dictionary Entry
A dictionary entry can be deleted by clicking the trash icon next to them.
Be careful that the dictionary entry is not used in on of the [Parameter Types] definitions.
8.5. Importing and Exporting Dictionaries
The system administrator can export and import dictionaries from the action menu.
The export/import file format is based on a JSON representation of the ExportedDictionaryVo class.
Example:
[
  {
    "name": "mail",
    "entries": [
      {
        "descs": [
          {
            "lang": "da",
            "value": "K\u00e6re {0}"
          },
          {
            "lang": "en",
            "value": "Dear {0}"
          }
        ],
        "key": "mail.dear.user"
      },
      ...
    ],
  }
]
Importing a dictionary JSON file will trigger the dictionary-import batch job. Batch jobs can be monitored and managed by system administrators.
As an alternative to manually uploading a dictionary import JSON file on the _Dictionaries sysadmin page, the file can be copied to the $NIORD_HOME/batch-jobs/dictionary-import/in folder.
8.6. Reloading Standard Dictionaries
As mentioned in the [Standard Dictionaries] section, the standard dictionaries are initially loaded from resource bundles in the Niord distribution.
These dictionaries can be re-loaded from the resource bundles by enacting the "Reload from system" function in the action menu.
9. Parameter Types
The Parameter Types page allows a system administrator to manage named parameters that may be used for user input when executing message templates - please refer to the Message Template Execution chapter.

There are three categories of parameter types:
[ cols="30,70", options="header" ]
Category |
Description |
standard |
There is a fixed set of standard parameter types, such as "text", "number", "boolean", "date", etc. These types cannot be modified or deleted. When executing a message template, parameters of the standard type will be represented via standard input widgets such as an input field for "text", a checkbox for "boolean", etc. |
list |
A list parameter type is a named and ordered collection of dictionary entries - please refer to the [Dictionaries] chapter. |
composite |
A composite parameter type is a named collection of standard and list parameter types. |
Example: When executing the "Marked Wreck" message template, one of the parameters the user is asked to fill out, is the "Wreck" parameter:

The "Wreck" parameter is really just a composite parameter made up of a list parameter type ("vessel_type_list") for specifying the wreck type, a standard parameter type ("number") for specifying the wreck depth, and a standard parameter type ("boolean") for specifying if the wreck is visible above sea surface.
The "vessel_type_list" list parameter type in turn includes the "aton" dictionary entries for "vessel", "fishing vessel" and "sailing vessel".
9.1. Adding or Editing a Parameter Type
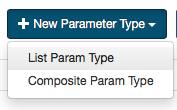
The sysadmin can add a new parameter type by clicking the "New Parameter Type" button, and then select either "List Parameter Type" or "Composite Parameter Type":
Similarly, the sysadmin can edit an existing list or composite (but not standard) parameter type by clicking the pencil symbol next to the entry.
This will open either the List Parameter Type Edit Page or the Composite Parameter Type Edit Page:
9.1.1. List Parameter Type Edit Page
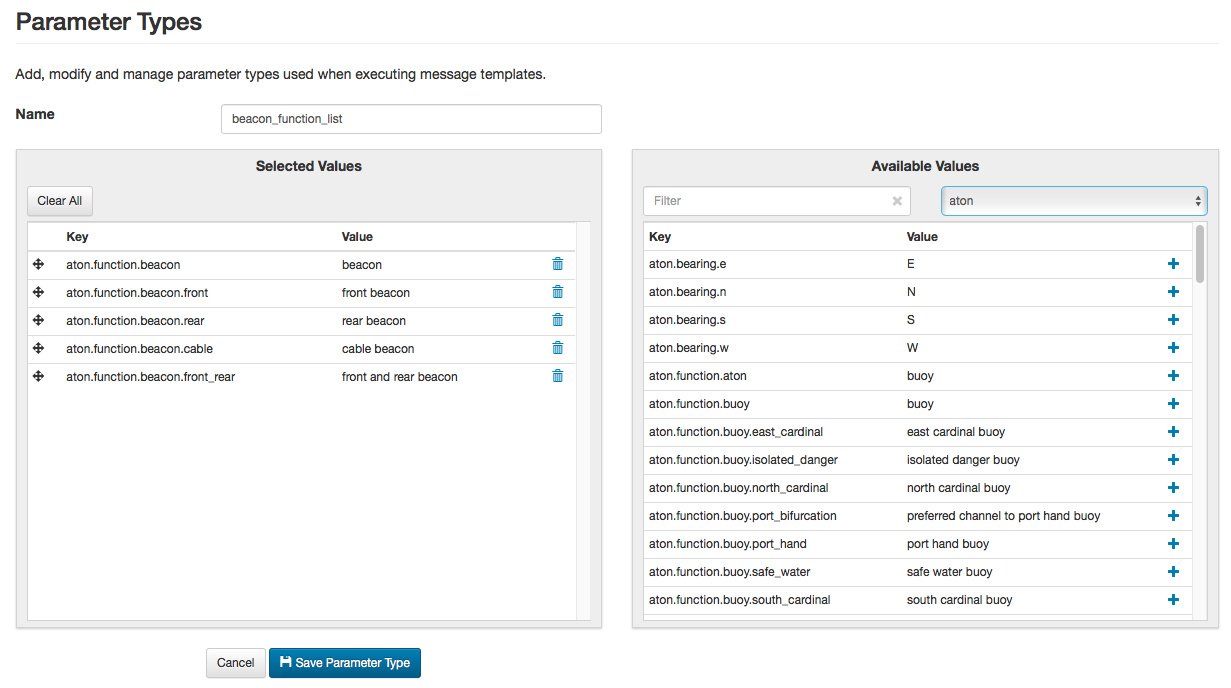
The sysadmin specifies a unique name for the parameter list, and assigns the relevant dictionary entries to the list. For a discussion of dictionaries, please refer to the [Dictionaries] chapter.
The sysadmin can select the relevant dictionary using the dictionary menu in the top of the "Available values" panel. She can also filter the entries of the currently selected dictionary using the Filter input field.
Dictionary entries are added to the list by clicking the plus icon next to the entries.
Similarly, dictionary entries are removed from the parameter type list by clicking the
trash icon next to the entries in the "Selected Values" panel.
Lastly, selected dictionary entries can be re-ordered by dragging an entry
to its proper position using the ![]() drag handle.
drag handle.
9.1.2. Composite Parameter Type Edit Page
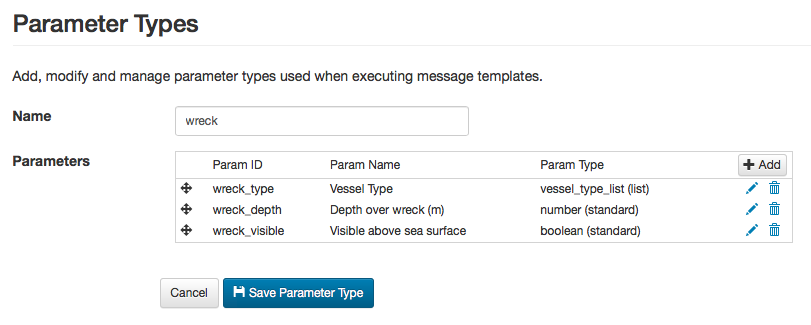
The sysadmin specifies a unique name for the composite parameter, and assigns the relevant nested parameters.
The sysadmin adds a new nested parameter by clicking the "Add" button, and edits the nested parameters by clicking the pencil icon next to the parameters. This will open the Nested Composite Parameter Edit Dialog:
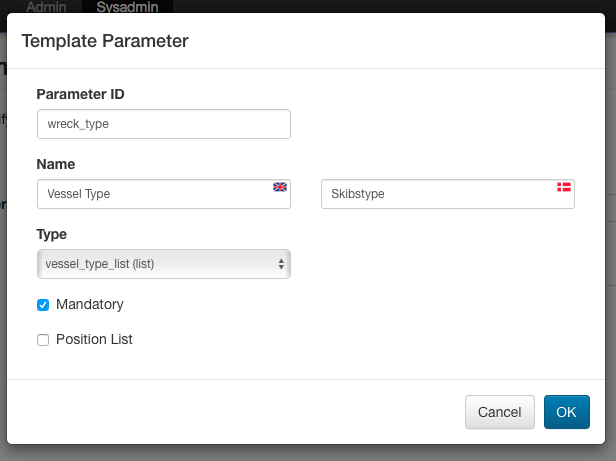
The nested parameter must be assigned a unique Parameter ID, a Name in all supported languages, a Type which can be any of the defined standard or list parameter types.
Furthermore, the sysadmin must decide whether the parameter should be mandatory, and if the parameter is tied to a position list.
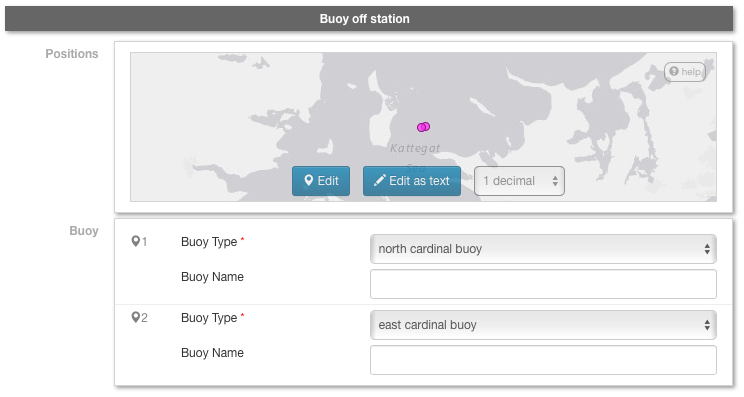
Tying a nested parameter type to a position list will ensure the following effect: When executing a message template, the parameter will be repeated for each position defined for the message. In the example below, the "Buoy" parameter is repeated for both positions selected in the Positions editor.
Nested parameters can be deleted from the composite parameter type by clicking the trash icon next to the parameters.
Lastly, the nested parameters can be re-arranged by dragging a parameter
to its proper position using the ![]() drag handle.
drag handle.
9.2. Deleting a Parameter Type
A parameter type can be deleted by clicking the trash icon next to them. However, the sysadmin should first check that the parameter is not used in either message template definitions (see the [Categories] chapter) or in composite parameter types.
9.3. Duplicating a Parameter Type
A parameter type can be duplicated by clicking the copy icon next to them.
9.4. Importing and Exporting Parameter Types
The system administrator can export and import parameter types from the action menu.
The export/import file format is based on a JSON representation of the ParamTypeVo class and its sub-classes: StandardParamTypeVo, ListParamTypeVo and CompositeParamTypeVo.
Example:
[
  {
    "name": "ais",
    "type": "COMPOSITE"
    "templateParams": [
      {
        "descs": [
          {
            "lang": "da",
            "name": "Afm\u00e6rk. type"
          },
          {
            "lang": "en",
            "name": "AtoN Type"
          }
        ],
        "mandatory": false,
        "paramId": "aton_type",
        "positionList": false,
        "type": "radio_navigation_aton_list"
      },
      ...
    ]
  },
  ...
]
Importing a parameter type JSON file will trigger the param-type-import batch job. Batch jobs can be monitored and managed by system administrators.
As an alternative to manually uploading a parameter type import JSON file on the Parameter Types sysadmin page, the file can be copied to the $NIORD_HOME/batch-jobs/param-type-import/in folder.
10. Script Resources
The Script Resources page allows a system administrator to manage the list of script resources in Niord.
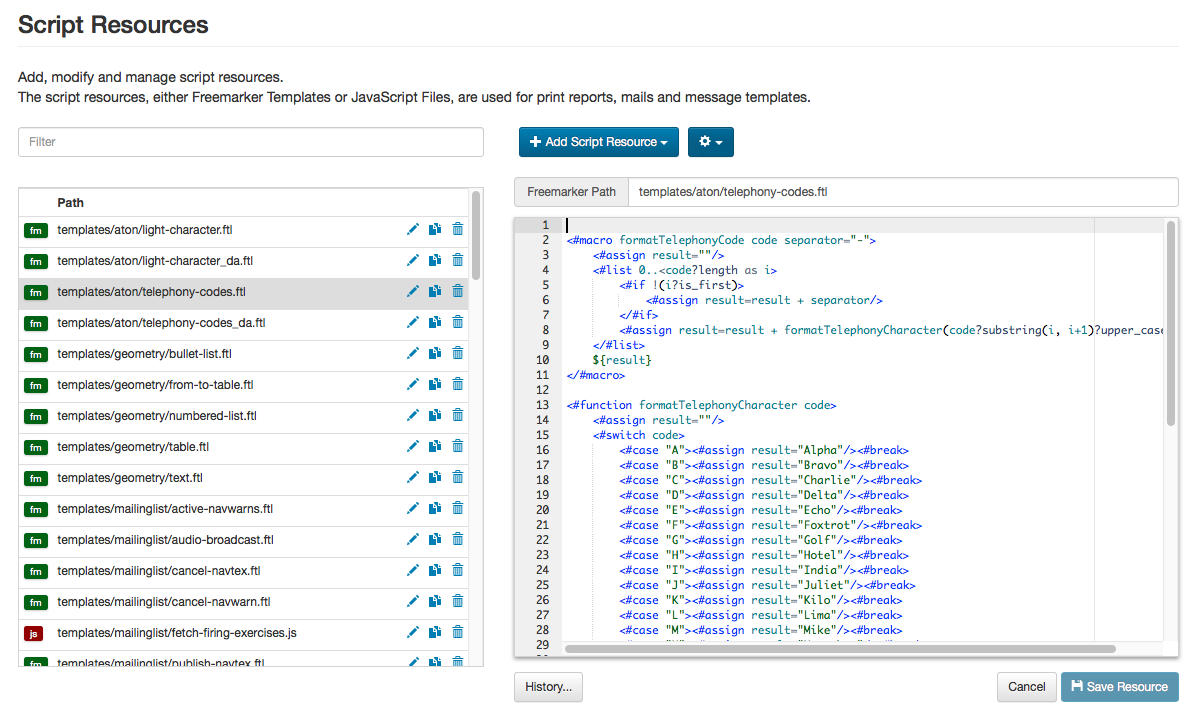
Script resources are always associated with a path, and come in two flavours; Freemarker templates (with an ".ftl" path extension) and server-side Nashorn JavaScript files (with a ".js" path extension).
System administrators wishing to work with script resources, should acquaint themselves with these technologies, which are detailed further in the [Server-Side JavaScript] and [Freemarker Templates] sections.
The Freemarker templates are typically, but not exclusively, used for generating HTML, whereas the server-side JavaScript files are typically used for looking up or manipulating data.
The Script Resources Page displays the list of script resources currently persisted to the database. The system administrator can type a term into the Filter input field above the list, to filter the script resources by their paths.
10.1. Script Resource Usage
The script resources are used throughout Niord for operations such as generating PDF print reports, generating mails, etc. An overview of functions using script resources is found in the table below:
[ cols="30,70", options="header" ]
Function |
Description |
Print Reports |
Print Reports are maintained on the [Print Reports] sysadmin page. There are a couple of standard and draft reports, along with domain-specific reports, such as the weekly Notices to Mariners digest. In order to generate PDF files, Niord will first use Freemarker templates to generate HTML, and then convert the HTML into PDF (CSS 2 has extensions for paged media). Print Report Freemarker templates are typically found under the "templates/messages/" sub-path. |
Message Templates |
The single most extensive usage of script resources is for Message Templates - please refer to the subsequent [Intermediate Message Template Format] section. Message Templates use JavaScript file for data-manipulation and Freemarker templates for generating an intermediate template XML-format, used for generating messages. Message Template script resources are typically found under the "templates/tmpl/" sub-path. |
Mailing Lists |
Mailing lists also use script resources for generating the actual HTML e-mails - please refer to the [Mailing Lists] chapter. Mailing List script resources are typically found under the "templates/mailinglist/" sub-path. |
Miscellaneous |
Freemarker templates are used for quite a few discrete functions, such as formatting a light character (e.g. "Al.Bu.Y 3s") as human text, and formatting message positions in various formats - please see the Insert Locations section of the Editors manual. |
10.2. Script Resource Extensions
Niord has added some extensions to both types of the script resources.
Firstly, the script resources are always loaded from the database, not the file system. However, if a script resource, as given by its path, does not exist in the database, then Niord will check to see if the resource can be loaded from the class-path and persisted to the database, thence commencing operations.
This means that Niord developers can develop and maintain the initial batch of script resources as project files and use a professional code editor for editing the scripts.
Another Niord extension has to do with script resource inclusion. File system-based Freemarker Templates can include other Freemarker templates, and similarly for JavaScript files; a trait that facilitates code reuse and libraries. Niord has extended the script resource inclusion concept, so that it works with the database-backed scripts as well. Subsequent sections will give examples of script resource inclusion.
10.3. Server-Side JavaScript
An introduction to Nashorn JavaScript can be found at http://winterbe.com/posts/2014/04/05/java8-nashorn-tutorial/.
The scripts are executed server-side, which means that you can e.g. call Java Enterprise Beans and load and manipulate data.
| Executing JavaScripts server-side is clearly a security issue, since you can e.g. create a script that deletes data. However, all access to create and update JavaScripts is strictly restricted to system administrators, a role reserved to the person(s) that set up and configure the entire system, and who can wreck it anyway, should they so decide… |
The following example illustrates how to perform a message search for published firing exercises:
var messageService = CdiUtils.getBean(org.niord.core.message.MessageService.class);
var seriesIds = java.util.Collections.singleton('dma-fe');
var statuses = java.util.Collections.singleton(org.niord.model.message.Status.PUBLISHED);
var searchParams = new org.niord.core.message.MessageSearchParams();
searchParams.seriesIds(seriesIds)
    .statuses(statuses);
var searchResult = messageService.search(searchParams);
10.3.1. Inclusion in JavaScript
As mentioned in the [Script Resource Extensions] section, JavaScript files are persisted in the database, and may include other JavaScript files.
Hence, the "templates/tmpl/common.js" JavaScript file contains a collection of common JavaScript functions which is often included by other JavaScript files using the syntax:
/** Always load using full path and a "niord:" prefix **/
load('niord:templates/tmpl/common.js');
10.4. Freemarker Templates
The documentation for Freemarker templates are found at http://freemarker.org.
The Freemarker Templates are typically used to convert a data model, such as a message list, into HTML, and sometimes into plain text or XML.
The following simple example, "templates/geometry/text.ftl", is instantiated with a "geometry" (position list) and a "format", and formats the positions as a comma-separated list of lat-lon positions.
<#assign formatPos = "org.niord.core.script.directive.LatLonDirective"?new()>
<#if geometry?has_content>
<#list geometry as feature>
<#if feature.coordinates?has_content>
<#list feature.coordinates as coord>
<@formatPos lat=coord.coordinates[1] lon=coord.coordinates[0] format=format />
<#if coord?has_next>, </#if>
</#list>
</#if>
<#if feature?has_next>, </#if>
</#list>
</#if>10.4.1. Inclusion in Freemarker Templates
As mentioned in the [Script Resource Extensions] section, Freemarker templates are persisted in the database, and may include other Freemarker templates.
Hence, the "templates/tmpl/common.ftl" and "templates/messages/message-support.ftl" Freemarker templates contain a collection of common Freemarker functions and macros used by other Freemarker templates, using the syntax:
<!-- From same path level -->
<#include "common.ftl"/>

<!-- Include from a different path level -->
<#include "../tmpl/common.ftl"/>
10.4.2. Language-Specific Freemarker Templates
When loading the main Freemarker template path, or any of the included templates (see above), the actual template path loaded is subject to a language-specific selection.
If e.g. "templates/aton/light-character.ftl" is loaded in the context of a Danish locale, then the actual template being loaded is the "templates/aton/light-character_da.ftl" template (if it exists).
10.4.3. Dictionaries in Freemarker Templates
As described in the [Dictionaries] chapter, dictionaries are also used in Freemarker Templates. As an example, the "message" and "mail" dictionaries are available to mailing-list Freemarker templates, the "message" and "pdf" are available to print report Freemarker templates, and so forth. The following examples demonstrate how to emit a dictionary term:
<!-- Emitting the "pdf.toc" dictionary entry -->
<h2>${text("pdf.toc")}</h2>

<!-- Emitting a parameterized dictionary entry which contains a {0} placeholder -->
${text('cancellation.this_message',cancelDate)}
10.5. Intermediate Message Template Format
Freemarker templates are used for generating an intermediate XML-based Message Template Format. Message templates are used so extensively, that the format merits its own description below. Please also refer to the [Categories] and Message Template Execution chapters.
The data passed along to the Freemarker template being executed is
[ cols="30,70", options="header" ]
Data |
Description |
message |
A template NW or NM message instantiated from input fields in the template execution dialog. |
params |
A map of other parameters instantiated from input fields in the template execution dialog. |
template |
The message template (executable category) being executed. |
languages |
The list of model languages to generate data for. |
The output of the Freemarker templates should be an intermediate XML format, which contain a list of <field-template> elements for each field that should be updated of the message. The snippet below illustrates what the resulting XML may look like:
<field-template field="part.getDesc('en').subject" format="text">
Denmark. Kattegat. Randers Fiord. Light unlit.
</field-template>
<field-template field="part.getDesc('da').subject" format="text">
Danmark. Kattegat. Randers Fjord. Fyr slukket.
</field-template>
<field-template field="part.getDesc('en').details" format="html">
<p>The light Voer Brohoved in pos. 56° 31.2'N - 010° 13.8'E is unlit.</p>
</field-template>
<field-template field="part.getDesc('da').details" format="html">
<p>Fyret Voer Brohoved på pos. 56° 31,2'N - 010° 13,8'E er slukket.</p>
</field-template>
<field-template field="message.promulgation('audio').text" update="append">
Fyret Voer Brohoved på position 56 grader 31,2 min. nord 10 grader 13,8 min. øst er slukket.
</field-template>
<field-template field="message.promulgation('navtex').text" update="append">
LIGHT VOER BROHOVED 56-31.2N 010-13.8E
UNLIT.
</field-template>The "field" attribute (which is actually a JavaScript expression), is used to point out which message attribute to update with the contents of the <field-template>.
The "update" attribute indicates whether to replace or append the content to the attribute.
The "format" attribute indicates the format of the <field-template> contents. If the format is e.g. "text", then the contents is cleaned up as a single line of text.
Unlike most other types of script resources, which gets instantiated with a specific language and locale, the ones used for message templates should handle multiple languages themselves. The currently used language can be changed using the following snippet:
<#setting locale='da'>10.6. Adding or Editing a Script Resource
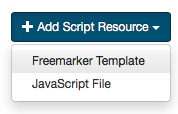
The sysadmin can add a new Freemarker Template or JavaScript file by clicking the "Add Script Resource" button, and select the type to add:
Similarly, the sysadmin may edit an existing script resource by clicking the pencil icon next to the script resource.
The editor for the script being added or edited, contains two fields; the script resource path and the actual script:
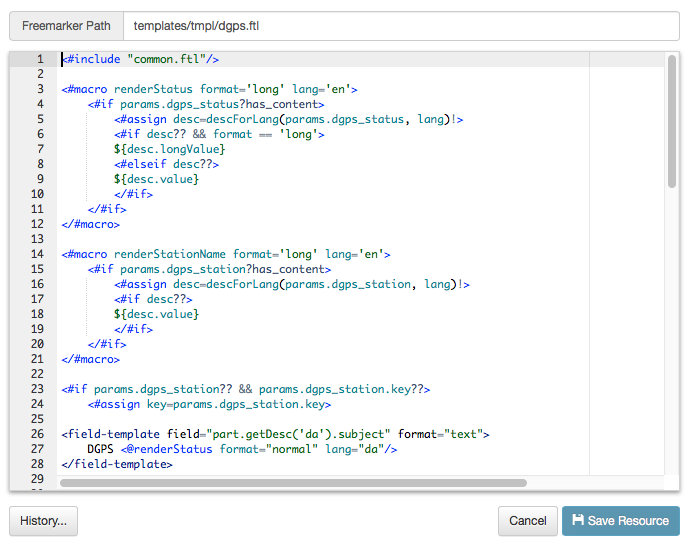
The script editor has syntax coloring to aid and facilitate the editing process.
10.7. Script Resource Revisions
Script resources are versioned, in the sense that every time the sysadmin edits and saves a script resource, a new revision is stored. The revisions of a script resource can be inspected by clicking the "History" button, which opens the Script Resource History dialog:
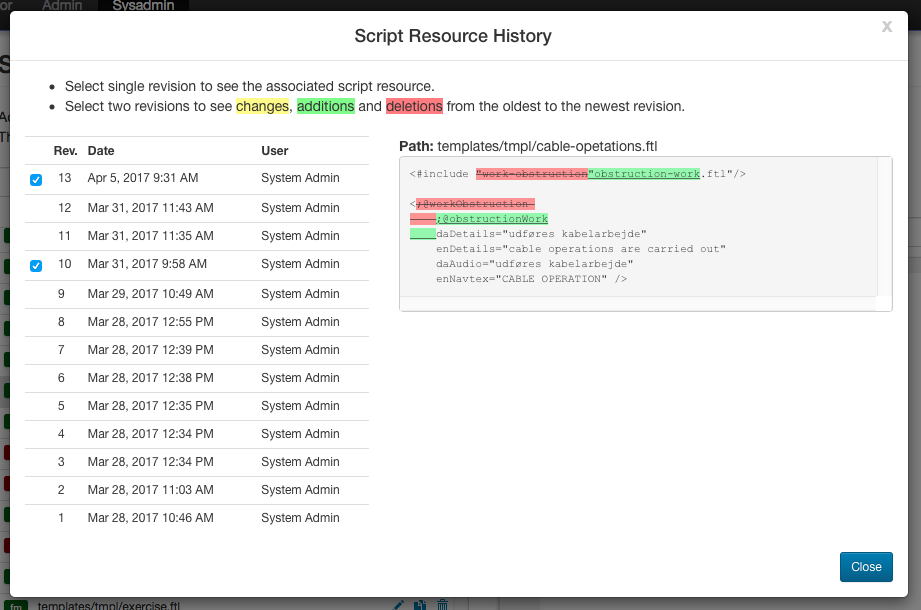
An earlier revision of the script can be inspected by clicking the checkbox next to the revision. If two revisions are selected (as above), the dialog will display the differences using color coding.
10.8. Deleting a Script Resource
A script resource can be deleted by clicking the trash icon next to them. However, the sysadmin should first carefully check if the script resource is referenced in mailing lists, print reports, message templates, or indeed included in other script resources.
10.9. Reloading Script Resources
As described in the [Script Resource Extensions] chapter, script resources may originate from files in the Niord class-path, before being loaded into the database. Any subsequent changes to a script resources will (naturally) only update the version in the database, which may thus come out of sync with the class-path file.
If the sysadmin enacts the "Reload files" function from the action menu, all script resources in the database will be overridden with any corresponding version in the class-path.
10.10. Importing and Exporting Script Resource
The system administrator can export and import script resources from the action menu.
The export/import file format is based on a JSON representation of the ScriptResourceVo class.
Example:
[
  {
    "content": "\n<#macro formatLightCharacterPhase phase multiple=false >\n   ...",
    "path": "templates/aton/light-character.ftl",
    "type": "FM"
  },
  ...
]
Importing a script resource JSON file will trigger the script-resource-import batch job. Batch jobs can be monitored and managed by system administrators.
As an alternative to manually uploading a script resource import JSON file on the Script Resource sysadmin page, the file can be copied to the $NIORD_HOME/batch-jobs/script-resource-import/in folder.
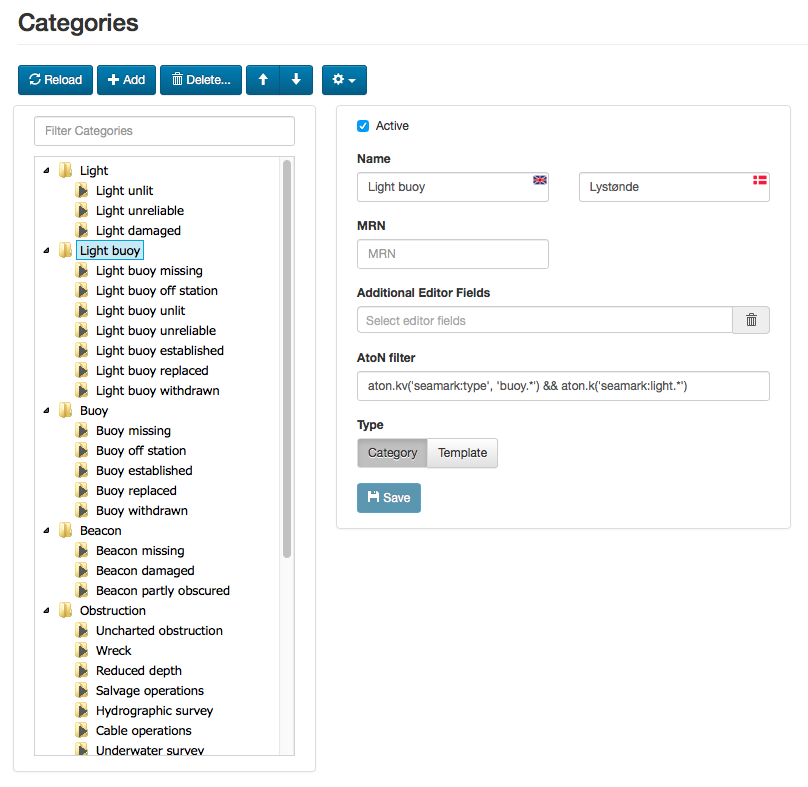
11. Categories
The Categories page allows a system administrator to manage the the hierarchical tree of categories in Niord. Lists of categories may be associated with notices to mariners and navigational warnings, and can be used for filtering message search results.
Furthermore, categories may be executable, in which case they can be used to generate messages from user input, as described in the Message Template Execution chapter. Hence, executable categories are synonymously known as message templates, or just templates, throughout the Niord documentation.
The category tree is navigated like a file system directory. Additionally, the user may filter the categories by typing a term into the Filter Categories input field above the category tree. The term is matched against the name of the categories.
11.1. Adding or Editing a Category
The user can add a new category by clicking the "Add" button, or edit a category by selecting it in the category tree.
When adding a new category, it will be a child-category of the currently selected category in the category tree. If no category is selected, the new category will become a new root category.
The details of the new or edited category will be present in the Category Editor Panel next to the category tree (see screenshot above).
The common editable attributes for both types of categories are listed below:
[ cols="30,70", options="header" ]
Category Attribute |
Description |
Active |
Only an active category can be assigned to a message or executed as a message template. |
Name |
The name of the category in all supported model languages. |
MRN |
Optionally, specify a Maritime Resource Name (a unique URN) for the category. Defining MRNs for categories will facilitate better integration between Niord systems of different countries. |
Additional Editor Fields |
Can be used to enable extra fields in the message editor when the category is assigned to the message. As an example, if a "Firing Exercises" category is assigned to a navigational warning, it might make sense to show the "Signals" editor field, not normally enabled for navigational warnings, in the message editor. |
AtoN filter |
The AtoN filter is not currently used in production, but it ties in with the Aids to Navigation module of Niord. There, you can start by selecting an AtoN and then execute a message template based on the AtoN data. The AtoN filter category attribute can be used to filter which templates should be available for a given AtoN. For instance, in the example above the "Light Buoy" category and all its sub-categories, are only availble to AtoNs matching the filter: "aton.kv('seamark:type', 'buoy.*') && aton.k('seamark:light.*')". AtoNs are defined in an OpenStreetMap (OSM) Seamark format, and thus, the filter states that the AtoN should be of type "buoy" and also have an associated light. |
Type |
Optionally, specify the category type. Currently, "Category" and "Template" are the only supported types. A Category of the "Category" type has no more attributes. However, a "Template" category has a few more attributes detailed in the next section. |
11.2. Adding or Editing a Template
A category of type "Template" is executable, as described in the Message Template Execution chapter.
This section will detail the attributes that may be edited for templates in addition to the common attributes editable for all categories and detailed in the previous section.
11.2.1. Domains Attribute
Most of the executable templates only really make sense for Navigational Warnings (NW), not e.g. Notices to Mariners (NM), since NWs tend to be short and concise and must follow various international standards. NMs on the other hand, tend to be more free style messages, not easily handled by a template system.
The Domains attribute can thus be used to restrict templates to specific NW-related domains.
11.2.2. Standard Template Fields Attribute
The Standard Template Fields attributes can be use to specify a list of standard template editor fields, which mostly constitutes simplified versions of the corresponding message editor fields - see the Editor Page chapter. The supported template fields are:
[ cols="30,70", options="header" ]
Template Field |
Description |
type |
Used for selecting the NW or NM sub-type of the message. |
promulgation |
Used for enabling and disabling the supported promulgation types. |
id |
Can be used for selecting the message series of a message. |
publish_date |
Allows the user to specify a publication date interval. |
areas |
Used to specify the areas and vicinity of the messages. |
positions |
Used for defining the positions of the message. |
event_dates |
Allows the user to specify a list of event date intervals. |
work_vessel |
Used for specifying work vessels, e.g. for cable operations. |
markings |
Used for specifying a list of markings, e.g. used for marking a wreck. |
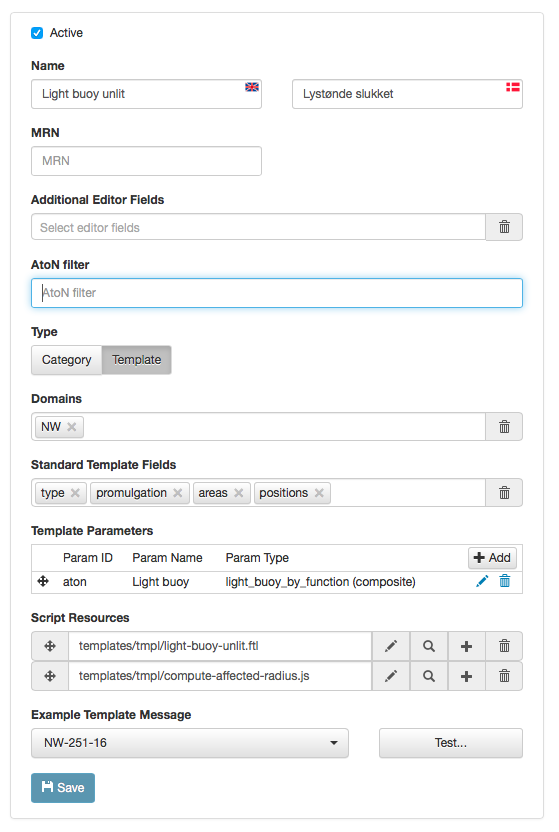
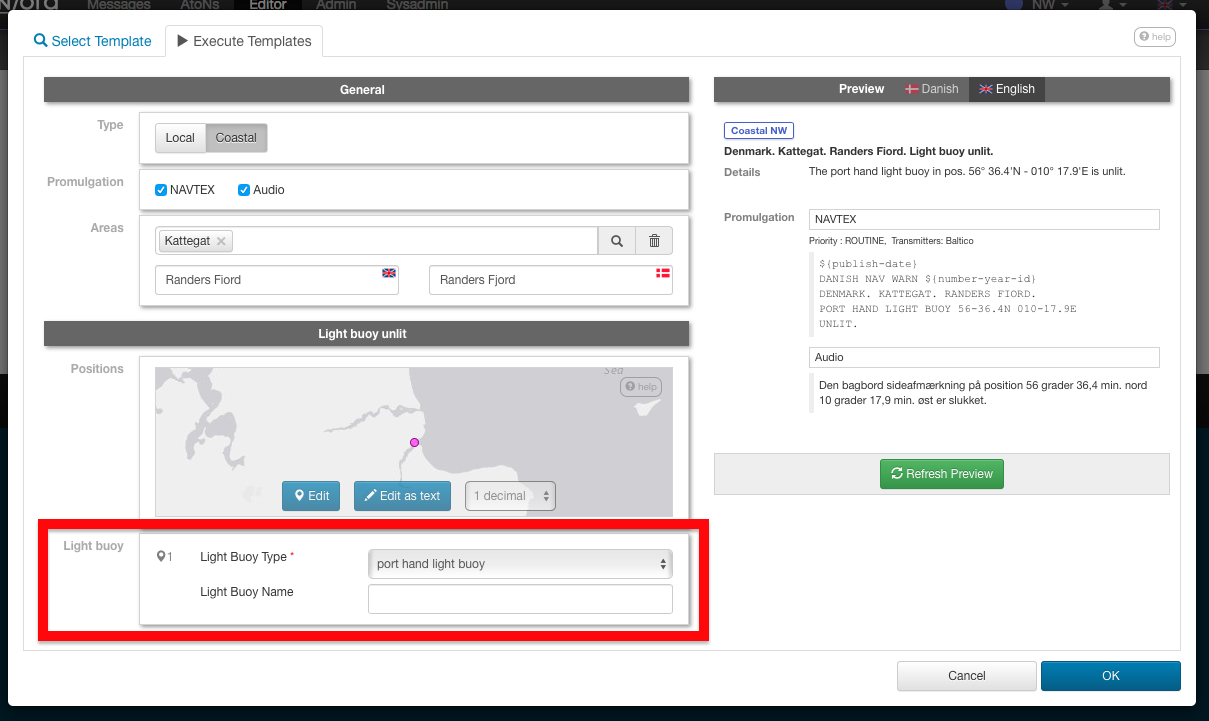
As an example, the "light buoy unlit" message template displays the "type", "promulgation", "areas" and "positions" standard template fields:
11.2.3. Template Parameters Attribute
For most message templates, just using standard template fields for user input is not sufficient. Rather, the user executing the template will need to input template-specific data as well, such as the buoy function in the "Light buoy unlit" template.
The Template Parameters field is used for defining the additional parameters of a template. The field defines of a list of parameters, using the Parameter Types defined on the [Parameter Types] sysadmin page. Indeed, defining the parameters is analogous to the way composite parameter types are defined, as detailed in the Composite Parameter Type Edit Page.
As an example, the "light buoy unlit" message template use the "light_buoy_by_function" composite parameter type to query the end user about the light buoy function and name:
11.2.4. Script Resources Attribute
The Script Resources attribute is used to define the actual list of script resources, i.e. server-side JavaScript and Freemarker templates, that get executed, when a message template is run.
The functionality of script resources is detailed in the [Script Resources] chapter. The Freemarker templates are used to generate an [Intermediate Message Template Format] that defines how a message is constructed when a message template is executed. The JavaScript resources can be used to modify data. In the "Light buoy unlit" example, a "compute-affected-radius.js" script is run, that will attempt to add an affected radius to the geometry of the constructed message based on the range to the light (only works if the message template is run from the AtoN module page).
The path specified for a script resource must match an actual script resource defined on the
[Script Resources] sysadmin page.
Indeed, clicking the pencil button of the script resource input field will open the specified script
resource for editing on the [Script Resources] page.
Clicking the magnifying glass button will open a dialog for easy script resource selection.
Clicking the plus-sign button will add another blank script resource field to the list, and clicking
the trash-icon button will clear the script resource path.
Finally, the order of execution can be controlled by dragging a script resource its proper position using
the ![]() drag handle.
drag handle.
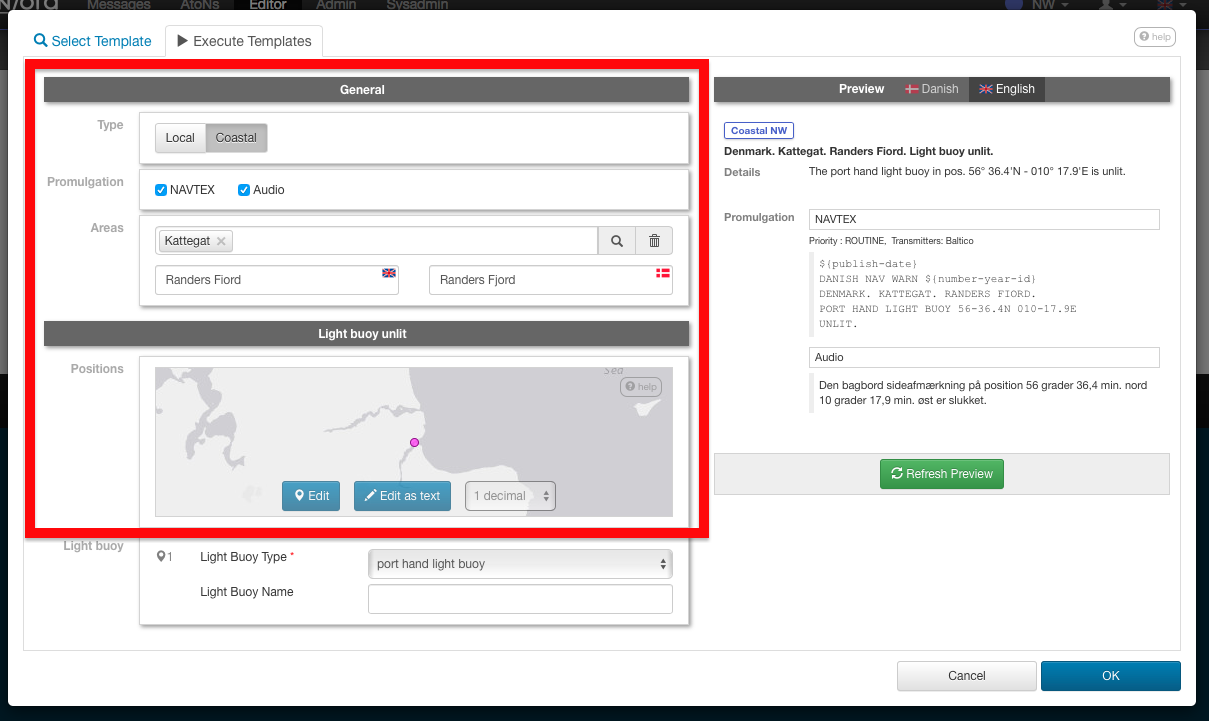
11.2.5. Example Template Message Attribute
With a large collection of message template, it may not be easy for a non-expert user to guess which template to execute in a particular situation.
The system administrator can define an example template message to each template, to aid the user. This message will be displayed for guidance, whenever the template is selected in the Template Selection Dialog.
11.3. Reorganizing Categories
The hierarchical order of the categories are updated in two ways:
-
To move a category to a different parent category, use drag-and-drop.
-
To move a category to another position under the same parent category, use the up- and down-arrow buttons above the category tree.
11.4. Deleting a Category
A category, including all its sub-categories, can be deleted by selecting it and then click the "Delete" button above the category tree. However, this only works if neither the selected category, nor any of its sub-categories, have ever been assigned to a message.
If the category has indeed been assigned to a message, the user should instead deactivate the category.
11.5. Importing and Exporting Categories
The administrator can export and import categories from the category action menu.
The export/import file format is based on a JSON representation of the SystemCategoryVo class. The data file should define root categories at the top level, and the recursively define sub-categories in the children field of the parent category.
The imported data is merged into the existing category tree. If an MRN is defined for an imported category, this is used to search for existing categories in the category tree. Alternatively, the name of the category (in all supported languages) is used to search for existing matches.
Example:
[
  {
    "active": true,
    "descs": [
      { "name": "Fyr", "lang": "da" },
      { "name": "Light", "lang": "en" }
    ],
    "type": "CATEGORY",
    "atonFilter": "aton.kv('seamark:type', 'light.*')",
    "children": [
      {
        "active": true,
        "descs": [
          { "name": "Fyr slukket", "lang": "da" },
          { "name": "Light unlit", "lang": "en" }
        ],
        "type": "TEMPLATE",
        "siblingSortOrder": 0.0,
        "domains": [
          { "domainId": "niord-nw", }
        ],
        "stdTemplateFields": [
          "areas",
          "type",
          "promulgation",
          "positions"
        ],
        "templateParams": [
          {
            "paramId": "aton",
            "type": "light",
            "mandatory": false,
            "positionList": true,
            "descs": [
              { "name": "Fyr", "lang": "da" },
              { "name": "Light", "lang": "en" }
            ]
          }
        ],
        "scriptResourcePaths": [
          "templates/tmpl/light-unlit.ftl",
          "templates/tmpl/compute-affected-radius.js"
        ],
        "messageId": "NW-003-17"
      },
      ...
    ]
  },
  ...
]
Importing a category JSON file will trigger the category-import batch job. Batch jobs can be monitored and managed by system administrators.
As an alternative to manually uploading a category import JSON file on the Categories admin page, the file can be copied to the $NIORD_HOME/batch-jobs/category-import/in folder.
12. Print Reports
The Print Reports page allows a system administrator to manage the list of PDF print reports in Niord.
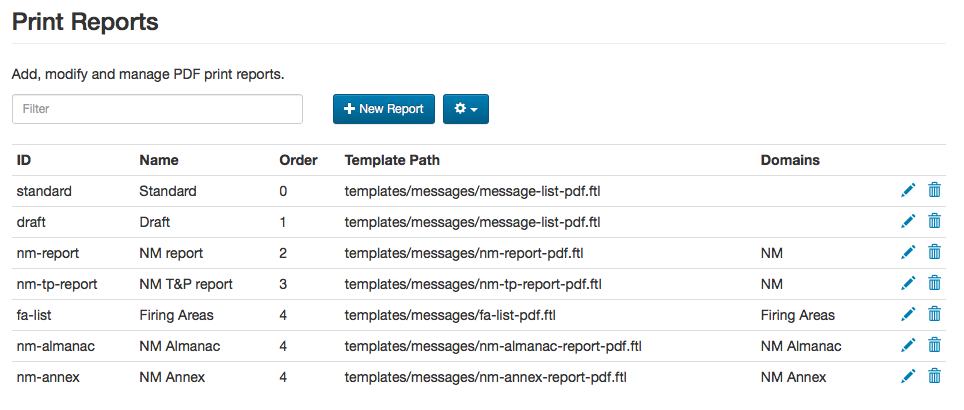
The sysadmin may filter the list of print reports by typing a term into the Filter input field above the print report list. The term is matched against the ID and name of the print reports.
Whenever a user selects to print a list of messages, as described in the Print Action chapter of the editors manual, she gets to chose which Print Report to use.
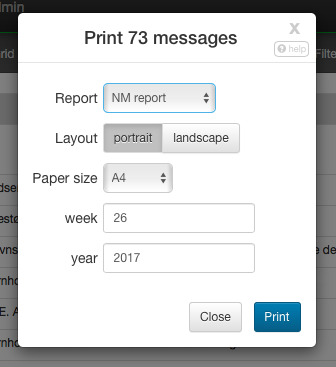
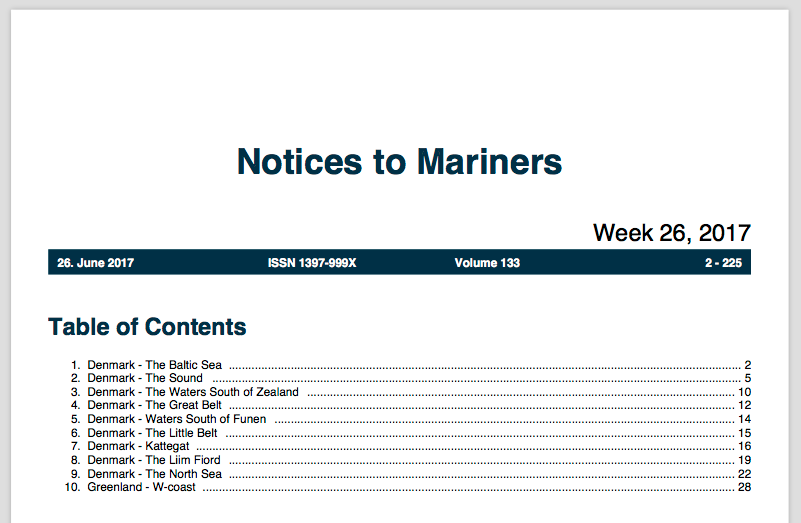
The available list of print reports are domain specific, and each print report may query the end user for a list of input parameters, such as the "Week" and "Year" for the "NM Report" above. These parameters may in turn be used on the generated PDF, as demonstrated below:
12.1. Standard Reports
Niord will always ensure the availability of two standard reports available to all domains.
[ cols="30,70", options="header" ]
Standard Report |
Description |
Standard |
The Standard report prints out the details of the current message list in the currently selected language. It also sports a front page with a Table of Contents section and information about the currently applied message filter. |
Draft |
The Draft report is similar to the Standard report, except that it includes all language versions of each message, and a few extra fields like message type and status that are not normally included. This makes the Draft report very usable for proof-reading messages. |
12.2. Generating PDFs
Generating PDFs using print reports is actually a two-phase process. First, the Freemarker template associated with the print report is used to convert a list of message into a HTML representation. Then, the HTML is converted into a PDF and returned to the user.
When creating and editing print reports, is important to understand how CSS Paged Media can be used to control such things as page size, pagination, headers and footers in the resulting PDF. Thus, the sysadmin is advised to acquaint herself with relevant documentation, such as:
-
https://www.w3.org/TR/css3-page/ - CSS Paged Media specification.
-
https://www.smashingmagazine.com/2015/01/designing-for-print-with-css/ - Introduction to using paged media.
12.3. Adding or Editing a Print Report
The sysadmin can add a new print report by clicking the "New Report" button, or edit an existing print report by clicking the pencil symbol next to the domain.
This will open the Print Report Edit Page:
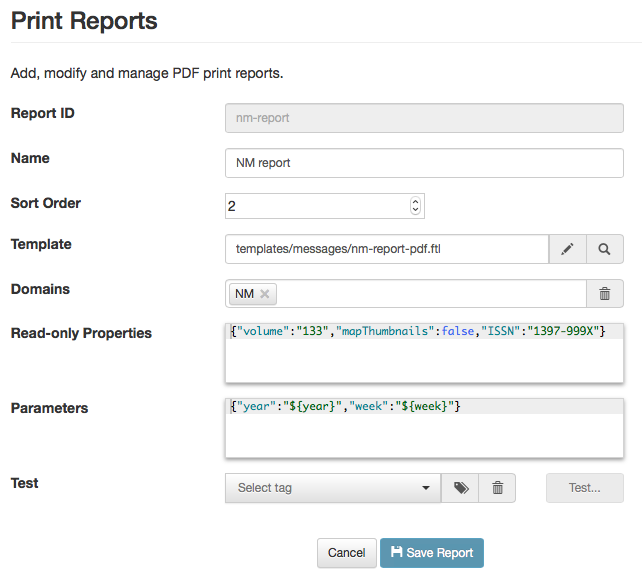
The print report attributes:
[ cols="30,70", options="header" ]
Report Attribute |
Description |
Report ID |
A unique ID for the report. |
Name |
A human readable name of the report. |
Sort Order |
Defines the order of the print reports as used in the Print Dialog. |
Template |
The Freemarker template used to generate HTML. The specified path must be the path of an existing script resource, as defined in the [Script Resources] chapter. Clicking the pencil button next to the path input field will indeed open the report on the [Script Resources] sysadmin page. Clicking the magnifying glass icon will open a dialog for easy script resource selection. |
Domains |
The domains for which the print report will be made available. |
Read-only Properties |
A JSON property object that may be used in the Freemarker template. In the "NM Report" example screenshots above, the "volume" value, "133", and "ISSN" value, "1397-999X", come from these read-only properties. |
Parameters |
The Parameters field is exactly like the Read-only Properties, except that the properties will be displayed in the Print dialog, and may thus be edited by the user per print. The Parameter values may be instantiated with default values containing replacement tokens, such as "${year-2-digits}", "${year}", "${week-2-digits}" and "${week}". In the "NM Report" example screenshots above, the effect of specifying "week" and "year" parameters can be seen. |
Test |
The Test field is not actually a print report attribute. The sysadmin can specify a message tag and test-execute the print report in this section. |
12.4. Deleting a Print Report
A print report can be deleted by clicking the trash icon next to them.
12.5. Importing and Exporting Print Reports
The system administrator can export and import print reports from the action menu.
The export/import file format is based on a JSON representation of the FmReportVo class.
Example:
[
  {
    "reportId": "nm-report",
    "name": "NM report",
    "sortOrder": 2,
    "templatePath": "templates/messages/nm-report-pdf.ftl",
    "domains": [
      { "domainId": "niord-nm" }
    ],
    "properties": {
      "mapThumbnails": false,
      "ISSN": "1397-999X",
      "volume": "133"
    },
    "params": {
      "week": "${week}",
      "year": "${year}"
    }
  },
  ...
]
Importing a print report JSON file will trigger the report-import batch job. Batch jobs can be monitored and managed by system administrators.
As an alternative to manually uploading a report import JSON file on the Print Reports sysadmin page, the file can be copied to the $NIORD_HOME/batch-jobs/report-import/in folder.
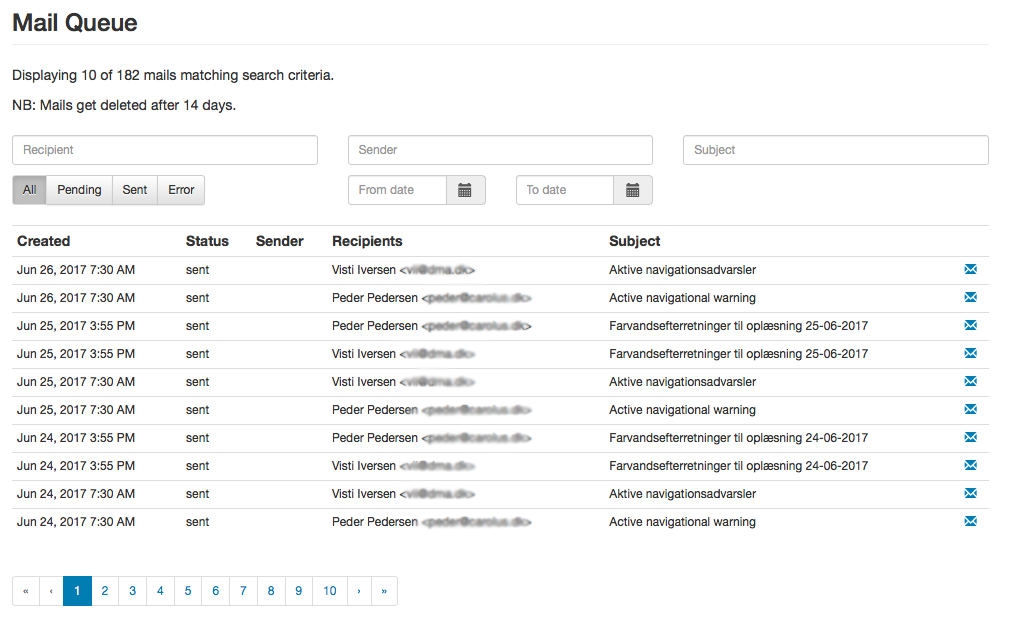
13. Mail Queue
The Mail Queue page allows a system administrator to inspect all mails sent by the Niord system.
Mails in Niord originate from a few places:
-
Users can send mails based on a message selection on the Messages page. Please refer to the E-mail Selection Action chapter.
-
Similarly, when a user submits a new comment to a message, they can add mail recipients, as described in the Comments Editor Page chapter.
-
By far, the most mails will have been sent by mailing lists, as described in the Mailing Lists chapter.
Niord has a system setting, "mailDeleteAfterDays", that defines for how many days a message should be preserved in the Mail Queue. After that, the mails will be deleted.
13.1. Sending Mails
When a mail is submitted to the mail queue, it will have a pending status. Every minute, Niord will process pending mails and attempt to send them. If a mail is successfully sent to the SMTP-server, it will be assigned the sent status. If an error occurs, however, the error message will be stored in the mail, and it will be re-scheduled to be sent after a set number of minutes (which increases with each attempt). After 5 failed attempts to send a mail, it will be be assigned the error status, after which, no more attempts will be made to send the mail.
A system administrator should thus periodically check for error-status mails in the Mail Queue, and take appropriate actions (such as updating an invalid user mail address, etc).
13.2. Mail Filtering
The mail queue may contain thousands of mails. Hence the list of mails is paginated with 10 mails per page.
The fields above the mail list are used for filtering the mail list. The available filter fields are:
[ cols="30,70", options="header" ]
Mail Filter |
Description |
Recipient |
Matches the e-mail address of the recipients |
Sender |
Matches the e-mail address of the sender |
Subject |
Matches the subject of the mails |
Status |
Filters the mails by their status, either pending, sent or error (or all of these). |
Date Interval |
A possibly open-ended date-interval that can be used to filter mails by the date they were submitted to the mail queue. |
13.3. Mail Details
Clicking the letter-icon next to a mail, will open the Mail Details dialog:
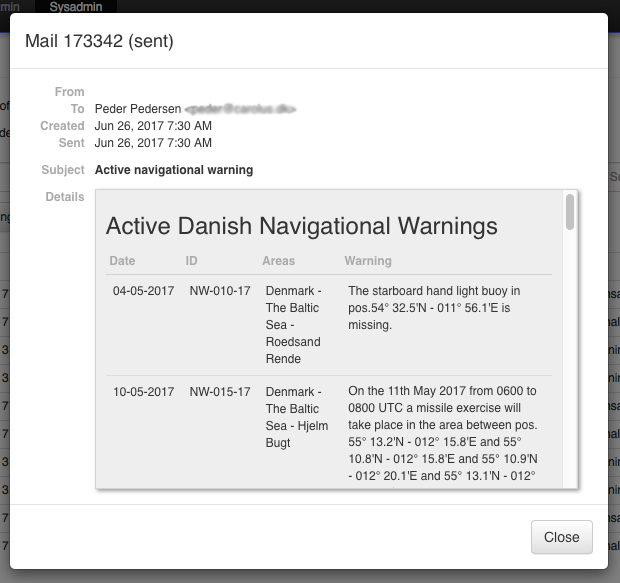
This will display the mail in its entirety, including the date, address fields, subject and mail body.
14. Integration
By default, the Integration sysadmin page is blank, and serves as a place-holder for system-specific integration management pages.
Hence, this chapter will use the Danish Niord system as an example for how to add integration functionality. All functionality and UI resources for the Danish Integration page is included in the niord-dk Github project.
| The functionality detailed in this chapter is specifically from the Danish Niord system, and thus, it is not standard Niord functionality. |
14.1. DK Legacy NW Import
The Legacy NW Import integration tab will only be present when the currently selected domain is "Legacy NW". It supports importing NWs from the current Danish NW production system (until Niord takes over this role completely, that is).
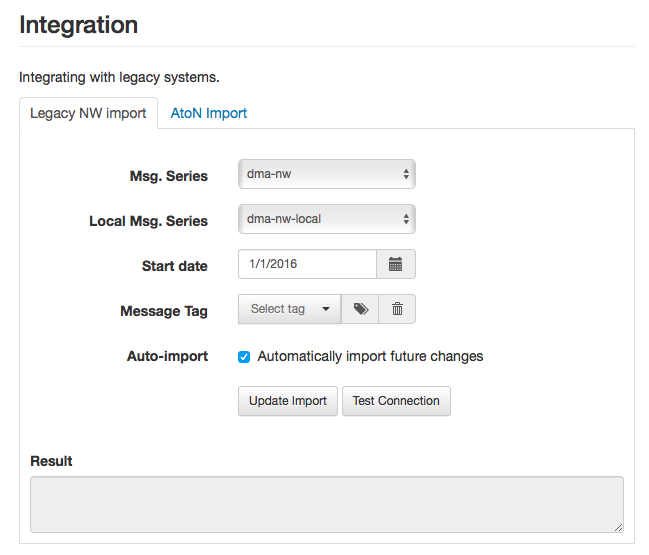
The panel allows the system administrator to specify the target message series to use for local and coastal legacy NW messages, and also to specify the date from which to import old legacy NW messages, and whether to auto-import NW messages from the legacy system or not.
14.2. DK Legacy Firing Area Import
The Legacy Firing Area Import integration tab will only be present when the currently selected domain is "Firing Areas". It supports importing firing areas from the current Danish NW production system (until Niord takes over this role completely, that is).
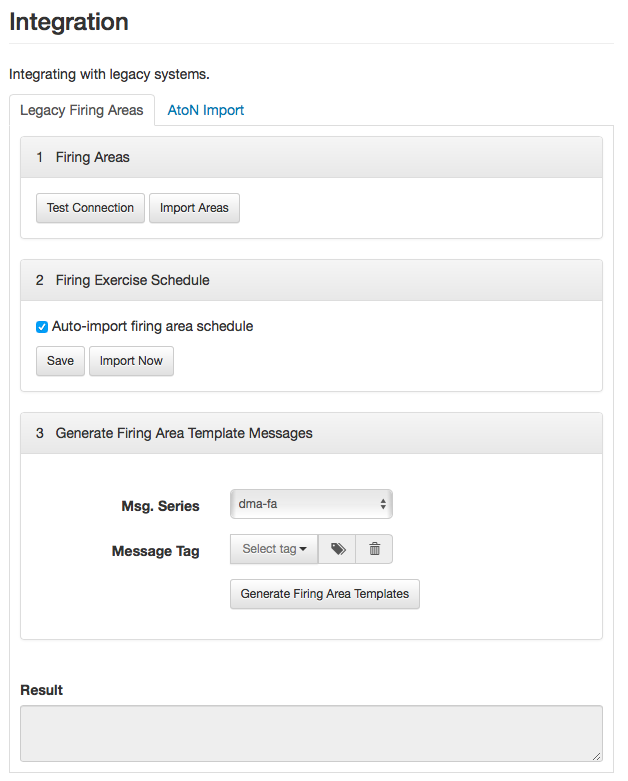
The tab also supports importing the firing schedules associated with the firing areas from the legacy NW system, and there is a function for generating firing area template messages from the firing areas.
Please refer to the [Firing Schedules] chapter for a discussion of firing areas and schedules in Niord.
14.3. DK Legacy AtoN Import
The Legacy AtoN Import integration tab supports importing Danish Aids to Navigation seamarks. The files to upload must be Excel sheets generated from the Danish Afmærkningsregister system.
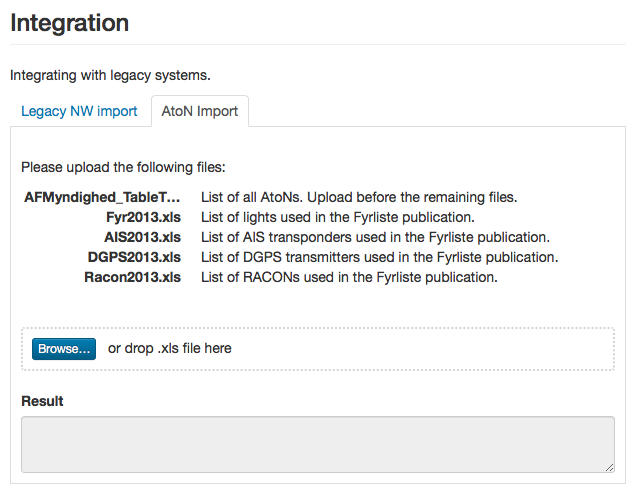
Please note, the AtoNs Niord module is currently not enabled in production, since the quality of the AtoN data is not good enough. However, in the future it is hoped that a more extensive AtoN integration will be implemented.
15. Settings
The Settings page allows a system administrator to manage system settings in Niord.
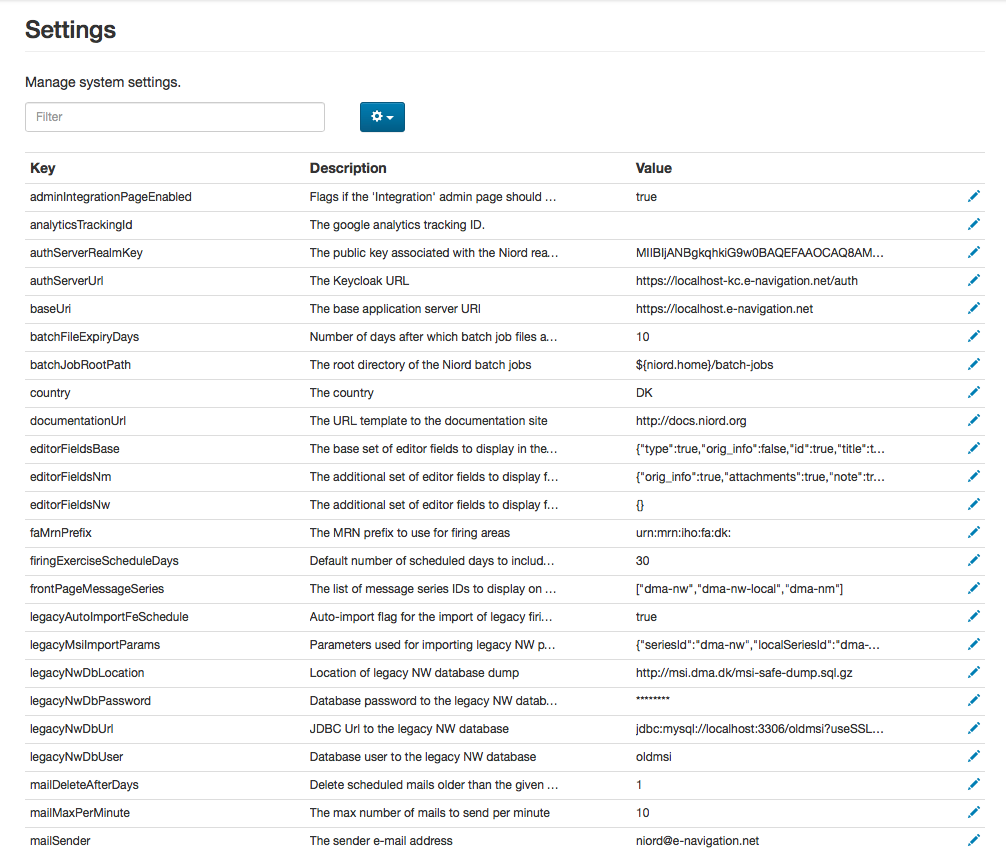
Settings are ultimately persisted to the database, and this is the incarnation of the settings that you get to view and modify on the Settings page.
However, the settings originate from various sources before being persisted to the database. These options are detailed later in this chapter.
15.1. Settings Model
A setting in Niord is more that just a key-value pair. It is comprised of the following attributes:
[ cols="20,80", options="header" ]
Setting Attribute |
Description |
Key |
A unique key for the setting. |
Value |
The value of the setting. The format of the value depends on the type of the setting. |
Type |
The type of a setting can be one of "String", "Password", "Integer", "Long", "Float", "Double", "Date", "Boolean", "Path" and "json". |
Description |
A textual description of the setting. |
Cached |
Dictates if the setting may be cached (for a few minutes) in Niord. This reduces load on the database. |
Web |
If this flag is set, the setting is passed along to the Niord web-application via a JavaScript file, and becomes available to the Angular code as a $rootScope variable. |
Editable |
If this flag is set, the setting is editable and included in the settings list on the Settings page. |
Note that for settings of type "Password", the associated value never leaves the Niord backend. If the Editable flag is set, the sysadmin can set a new password on the Settings page, but she can never view the old password.
15.2. Settings from niord.json
Whenever Niord starts up, it will look for a "niord.json" file in Niords home folder (itself controlled with a settings).
Example:
[
  {
    "key"         : "baseUri",
    "description" : "The base app URI",
    "value"       : "https://niord.e-navigation.net",
    "web"         : false,
    "editable"    : true
  },
  {
    "key"         : "authServerUrl",
    "description" : "The Keycloak URL",
    "value"       : "https://niord-keycloak.e-navigation.net/auth",
    "web"         : false,
    "editable"    : true
  },
  ...
]
15.3. Settings from Environment Variables
When the Niord app starts up, settings may be instantiated using environment variables.
Example: In order to specify the "niord.home" system setting, instantiate the app with the argument "-Dniord.home=/home/enav/niord".
If settings are defined from environment variables, they are essentially read-only. A sysadmin cannot override these settings on the Settings page.
15.4. Settings from Code
Settings can also be defined and instantiated with default values directly in Niord java code.
Example:
public class RepositoryService {

    @Inject
    @Setting(value="repoRootPath", defaultValue="${niord.home}/repo",
             description="The root directory of the Niord repository")
    Path repoRoot;

    @Inject
    @Setting(value="repoCacheTimeout", defaultValue="5",
             description="Cache timeout of repo files in minutes", type=Type.Integer)
    Integer cacheTimeout;

    ...
}
15.5. Editing a System Setting
The sysadmin can edit a system setting by clicking the pencil symbol next to the setting.
This will open the Setting Editor Page:
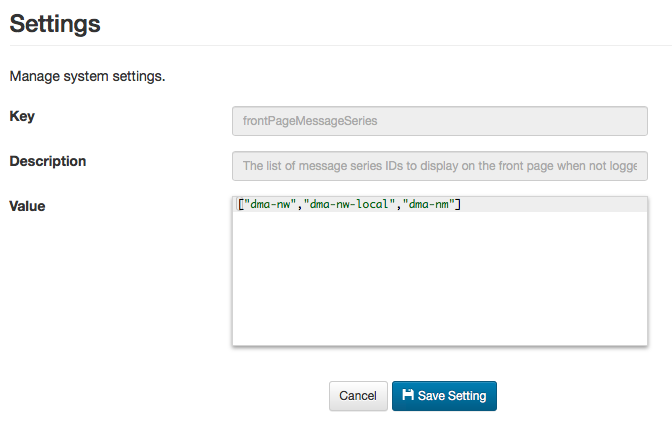
The only setting attribute that can be edited is the value of the setting. The editor widget used for editing the value depends on the type of the setting, with checkboxes used for "boolean" settings, a date picker used for settings of type "Date", etc.
15.6. Importing and Exporting Settings
The system administrator can export and import system settings from the action menu.
The export/import file format is based on a JSON representation of the SettingVo class.
Example:
[
  {
    "description": "The Keycloak URL",
    "key": "authServerUrl",
    "type": "String",
    "value": "https://localhost-kc.e-navigation.net/auth"
  },
  {
    "description": "The base app URI",
    "key": "baseUri",
    "type": "String",
    "value": "https://localhost.e-navigation.net"
  },
  ...
]
Importing a settings JSON file will trigger the settings-import batch job. Batch jobs can be monitored and managed by system administrators.
As an alternative to manually uploading a settings import JSON file on the Settings sysadmin page, the file can be copied to the $NIORD_HOME/batch-jobs/settings-import/in folder.
16. Batch Jobs
The Batch Jobs page allows a system administrator to monitor batch jobs executed in Niord.
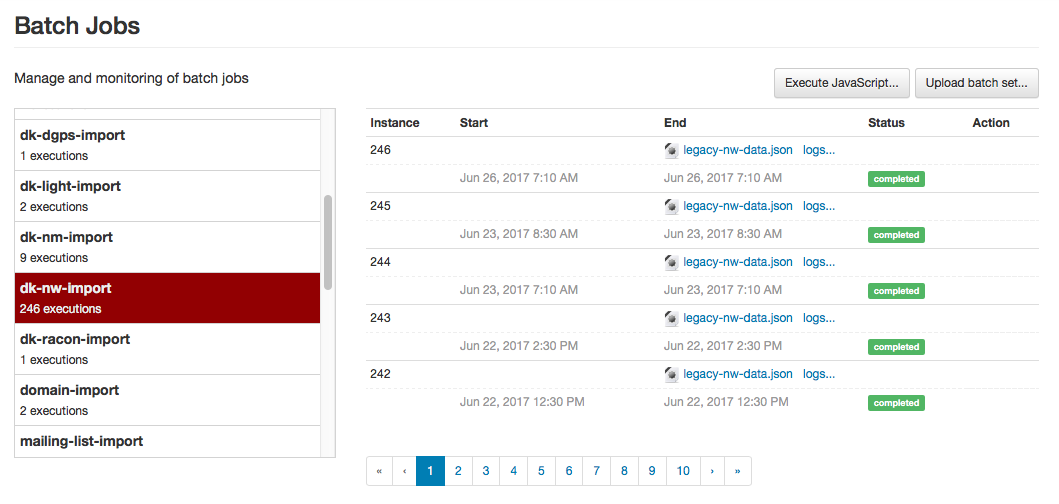
Batch jobs play an extremely important role in Niord. Almost all types of Niord data, e.g. areas, charts, categories, dictionaries, messages, etc., can be imported using batch jobs.
The list in the left side of the Batch Jobs page, lists all the batch job types that have been executed in Niord, and for each batch job type, the number of executions.
16.1. Batch Job Execution
Batch Jobs can either be executed from the UI (e.g. by uploading an AtoN Excel file from Danish [Integration] sysadmin page), or by copying the same file to a batch job folder on the Niord server.
The path to the batch job file system folder is: $NIORD_HOME/batch-jobs/batch-job-type/in. The screenshot below shows the batch job folder structure, with the folders of the "dk-aton-import" batch job fully expanded:
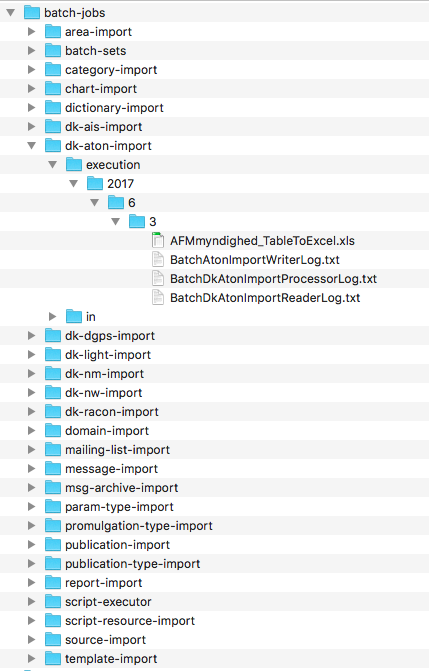
When the batch job is executed, the batch job file is copied to the "execution" sub-folder with the format $NIORD_HOME/batch-jobs/batch-job-type/execution/year/month/execution-no, along with the log files produced whilst executing the batch job.
The batch job architecture in Niord is implemented using the Java EE 7.0 Batch Processing Architecture - please refer to http://www.oracle.com/technetwork/articles/java/batch-1965499.html. This means that the batch jobs are typically divided into three sub-tasks for reading, processing and writing data, each producing their own log file in the execution folder.
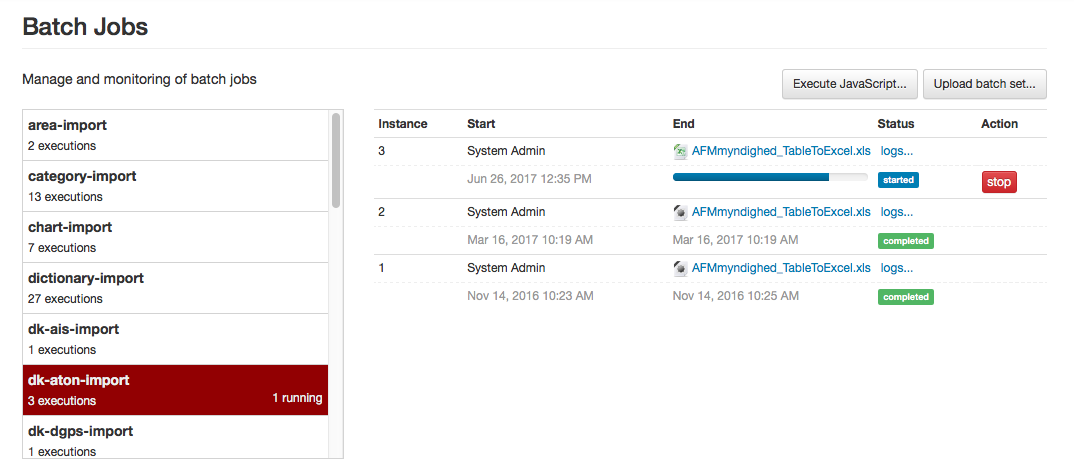
Also, each batch job processes a certain batch job-specific number of records in each transaction, which means that the batch job can be stopped during execution, restarted or abandoned.
As an example, the "dk-aton-import", which is a fairly long-running batch job, will first have the "started" status, and appear with a progress indicator on the Batch Jobs page:
If the batch job fails during execution, if will stop executing, and enter the "failed" status. Similarly, if the user clicks the "Stop" button, it will enter the "stopped" status:
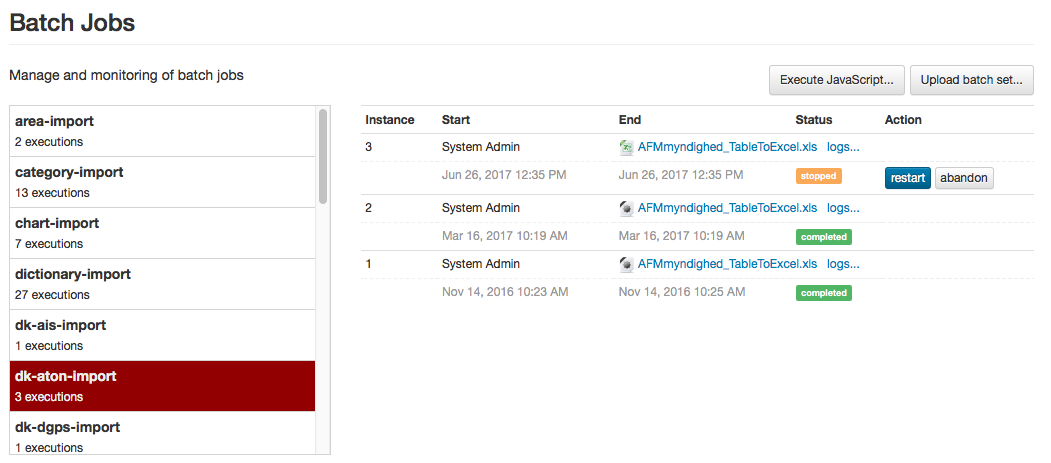
All database transactions will be rolled back to the last successful commit before the batch job failed or was stopped. The system administrator can now click the "Abandon" button to completely abandon the batch job, or she can click "Restart" to attempt to restart the batch job. If the batch job failed, the sysadmin may e.g. attempt to update the batch job file to fix the problem causing it to fail, and then restart.
The sysadmin can also inspect the log files generated by the sub-tasks of the batch job, by clicking the "logs…" link, which opens the Batch Job Logs dialog:
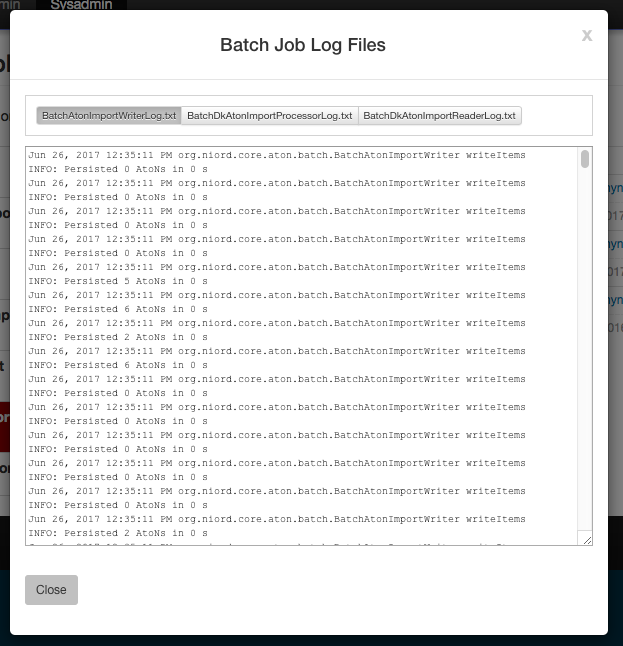
All associated log files are listed in the top part of the dialog, and the contents of a log file can be inspected by clicking on the associated log file name.
16.2. Batch Sets
The "Upload Batch Set" button in the top-right part of the Batch Jobs page, allows the system administrator to upload a zip-archive containing multiple batch job files.
The zip archive must also contain a special file, batch-set.json, which enlists and schedules all included batch jobs.
Example:
[
  {
    "jobName": "domain-import",
    "fileName": "domains.json",
    "delay": 2000
  },
  {
    "jobName": "dictionary-import",
    "fileName": "aton-dict.json",
    "delay": 2100
  },
  {
    "jobName": "chart-import",
    "fileName": "charts.json",
    "delay": 5000
  },
  {
    "jobName": "area-import",
    "fileName": "areas.json",
    "delay": 5100
  },
  ...
]
The scheduling mechanism (i.e. the "delay" attribute), can be used for handling inter-dependencies between imported data. If e.g. the areas.json file depends on the presence of the domains defined in the domains.json file, they can be scheduled as seen in the example above.
16.3. Batch Job Clean-Up
In order to avoid getting the Niord file system filled up with batch job execution files and folders, old files and folders will automatically be deleted after a certain amount of time, as dictated by the "batchFileExpiryDays" system setting.
17. Mailing Lists
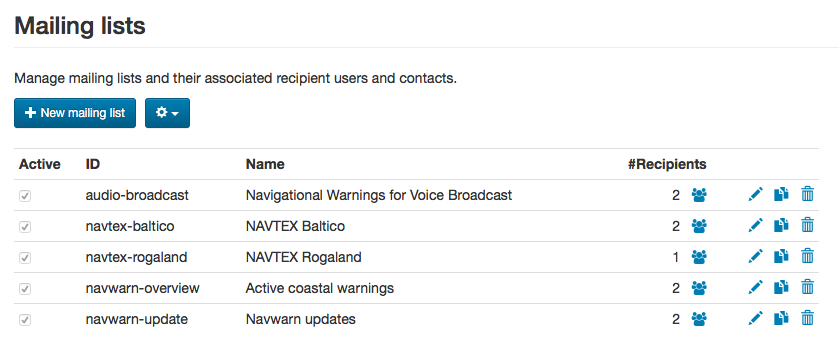
The Mailing Lists page allows a system administrator to manage the mailing lists of Niord.
| The Mailing Lists page is actually placed under the Admin main menu page. This is because mere administrators can manage mailing list subscriptions, but not create or modify the mailing lists themselves. Hence, mailing list subscription is detailed in the Mailing Lists chapter of the administrator manual. |
When a system administrator accesses the Mailing Lists page, it has the following functionality:
17.1. Managing Mailing List Recipients
As mentioned above, subscription of the mailing lists is detailed in the Mailing Lists chapter of the administrator manual.
17.2. Adding or Editing a Mailing List
The sysadmin can add a new mailing list by clicking the "New mailing list" button, or edit an existing mailing list by clicking the pencil symbol next to the mailing list.
This will open the Mailing List Edit Page:
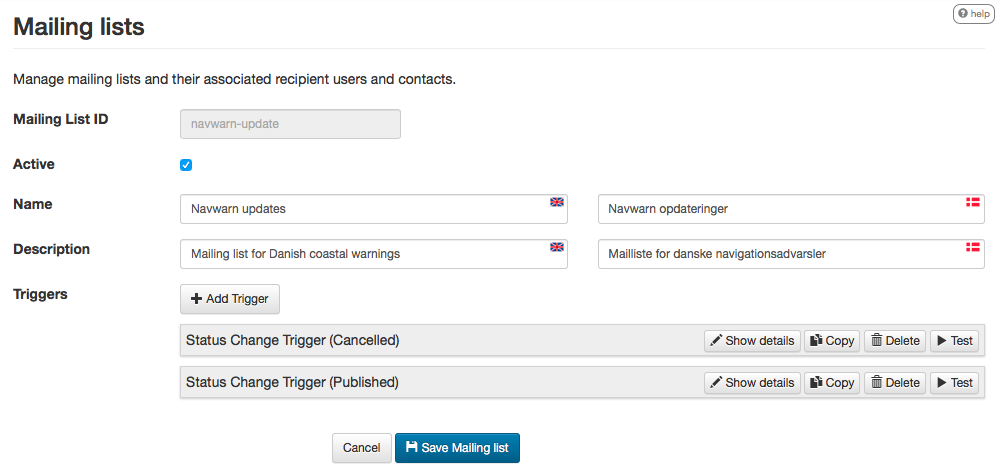
The basic mailing list attributes:
[ cols="30,70", options="header" ]
Mailing List Attribute |
Description |
Mailing List ID |
A unique ID for the mailing list. |
Active |
Only active mailing lists will actually execute and send out mails. |
Name |
A human readable name of the mailing list in all supported languages. |
Description |
A human readable description of the mailing list in all supported languages. |
Mailing list triggers are described separately below.
17.2.1. Mailing List Triggers
Mailing lists should be associated with one or more mailing list triggers. The triggers define the criteria that will cause the mailing list to execute, and they define the format of the actual mails.
A new trigger is added by clicking the "Add Trigger" button. Similarly, a trigger is edited by clicking the "Show Details" button in the trigger bar, and deleted again by clicking the "Delete" button.
The common trigger attributes are:
[ cols="30,70", options="header" ]
Trigger Attribute |
Description |
Trigger Type |
A trigger can either be a Scheduled Triggers or a Status Change Triggers. These types are described in more detail below. |
Mail Subject |
The subject used for the mails being sent in all supported languages. Each subject field has a checkbox to enable or disable that particular language variant. The subject can contain replacement tokens such as "${short-id}" and "${number-year-id}" (for status driven - i.e. single message - mails). |
Mail Body |
The list of script resources used for generating the mail HTML body. Typically, this will be a single Freemarker template. However, the list might also contain a JavaScript for looking up additional data used in the mail. |
Scheduled Triggers
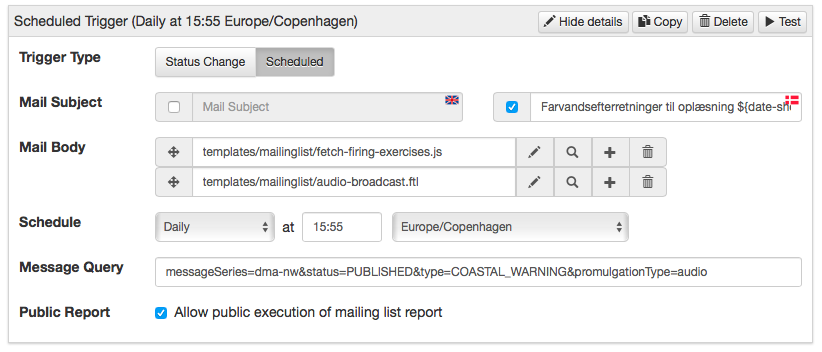
The scheduled triggers will execute periodically, and base their generated mails on a list of messages matching a certain message query.
[ cols="30,70", options="header" ]
Trigger Attribute |
Description |
Schedule |
The schedule for when a trigger is executed. Either daily or a specific weekday, at a certain time. |
Message Query |
The Message Query will be used as a filter for the list of messages passed along as data to the script resources. The example above will fetch all published coastal navigational warnings of the "dma-nw" message series, that also have an associated "audio" promulgation. |
Public Report |
If this option is checked the mailing list trigger can also be executed (with no mails generated) as a report in the action menu of the Messages page - please refer to the Report Action chapter. |
Status Change Triggers
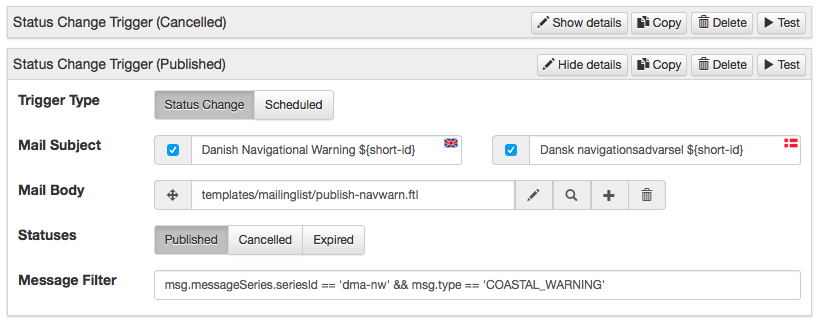
The status change triggers will execute whenever a message changes status in Niord, and if the updated message matches the specified status and filter, it will cause the mailing list to send mails.
[ cols="30,70", options="header" ]
Trigger Attribute |
Description |
Statuses |
The new status of the messages that will cause the trigger to execute. |
Message Filter |
The Message Filter defines an additional filter that the message must match, before the trigger executes. The filter is strictly speaking a server-side JavaScript expression. The example above will match coastal navigational warnings that are published and whose message series is "dma-nw". |
17.2.2. Testing Triggers
All mailing list triggers can be tested by clicking the "Test" button in the trigger bar. This opens the Test Trigger Execution dialog:
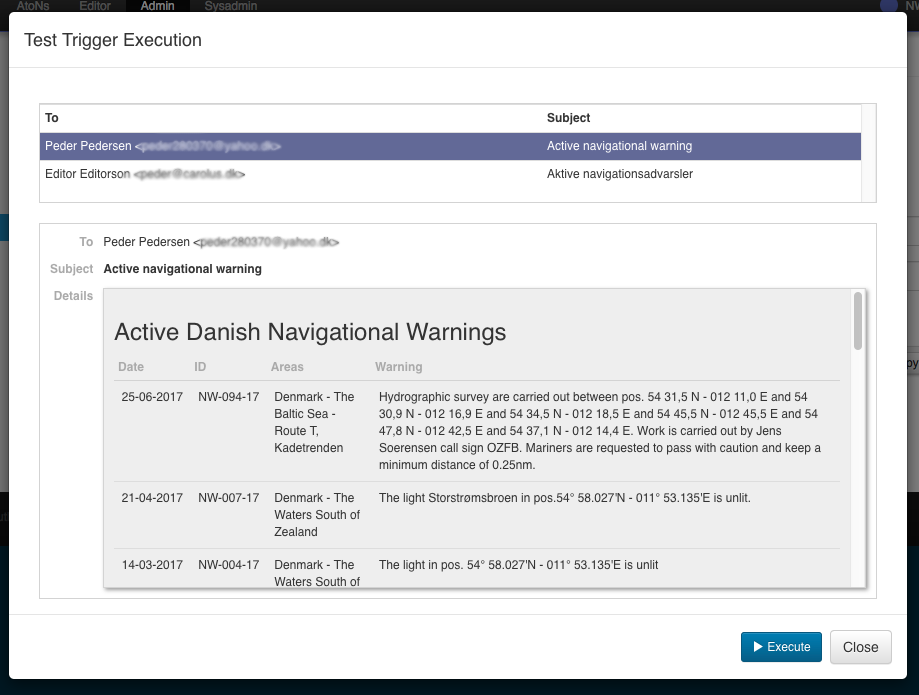
For status-change triggers, the system administrator must also specify the short ID of the message to test the trigger with.
Upon clicking the "Execute" button, the mailing list trigger will be executed, but no mails are actually sent out. Instead the dialog will list all generated mails, and, upon selecting one of these mails, the contents will be displayed in the dialog.
17.3. Deleting a Mailing List
A mailing list can be deleted by clicking the trash icon next to them.
As an alternative, the system administrator can choose to in-activate the mailing list.
17.4. Importing and Exporting Mailing List
The system administrator can export and import mailing lists from the action menu.
The export/import file format is based on a JSON representation of the MailingListVo class.
Example:
[
  {
    "mailingListId": "audio-broadcast",
    "active": false,
    "descs": [
      {
        "lang": "da",
        "name": "Farvandsefterretninger til oplæsning",
        "description": "Farvandsefterretninger og skydeøvelser til oplæsning på DR"
      },
      {
        "lang": "en",
        "name": "Navigational Warnings for Voice Broadcast",
        "description": "Navigational Warnings and Firing Exercises for voice broadcast on Danish Radio"
      }
    ],
    "triggers": [
      {
        "type": "SCHEDULED",
        "scheduleType": "DAILY",
        "scheduledExecutionTime":"15:55",
        "scheduledExecutionTimeZone":"Europe/Copenhagen",
        "messageQuery": "messageSeries=dma-nw&messageSeries=dma-nw-local&status=PUBLISHED&promulgationType=audio",
        "scriptResourcePaths": [
          "templates/mailinglist/fetch-firing-exercises.js",
          "templates/mailinglist/audio-broadcast.ftl"
        ],
        "descs": [
          {
            "lang": "da",
            "subject": "Farvandsefterretninger til oplæsning ${date-short}"
          }
        ]
      }
    ]
  },
  ...
]
Importing a mailing list JSON file will trigger the mailing-list-import batch job. Batch jobs can be monitored and managed by system administrators.
As an alternative to manually uploading a mailing list import JSON file on the Mailing Lists sysadmin page, the file can be copied to the $NIORD_HOME/batch-jobs/mailing-list-import/in folder.
18. Keycloak Integration
Keycloak is an open source identity and access management middleware product, which is documented in detail at the Keycloak website.
In general, once Niord has been set up and configured, there is hardly any need for administrators to use Keycloak directly.
Keycloak has been integrated tightly with Niord in the manner detailed below. The reader should be somewhat familiar with Keycloak before reading this.
18.1. Niord Domains
Domains in Niord are detailed in the [Domains] chapter. For each domain in Niord, there will be bearer only application client in Keycloak.
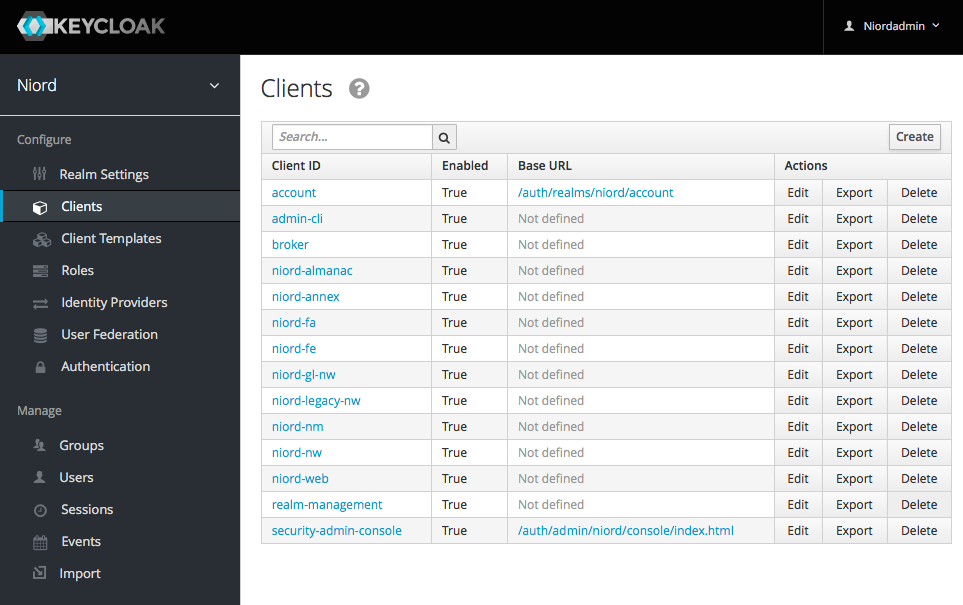
As an example, for the "NM" Niord domain, there is a corresponding "niord-nm" application client in Keycloak.
Also, there is a single public application client for the actual Niord web application.
18.1.1. Roles
As described in the [System Administrators Manual] chapter, a user may have either the User, Editor, Admin or Sysadmin role in each of the Niord domains.
These roles area really just application client roles in Keycloak:
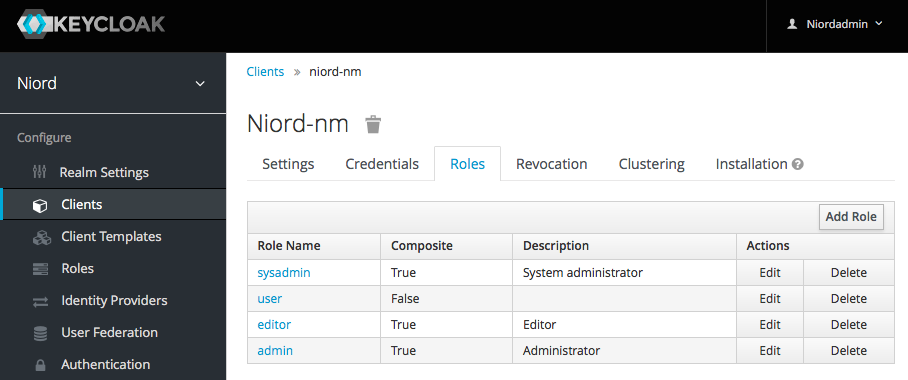
The roles are composite client roles, defined hierarchically, so that if a user has the Sysadmin role, she also automatically has the Admin role, if she has the Admin roles, she also automatically has the Editor role, and if she has the Editor role, she also automatically has the User role.
When a domain is created via the Niord UI, the corresponding application client, including the client roles mentioned above, are created automatically in Keycloak.
18.2. Niord Users
All users in Niord are created and maintained in Keycloak, although Niord also provides a UI for managing users on top of Keycloak, as detailed in the Users & Contacts chapter of the administrator guide.
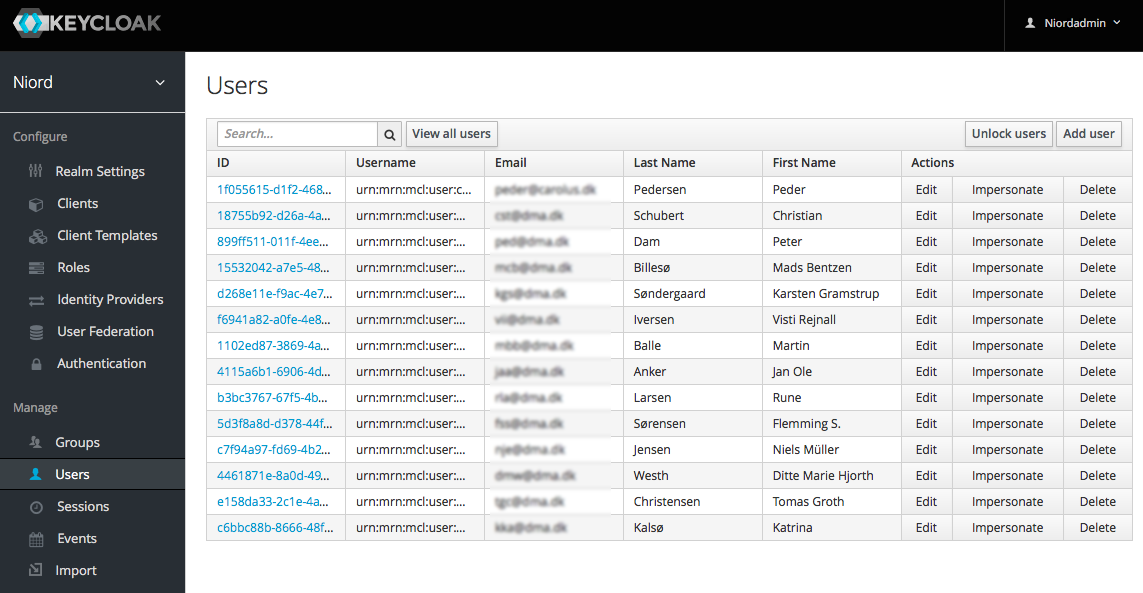
In turn, Keycloak may be configured to use other identity providers. For instance, in the set-up used by the Danish Maritime Authority (DMA), Keycloak is integrated with the DMA Active Directory Federation Service, and hence, the first time a DMA employee clicks the "DMA" link on the log-in page and logs in using her usual work credentials, she will automatically be created as a user in Keycloak.
Keycloak can also be integrated with other Keycloak services, Active Directory or other LDAP provides, etc.
18.2.1. User Groups
Instead of assigning domain roles (i.e. Keycloak application client roles) directly to users, which would be a tedious task, Niord instead rely on Keycloak Groups.
As an example, at the Danish Maritime Authority, the following user groups are defined, at the time of writing:
-
Sysadmin: Members of the "Sysadmin" user group will have the Sysadmin role in all domains.
-
Admins: Members of the "Admins" user group will have the Admin role in all domains.
-
Editors: Members of the "Editor" user group will have the Editor role in the "NW", "NM", "Firing Areas", "NM Almanac", "NM Annex" and "NW Greenland" domains.
-
Case Officers: Members of the "Case Officers" user group will have the User role the "NW", "NM", "Firing Areas", "NM Almanac", "NM Annex" and "NW Greenland" domains.
-
FE Editors: Members of the "FE Editors" user group will have the Editor role in the "Firing Areas" domain.
These groups are defined and maintained in Keycloak:
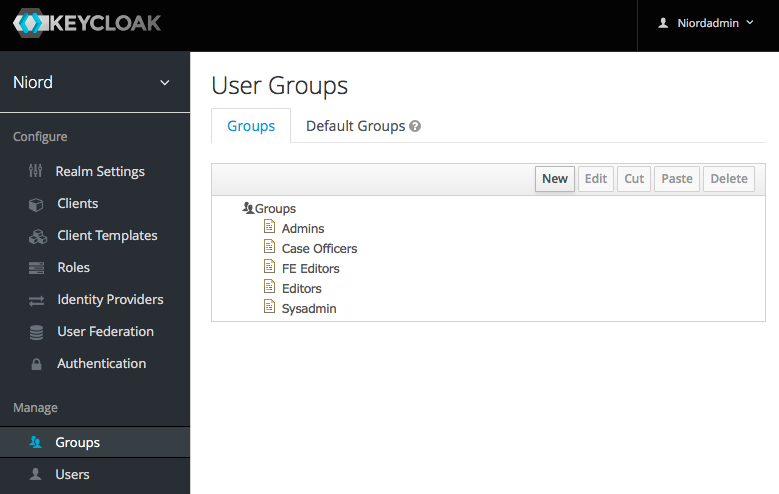
For each group, the relevant domain roles are assigned, as in the example below, where the "Editors" group is assigned the "editor" role of the "niord-nm" application client (i.e. "NM" domain):

Groups are created and maintained quite rarely. However, assigning users to groups is a common everyday task for administrators. Hence, Niord provides a simplified UI for this task, as detailed in the Managing User Group Memebership chapter.
18.3. User-Specific Editor-Fields
The list of editor fields being displayed when a user edits a message in Niord is highly configurable. There are settings to define a base set of fields, a message main-type (NW,NM) specific set, plus the list can be customized depending on the message series, areas and categories assigned to the message.
It is also possible to customize the list of editor fields per user in Keycloak, or indeed, per user group.
Step 1 is for the system administrator to define two User Attribute Mappers for the "niord-web" application client; one for the "editorFieldsNw" token claim and one for the "editorFieldsNm" token claim. Example:
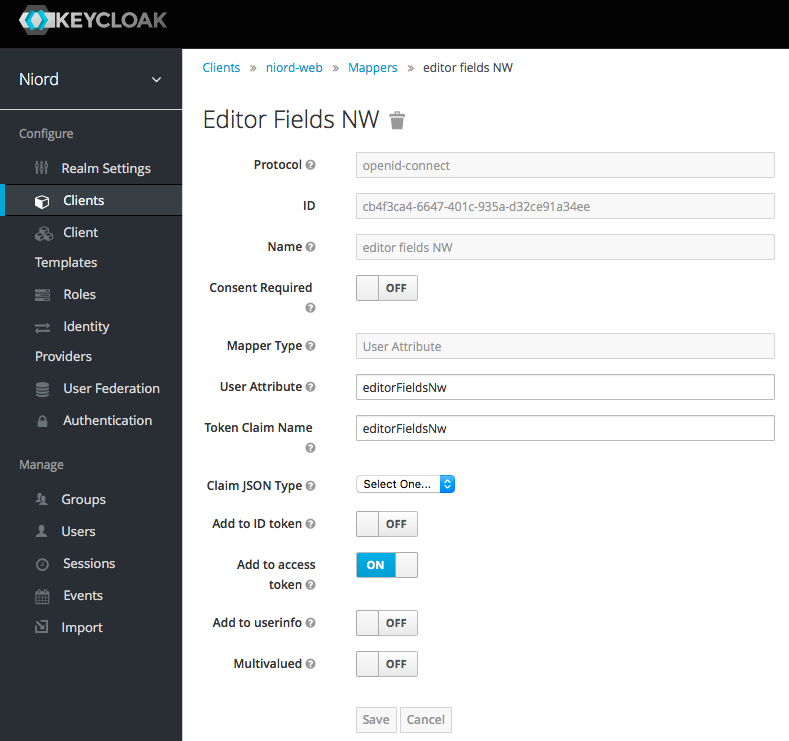
Step 2 is for the system administrator to assign the relevant "editorFieldsNw" and "editorFieldsNm" user attributes either directly to the user, or - more likely - to the relevant user groups. The format of the attribute values should be a JSON structure that enables and disables specific editor fields. Example:
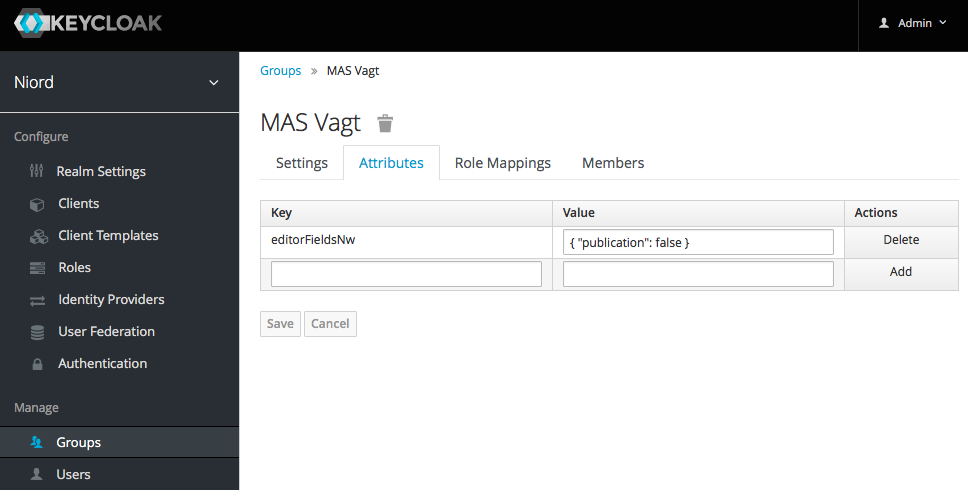
18.4. Niord Security
All access to the Niord backend happens via calls to REST endpoints. The obvious example is the actual Niord web application which makes Ajax calls to the Niord backend.
The Niord backend has been integrated with Keycloak, so that all calls to Niord resolves the roles of the callee in the context of the current domain (the current domain is specified via a request header).
Hence, access to Niord can be checked using standard Java EE security checks. See the (simplified) example below, where annotating a REST endpoint with "@RolesAllowed(Roles.ADMIN)" will validate that the user has the Admin role in the current domain, or throw an exception.
@PUT
@Path("/area/{areaId}")
@Consumes("application/json;charset=UTF-8")
@Produces("application/json;charset=UTF-8")
@RolesAllowed(Roles.ADMIN)
public SystemAreaVo updateArea(@PathParam("areaId") Integer areaId, SystemAreaVo areaVo) {
    Area area = new Area(areaVo);
    return areaService.updateAreaData(area).toVo(SystemAreaVo.class, DataFilter.get());
}