1. Introduction
Niord (Nautical Information Directory) is a system for producing and publishing Navigational Warnings (NW) and Notices to Mariners T&P (NM).
It was originally developed as part of the EfficienSea2 EU project and subsequently implemented as a production system for the Danish Maritime Authority.

This guide should be read by developers of Niord. It will use the Danish Niord system as a use case. The guide will cover topics, such as coding conventions, how to set up a development environment, etc.
1.1. Developer Profile
For the development process to be effective, the developer sshould preferably have a thorough knowledge of the following technologies:
-
Java 8
-
Java EE 7: Niord uses the entire Java EE 7 stack, specially EJB, JPA, JAX-RS, Servlets, Batch API, CDI, etc.
-
AngularJS + Bootstrap
-
MySQL
-
Docker
It would also be advantageous, if the developer has some knowledge of the following technologies:
-
OpenLayers
-
Wildfly 10
-
JBOSS Keycloak
-
Freemarker
-
Maven
-
Git(hub)
Furthermore, the actual Niord source code also has a certain learning curve.
1.2. Resources
The main GitHub repository for Niord is found at https://github.com/niordorg. For the developer, the main projects of the repository are.
| Projects | Description |
|---|---|
Main project for the Niord production system. |
|
Extensions for the Danish Niord production system. |
|
Simple end-user facing website that displays the active messages from the Niord production system. |
|
Extensions for the Ghanaian Niord production system (NB: separate repo). |
|
Resources for installing and configuring the middleware used by the Niord production system, i.e. MySQL, Wildfly and Keycloak. |
|
Scripts and configuration files for creating and pushing all Docker-containers needed for running a Niord production system. |
2. Java Coding Conventions
Niord is fairly consistent about using naming and coding conventions, and understanding these conventions makes it easier to read the code.
Each logical entity of Niord, such as an area, a chart, a message or a publication, is implemented using JPA entities, JSON-serializable value objects, business logic, REST interfaces, and batch import classes.
2.1. Area Example
As an example, consider the Area entity, which represents a specific area in the Areas tree. The classes used to implement areas, can be seen below:
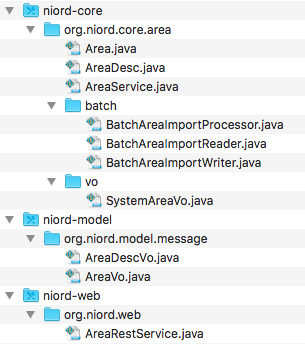
The classes are spread across three niord sub-projects:
| Projects | Description |
|---|---|
Contains the Niord Message Model. The message model is made up of
value objects. |
|
Contains the actual entity classes and business logic (session beans). |
|
Contains the JAX-RS REST interface used by clients (such as the Niord web application) to access the entities and execute business logic. |
2.1.1. Classes and Naming Conventions
| Classes | Description |
|---|---|
|
The Niord Message Model representation of an area. |
|
Contains a language code and all localizable attributes of |
|
The JPA entity definition of an area. |
|
The JPA entity definition of the area description entity, i.e. the localizable attributes of an area. |
|
When a system model entity, such as |
|
Each entity will have a companion stateless session bean or singleton EJB, with a |
|
Many of the Niord model entities have an associated batch job for importing the entities. |
|
Each Niord entity will also be associated with a JAX-RS REST interface. |
2.2. Localization
Almost all entities in Niord are localizable to any number of languages.
As can be seen from the Niord Message Model, this is implemented by
associating an entity with a list of classes that contain a language code
and all localizable attributes.
Area contains one localizable attributes; name:
public class AreaVo implements ILocalizable<AreaDescVo>, IJsonSerializable {
    List<AreaDescVo> descs;
}

public class AreaDescVo implements ILocalizedDesc, IJsonSerializable {
    String lang;
    String name;
}
2.3. Serialization and De-serialization
All Niord entities have methods for converting to and fro their value object representation.
In the simplest form, the JPA entity model will define a constructor that takes the value object
representation as a parameter, and it will have a toVo() function that returns the value object
representation of the entity. Example:
@Entity
public class Domain extends BaseEntity<Integer> {
    public Domain() {}
    public Domain(DomainVo domain) {
        // Instantiate entity from value object
    }
    public DomainVo toVo() {
        // instantiate and return a value object from entity
    }
}
Sometimes, however, things are a little more complex, as is the case for Area.
Area has two value object representations, AreaVo and SystemAreaVo.
When, say, a public REST API call returns a message with an associated area, then the AreaVo should be
returned. If, however, a system administrator edits an area via the Niord webapp, then the SystemAreaVo
representation should be used.
So, Area.toVo() actually takes the target value object class as a parameter, and leave it to the
REST service to decide which representation to use.
Another complexity in serializing an entity to its value object, is that often you wish to exact
control over which fields to return.
One example is language control. Most of the REST API calls will only return the localizable entities
(e.g. AreaDescVo) for the requested language. This preserves bandwidth and makes client code simpler.
Another good example is control over the hierarchical relationship of Areas.
When a message with an associated area (say, "Kattegat") is returned from a REST call, then you want
the parent relationship of areas to be included ("Kattegat" should include a parent-reference
to "Denmark). Alternatively, when editing the area tree on the Areas admin page, then you want
the REST call to return root areas with their children relationship.
To facilitate this type of serialization control, Niord use a DataFilter helper class, which
defines the fields and language to include. To control the serialization of an entire tree of
related entities, the fields can be prefixed with the entity name, as seen in the example below:
DataFilter filter = DataFilter.get()
    .fields("Message.details", "Message.geometry", "Area.parent", "Category.parent")
    .lang("en");
Hence, the resulting serialization code for Area will thus be:
@Entity
public class Area extends TreeBaseEntity<Area> implements ILocalizable<AreaDesc> {
    public Area() {}
    public Area(AreaVo area, DataFilter filter) {
        // Instantiate entity from value object
    }
    public <A extends AreaVo> A toVo(Class<A> clz, DataFilter filter) {
        // instantiate and return a value object from entity
    }
}
3. Webapp Coding Conventions
The other big chunk of code in Niord is the AngularJS and JavaScript-based web application.
3.1. Organization of Angular Sources
The web application is organized as follows:
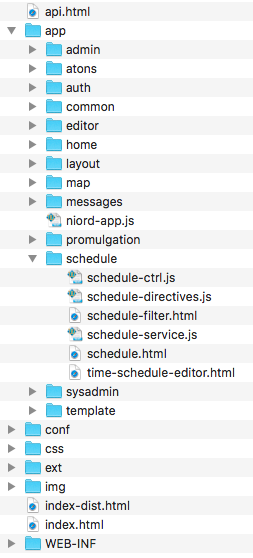
All source files developed as part of Niord, is placed in the app folder. All external dependencies, such as third-party AngularJS directives, are placed in the ext folder.
Under app, the angular sources, such as directives, controllers, services and partials (html), are primarily organized by main page. So, all sources for the Messages page are in the messages folder, etc.
3.2. Application Cache
The Niord web application use various HTML 5 features, such as Local Storage and Application Cache. The Application Cache in particular, makes day-to-day use of Niord substantially faster for end users.
| Application Cache has supposedly been deprecated, and is to be replaced with a Service Workers mechanism. However, Service Workers are not yet supported by Safari (read: iOS). |
The niord-web project can be built using the "dist" profile:
cd niord-web
mvn -P dist clean install
This will perform the following modifications to the resulting war file:
-
All Niord CSS and JavaScript files will be merged into single files.
-
An HTML5 Application Cache manifest file is generated to facilitate caching.
3.3. Overlay Wars
Another mightily important feature used by Niord, is the web-application overlay mechanism.
In reality, the Niord project would not be used in production by itself. Rather, developers would create a country-specific version (such as niord-dk for Denmark, or niord-gh for Ghana) with all the customizations and legacy integration needed for that particular country.
The main trick is to create a web application that functions as an overlay of the Niord web application. This allows the developer to selectively replace individual files, such as AngularJS files, CSS files, resource bundles, etc.
The pom.xml file of the new web application, should define the overlay as:
<plugin>
    <groupId>org.apache.maven.plugins</groupId>
    <artifactId>maven-war-plugin</artifactId>
    <version>2.4</version>
    <configuration>
        <workDirectory>target/overlay</workDirectory>
        <overlays>
            <overlay>
                <groupId>org.niord</groupId>
                <artifactId>niord-web</artifactId>
            </overlay>
        </overlays>
    </configuration>
</plugin>
4. Niord Development Set-Up
As described in the Overlay Wars section, a concrete implementation of the Niord system will almost always involve a country-specific customized project, such as the niord-dk project for Denmark, or the niord-gh project for Ghana.
The development setup described in this section will be based on niord-dk.
The niord-appsrv project contains scripts for setting up Wildfly, Keycloak, etc. However, the easiest way to get started developing on the Niord project is to use Docker for the databases and Keycloak. This is the set-up described below.
4.1. Prerequisites
-
Java 8+
-
Maven
-
Docker
-
Docker Compose
The set-up described in this section assumes that you are using Linux / MacOS X. If you are using Windows, you will probably need to adjust the various commands and scripts accordingly. Consider using Git Bash for the easiest migration.
4.2. Check out Niord Projects
As mentioned, the development set-up used in this document is based on the Danish Niord project.
Either use your favorite IDE (assume IntelliJ) to check out the niord and niord-dk projects, or check them out from the command line:
git clone https://github.com/NiordOrg/niord.git
cd niord
mvn clean install
cd ..
git clone https://github.com/NiordOrg/niord-dk.git
cd niord-dk
mvn clean install
The rest of the section will assume that you are working in the niord-dk directory.
Import the niord-dk project in IntelliJ via its pom.xml. Under the "Maven Projects" also import the parent niord project. This will allow you to work and debug both code-bases from within IntelliJ.
The first time around, IntelliJ may have created a new unversioned directory, niord-dk-web/overlays. Just delete it and build again.
4.3. Starting MySQL and Keycloak
Make sure your working directory is niord-dk.
You may want to start by creating a .env file in your working directory, which overrides the environment variables (such as database passwords) used in the docker compose file.
The following commands will start two MySQL databases, one for the application server and one for Keycloak, and also run Keycloak itself.
mkdir $HOME/.niord-dk
docker-compose -f dev/docker-dev-compose.yml pull
docker-compose -f dev/docker-dev-compose.yml up -d
The initial mkdir command is just to avoid permission problems since docker would otherwise create it as owned by root.
Once this is up and running, create a Keycloak admin user (default niordadmin/keycloak) which can be used to create user groups and assign domain roles to the groups:
./dev/keycloak-admin-user.sh
Enter http://localhost:8090/auth/ and check that you can log in using the Keycloak admin user.
4.4. Configuring Wildfly
Next, create and configure a Wildfly installation using:
./dev/install-wildfly.sh
Configure the Wildfly server in IntelliJ:
-
Firstly, you may want to right-click the wildfly-10.1.0-Final folder and mark the folder as excluded.
-
In Run → Edit configuration…, configure a new local JBoss server based on the Wilfly installation produced above.
-
Deploy "niord-dk-web:war exploded" to the server.
-
If you have only updated web resources, there is no need to re-deploy the web application. Use the "Update resources" function instead.
-
To get rid of superfluous IntelliJ code editor warnings, disable the "Declaration access can be weaker" and "Dangling Javadoc comment" inspections.
The Keycloak docker image creates an initial domain, "Master", and a Niord user, sysadmin/sysadmin, that should be used for the initial configuration of the system, whereupon they should be deleted.
Enter http://localhost:8080 and check that you can log in using the Niord sysadmin user.
4.5. Finishing touches
Import the Danish test base data into Niord:
./dev/install-base-data.sh
Within a minute or so, this will import domains, areas, categories, etc. needed to run the Niord-DK project. First clean up a bit:
-
In Niord, under Sysadmin → Domains, click the "Create in Keycloak" button for each of the imported domains. This will create the two domains in Keycloak.
-
In Keycloak, edit the "Sysadmin" user group. Under "Role Mappings", select the clients created for the imported domains one by one, and assign the "sysadmin" client roles to the group.
-
While in Keycloak, you may also want to define new user groups for editors and admins, and assign the appropriate client roles for the imported domains to the groups.
Additionally, for admin-related groups (who should be able to manage users in Niord), assign the "manage-clients" and "manage-users" client roles of the "realm-management" client to the groups. -
Delete the "Master" domain in Niord and the corresponding "niord-client-master" client in Keycloak.
-
Go through the configuration and settings of the Niord Sysadmin pages and adjust as appropriate.
5. Niord-Proxy Development Set-Up
The Niord-Proxy is a simple client-facing website that retrieves and renders messages from a Niord back-end server.
5.1. Prerequisites
-
Java 8+
-
Maven 3.x
When setting up the development environment for the Niord-Proxy, you need to point it to an existing Niord service, from where it will fetch data, i.e. the active messages and publications.
The set-up in this document will assume that you are running a development version of the Niord service, as described in the Niord Development Set-Up section.
5.2. Check out Niord-Proxy Project
Either use your favorite IDE (assume IntelliJ) to check out the niord-proxy project, or check it out from the command line:
git clone https://github.com/NiordOrg/niord-proxy.git
cd niord-proxy
Import the niord-proxy project in IntelliJ via its pom.xml.
5.3. Starting Niord-Proxy
The Niord Proxy can be run as an executable jar:
mvn clean install
java -Dswarm.http.port=9000 \
    -Dniord-proxy.executionMode=DEVELOPMENT \
    -Dniord-proxy.server=http://localhost:8080 \
    -Dniord-proxy.repoType=SHARED \
    -Dniord-proxy.repoRootPath=/Users/carolus/.niord-dk/repo \
    -Dniord-proxy.timeZone=Europe/Copenhagen \
    -Dniord-proxy.areas="urn:mrn:iho:country:dk|56|11|6,urn:mrn:iho:country:gl|70|-40|4,urn:mrn:iho:country:fo|62|-7|8" \
    -Dniord-proxy.analyticsTrackingId= \
    -jar target/niord-proxy-swarm.jar
An easier alternative is to run the org.niord.proxy.NiordProxyMain main class directly from your IDE
(e.g. IntelliJ). Use the same VM Options as for the executable jar above.
6. Niord Docker Containers
The previous sections described how to set up and configure a Niord development environment,
which relied Docker containers for running MySQL and Keycloak.
Docker containers is indeed a very flexible and convenient way of running Niord,
even in test and production.
This section will outline how to create and push docker containers for Niord. If you do not
rely on standard containers, please create your own Docker Hub at https://hub.docker.com, and
update the scripts and procedures accordingly.
In particular, you will need to create a Docker Hub repo for your own customized niord-appsrv.
The niord-docker repository contains a collection of bash scripts for creating and pushing docker containers, which may be used for inspiration.
6.1. Prerequisites
In order to build the projects and create docker containers, the following should be installed:
-
Java 8+
-
Maven
-
Docker
-
Docker Compose
The set-up described in this section assumes that you are using Linux / MacOS X. If you are using Windows, you will probably need to adjust the various commands and scripts accordingly. Consider using Git Bash for the easiest migration.
6.2. Checking out Projects
Assume that you have checked out the following projects, which is the Danish flavoured Niord system:
git clone https://github.com/NiordOrg/niord.git
git clone https://github.com/NiordOrg/niord-dk.git
git clone https://github.com/NiordOrg/niord-proxy.git
git clone https://github.com/NiordOrg/niord-docker.git
6.3. Building Projects
A standard update script could execute the following updates:
# Build niord project
cd niord
git pull
mvn clean install

# Build niord-dk project.
# NB: use the "dist" profile as this will merge JavaScripts and CSS files
#     into single files and enable support for HTML 5 App Cache.
cd ../niord-dk
git pull
mvn -P dist clean install

# Build niord-proxy project
cd ../niord-proxy
git pull
mvn clean install

# Update niord-docker
cd ../niord-docker
git pull
6.4. Creating Docker Containers
The example below demonstrates how to build some of the relevant docker containers. Create your own versions of the scripts which points to your own Docker Hub organization rather than dmadk.
# log in to dockerhub in order to push the images
docker login

# Build niord-appsrv docker image
cd niord-docker/02-niord-appsrv/
./build-niord-appsrv.sh build ../../niord-dk/niord-dk-web/target/niord-dk-web.war
./build-niord-appsrv.sh push

# Build niord-keycloak docker image
cd ../03-niord-keycloak/
./build-niord-keycloak.sh build
./build-niord-keycloak.sh push

# Build niord-proxy docker image
cd ../06-niord-proxy/
./build-niord-proxy.sh build ../../niord-proxy/target/niord-proxy-swarm.jar
./build-niord-proxy.sh push
6.5. Running a Complete Niord System
The following example will illustrate how to run a complete Niord system using Docker containers.
The example is based on the GhanaNautical.info project, which is a Ghana-flavoured version of Niord, since this is a very self-contained set-up where everything is created within a single Amazon WS account, ranging from an EC2 linux instance, the purchase of DNS names, generation of SSL certificates, configuration of mail accounts, SMTP, etc.
Setting up and configuring Amazon WS is beyond the scope of this manual, which will merely focus on how to run Niord as Docker-containers withing the Amazon WS infrastructure depicted below.
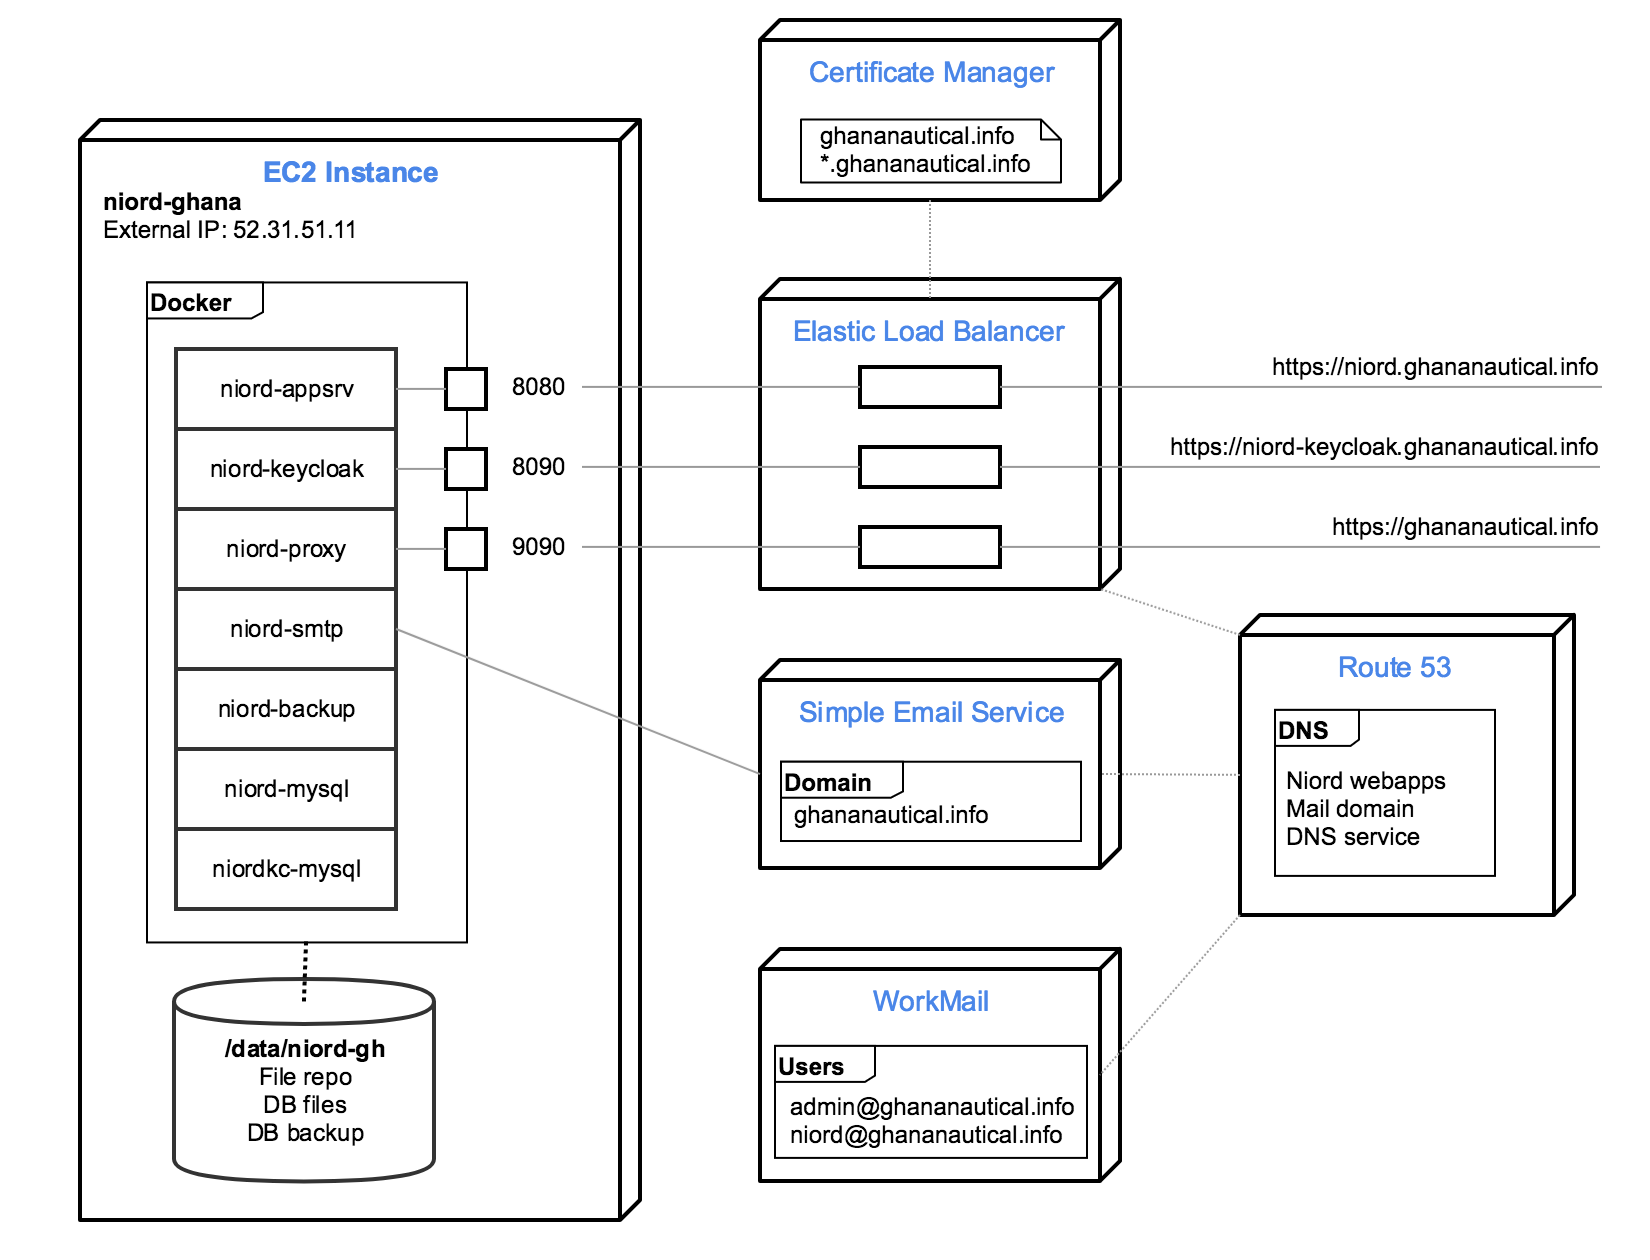
In this set-up the $NIORD_HOME directory is situated at /data/niord-gh. An initial bootstrapping
settings file should be created at /data/niord-gh/niord.json:
[
  {
    "key"         : "niord.home",
    "description" : "The root directory for the Niord application",
    "value"       : "/data/niord-gh",
    "web"         : false,
    "editable"    : true
  },
  {
    "key"         : "baseUri",
    "description" : "The base application server URI",
    "value"       : "https://niord.ghananautical.info",
    "web"         : false,
    "editable"    : true
  },
  {
    "key"         : "authServerUrl",
    "description" : "The Keycloak URL",
    "value"       : "https://niord-keycloak.ghananautical.info/auth",
    "web"         : false,
    "editable"    : true
  },
  {
    "key"         : "authServerSslRequired",
    "description" : "Either 'external', 'none' or 'all'",
    "value"       : "none",
    "web"         : false,
    "editable"    : true
 },
 {
    "key" : "mailSender",
    "description" : "The sender e-mail address",
    "value" : "niord@ghananautical.info",
    "web" : false,
    "editable" : true
 },
 {
    "key" : "mailValidRecipients",
    "description" : "Comma-separated list of valid mail recipients, or 'ALL' for all recipients, or 'LOG' for simulation",
    "value" : "ALL",
    "web" : false,
    "editable" : true
 }
]
Next, create a .env file in the working directory of the linux user. This should contain passwords
and settings for docker-compose:
NIORD_HOME=/data/niord-gh
MYSQL_ROOT_PASSWORD=TBD
KCDB_PASSWORD=TBD
NIORDDB_PASSWORD=TBD
AMAZON_SES_USER=TBD
AMAZON_SES_PASSWORD=TBD
PROXY_TRACKING_ID=TBD
Start the Niord system from the docker-compose file found in the niord-gh Github repository:
git clone https://github.com/GhanaNauticalnfo/niord-gh.git
docker-compose -f niord-gh/docker/docker-test-compose.yml pull
docker-compose -f niord-gh/docker/docker-test-compose.yml up -d
The first time the Niord system is started, add a Keycloak admin user, which can be used to create user groups and assign domain roles to the groups:
cd ~/niord-gh
./keycloak-admin-user.sh
Also, deploy the initial base data (charts, areas, domains, etc.) for the new installation:
zip -j /tmp/niord-basedata.zip ~/niord-gh/niord-gh-basedata/*.json
sudo mkdir -p /data/niord-gh/batch-jobs/batch-sets/
sudo mv /tmp/niord-basedata.zip /data/niord-gh/batch-jobs/batch-sets/
Within a minute or so, this will import domains, areas, categories, etc., needed to run the Niord Ghana project. First clean up a bit:
-
In Niord, under Sysadmin → Domains, click the "Create in Keycloak" button for the "NW" and "NM" domains. This will create the two domains in Keycloak.
-
In Keycloak, edit the "Sysadmin" user group. Under "Role Mappings", select first "niord-nw" then "niord-nm" and assign the "sysadmin" client roles to the group.
-
While in Keycloak, you may also want to define new user groups for editors and admins, and assign the appropriate client roles for "niord-nw" and "niord-nm" to the groups. Additionally, for admin-related groups (who should be able to manage users in Niord), assign the "manage-clients" and "manage-users" client roles of the "realm-management" client to the groups.
-
Delete the "Master" domain in Niord and the corresponding "niord-client-master" client in Keycloak.
-
Go through the configuration and settings of the Niord Sysadmin pages and adjust as appropriate.
Lastly, update the root crontab, using "sudo crontab -e", to call the niord-backup docker script periodically:
45 * * * * /usr/bin/docker exec niord-backup /hourly-backup.sh >> /data/niord-gh/backup/backup.log 2>&1
20 07 * * * /usr/bin/docker exec niord-backup /daily-backup.sh >> /data/niord-gh/backup/backup.log 2>&1