1. Introduction
Niord (Nautical Information Directory) is a system for producing and publishing Navigational Warnings (NW) and Notices to Mariners T&P (NM).
It was originally developed as part of the EfficienSea2 EU project and subsequently implemented as a production system for the Danish Maritime Authority.

Some of the main features of Niord area:
-
Niord provides an advanced and highly customizable production system for NW and NM T&P.
-
It includes a plug-in architecture for NW and NM message promulgation via e.g. mailing lists and Twitter.
-
Niord also integrates with the Maritime Cloud by defining a Maritime Cloud Service Specification and making NW & NM messages accessible via a Public REST API
-
The combined NW & NM message model adopted by Niord has been devised to make data future-compatible with the upcoming IHO S-124 specification.
2. Editors Manual
A user in Niord always works in the context of a current domain. Domains are used to separate NW & NM messages into more manageable lists - you could e.g. have a domain for NW messages, a domain for NM messages, a domain for firing exercises (also NWs), or indeed domains for separate regions with separate time-zones, etc.
A user has separate roles in each domain. The available roles are:
-
User: The user role can be assigned to e.g. case officers that should have access to see, proof-read and comment on un-published NW and NM messages.
-
Editor: Editors compose and manage the life cycle of an NW or NM message.
-
Admin: An administrator of a domain will have additional access to e.g. manage the base data (sea charts, publications, etc.) of the Niord system.
-
Sysadmin: A very special role that should be held only by the person(s) actually setting up and managing the Niord system.
The roles listed above are hierarchical in the sense that a sysadmin can do anything an admin can do, who in turn can do anything an editor can do, and so forth.
This document serves as a user manual for editors of a domain.
| Please use a newish Chrome, Safari or Firefox browser when using Niord. |
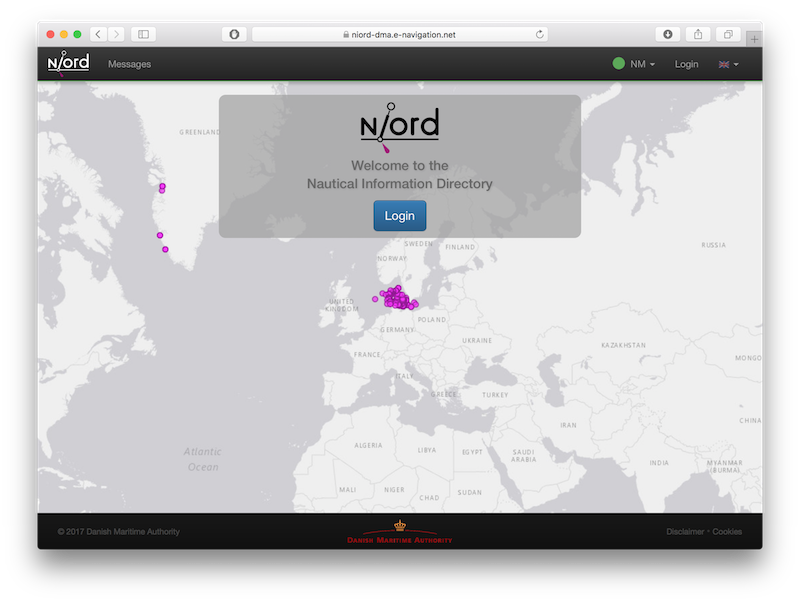
3. Home
The Home page of Niord is little more than a splash screen that displays a map with the list of in-force NW and NM messages of the currently selected domain.
The page shares its main menu (top) with all other pages. This chapter details the common functionality of the Niord system, such as log-in, domain and language selection; all accessible via the main menu.
3.1. Out-of-Date Warning
To provide a better user experience, Niord make use of the HTML 5 Application Cache to store a local copy of the Niord web application in the browser.
If Niord has been updated, and the locally cached version of the web application is out-of-date, the user will see the following error message on the Home page:
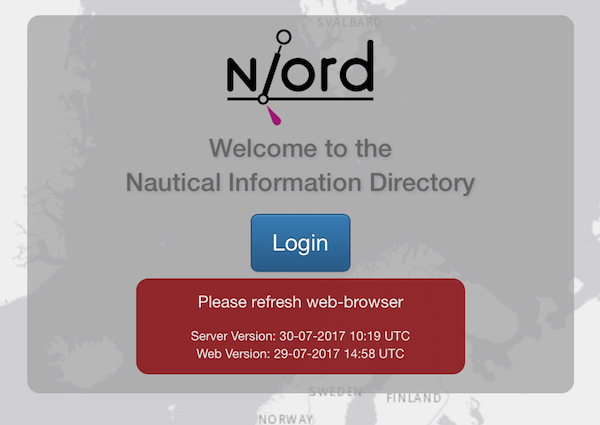
Depending on the type of web browser, the user should clear her local browser cache and reload the Niord website. In e.g. Chrome, use Ctrl-F5 and restart Chrome. In Firefox, you can remove the out-dated local copy under Preferences → Advanced → Network → Offline Web Content and User Data.
3.2. Login
Prior to logging in to Niord, the user should contact a Niord administrator to ensure that she is a registered user and has the proper roles assigned for the respective domains.
In order to log in, click the Login link of the main menu, or the Login button of the Home page.
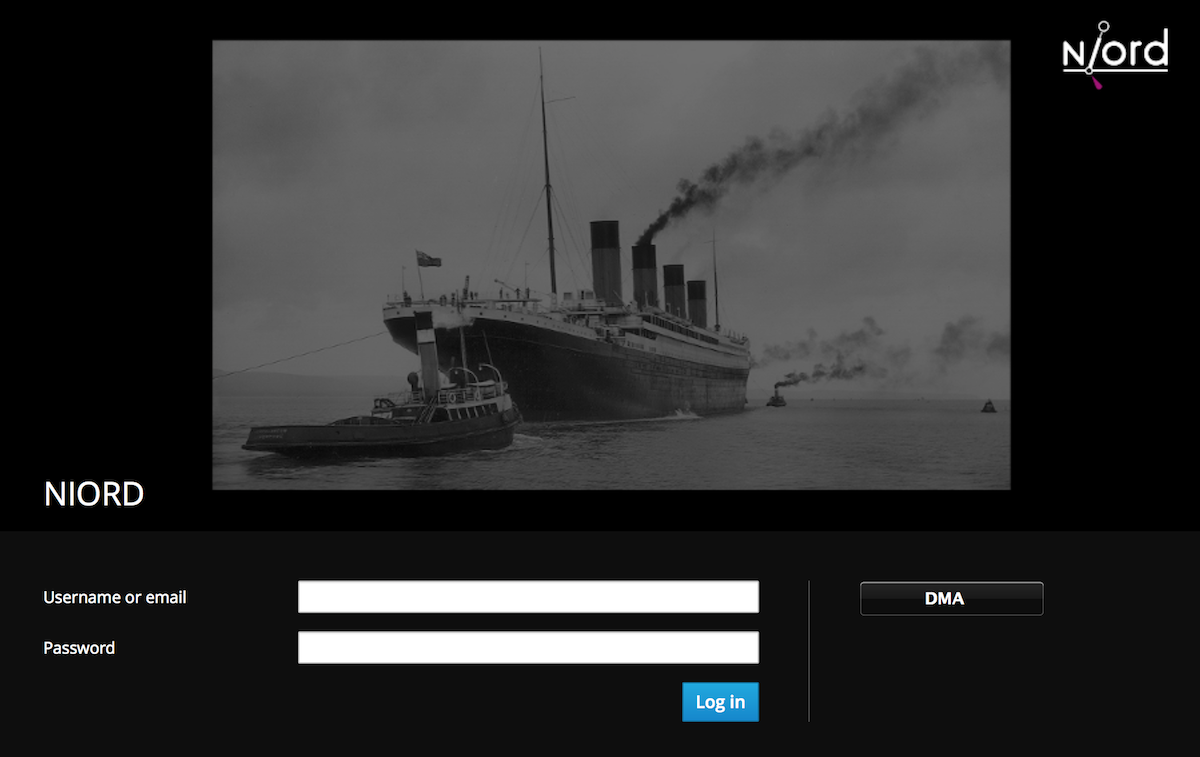
The actual login mechanism is configured by a Niord system administrator. The set-up used by the Danish Maritime Authority (DMA) is as follows:
-
When the user is an employee working within the DMA network (either in situ or via VPN), she can click the "DMA" button on the login page. Since Niord is integrated with the DMA ADFS, the user may then use the usual DMA work place credentials for authentication.
-
Outside the DMA network, or indeed for Niord users that are not DMA employees, the user can log in using a pre-assigned username and password. For added security, the user will subsequently be asked for a one-time code as provided by the Google Authenticator App on their mobile phone.
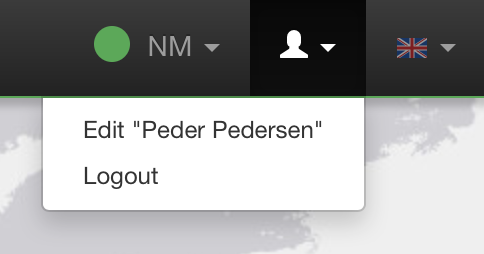
Once the user has successfully logged in, the main menu Login link will be replaced with a user menu, containing the options to log out and edit the user profile - including setting a new password.
3.3. Domain Selection
As described in the Editors Manual section, you always work within a current domain in Niord. The current domain is selected from the domain menu:

Next to each domain name, there is a symbol that indicates if the user can edit messages of that domain (pencil symbol), or only view public messages (eye symbol).
The current domain selection is stored in a cookie in the web-browser, and so, will also be the selected domain next time the user access Niord.
To make the current domain selection more visible to the user, each domain is assigned a colour that is displayed in the main menu (green for NM in this example).
3.4. Language Selection
Niord can be configured to support any number of website languages (i.e. the language used for menus, text and labels in the Niord website) and any number of NW-NM message model languages (i.e. the languages that the produced NW and NM messages include). Typically, however, a Niord system supports two languages; the local language and English.
The currently selected website language is selected from the Language menu:
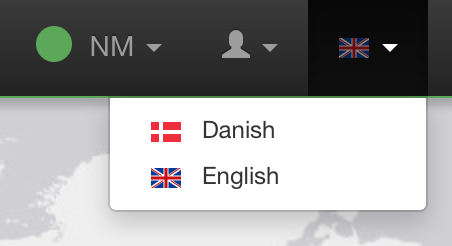
As with the current domain selection, the current language selection is stored in a cookie in the web-browser, and so, will also be the selected language next time the user access Niord.
4. Messages
The Messages page of Niord is always accessible via the main menu. It lists the NW and NM messages of the system according to the selected filter criteria, sorting and view mode.

4.1. View Modes
The current selection of messages can be displayed in four different view modes: Table, Grid, Details and Map, any of which may be selected in the Messages sub-menu.

4.1.1. Table View Mode
The default view mode is the Table view mode, where the filtered list of messages is presented in a compact table-like list. See example above.
The user can easily sort the message list by either message ID, date or area by clicking the respective column name in the header row. Click the same header name to toggle between ascending and descending sort order.
The date column can either display the publish dates, the event dates or the follow-up dates of the messages. Click the ellipsis in the header menu to switch between the date types.
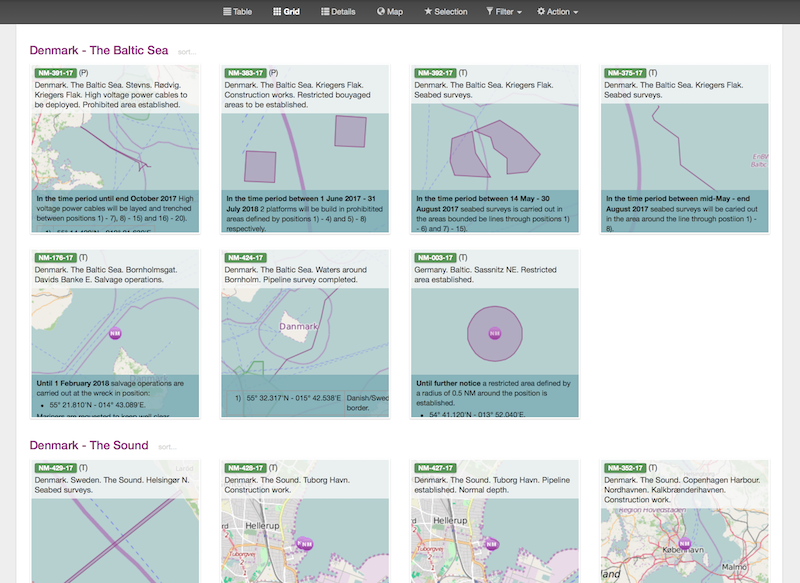
4.1.2. Grid View Mode
When selecting the Grid view mode, messages are listed in a semi-compact fashion with an auto-generated thumbnail image for each message.
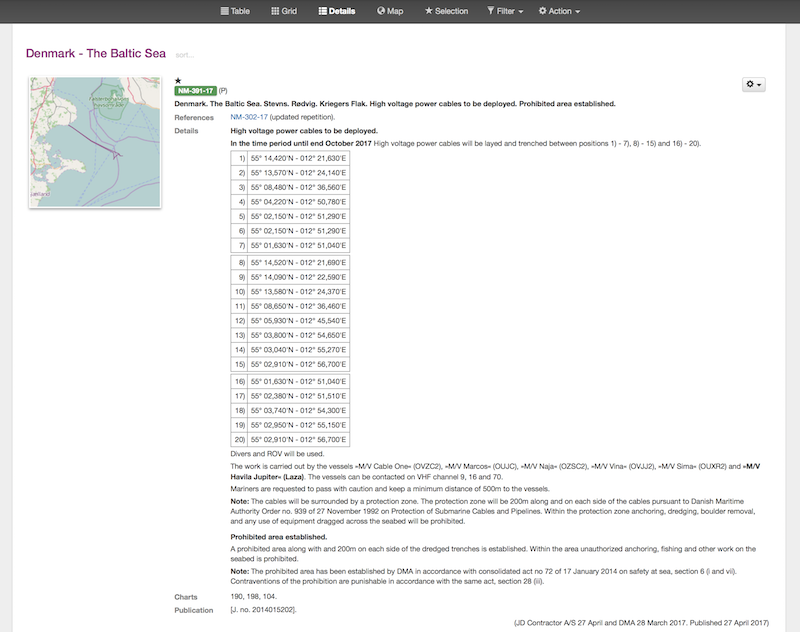
4.1.3. Details View Mode
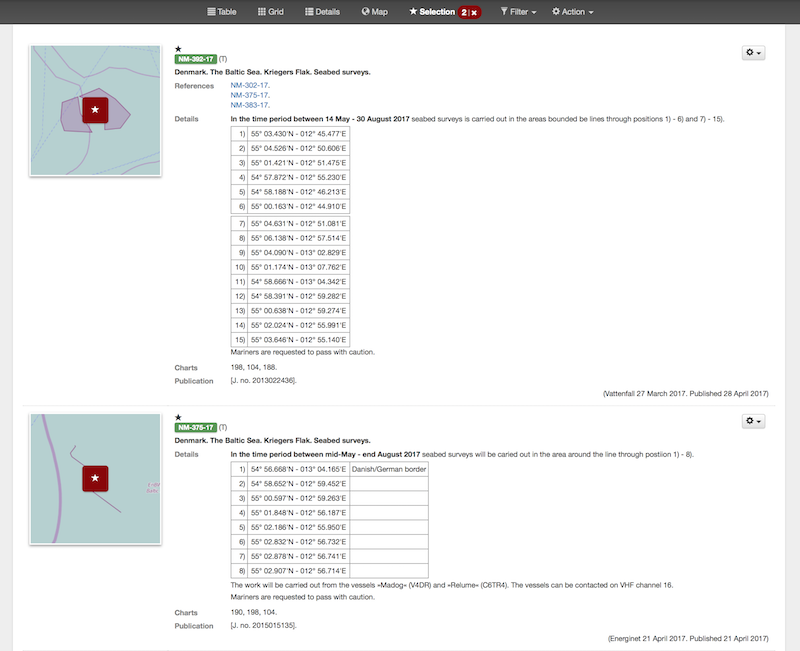
In the the Details view mode, each message is listed in detail, similarly to when a message is displayed in the Message Details dialog.
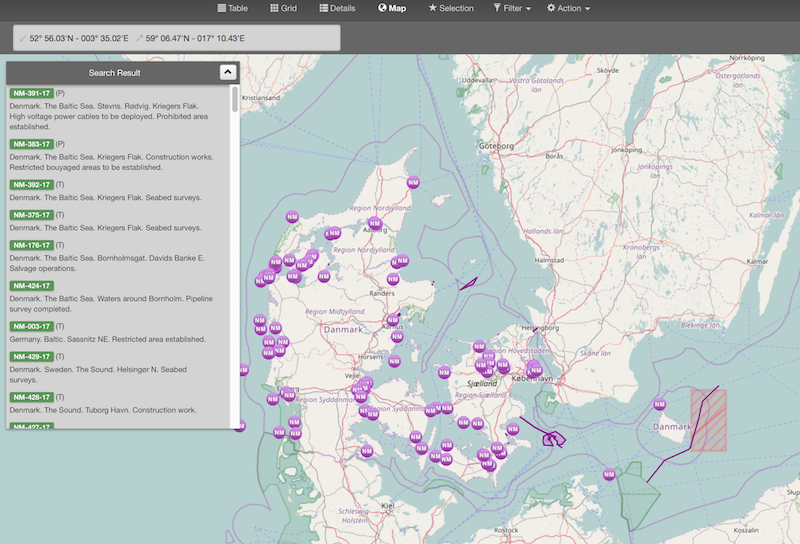
4.1.4. Map View Mode
In the Map view mode, all messages are displayed in a map. The list of messages will always be filtered according to the current bounding box of the map.
There is a Search Result panel in the top-left part of the map which contains a compact textual listing of the current set of messages. By default, this panel is collapsed, but the user may click the toggle-expand/collapse button in the panel header to show/hide the message list.
4.2. Message Selection
Irrespective of the view mode, each message of a messages list can be selected by clicking
the ![]() selection icon. And de-selected by clicking the icon again.
selection icon. And de-selected by clicking the icon again.
The current message selection is available at the Selection sub-page:
The selection list is persistent throughout the browser session, in the sense that you can perform multiple message searches, and thus build up the selection list as appropriate.
The purpose of supporting message selection, is to be able to perform certain actions on a more specific set of messages than those matching the current filtering criteria. Actions that can be applied to a selected set of messages include printing PDF reports, sending e-mails with messages, assigning messages to (and removing from) message tags, etc. These actions are detailed in the Message Actions section.
4.3. Message Filtering
When a user first enters the Messages page, the default set of messages being displayed consists of all published (in-force) messages associated with the currently selected domain.
The way to search for other types of messages is by applying a combination of message filters, available from the Filter menu:
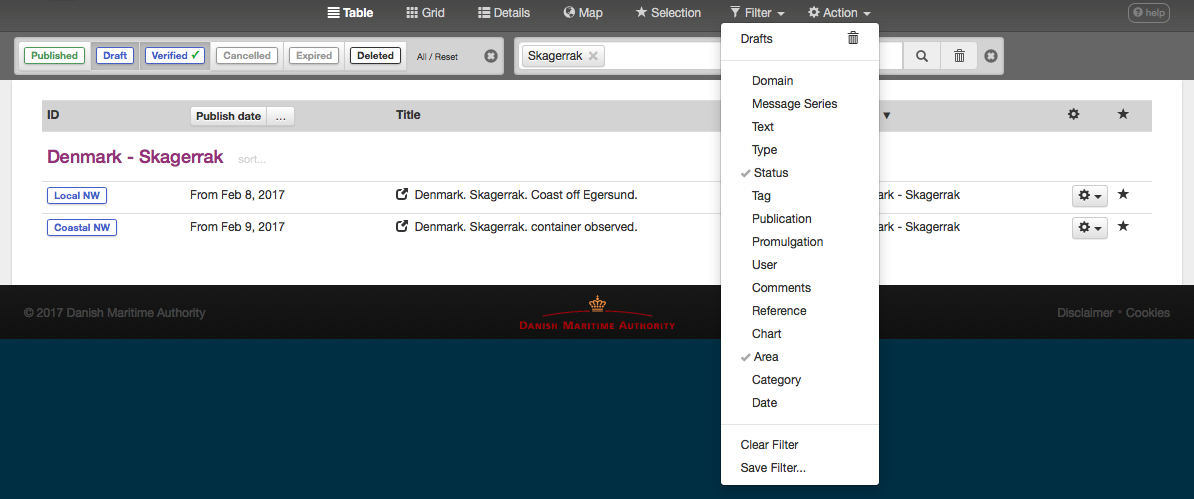
Whenever a message filter is updated, the resulting list of messages will automatically be updated, and also, the address (URL) of the browser will be updated, so that you can in effect bookmark a specific message filter.
The filters will be detailed individually below.
4.3.1. Domain Filter

The Domain filter allows the user to search messages of another domain without switching the current domain selection. This is very useful, if you e.g. wish to base a new Notice to Mariner on a copy of an existing Navigational Warning.
As an important security constraint, when filtering on messages from a different domain only public messages will be included in the search result. Public messages are those whose status are either Published, Cancelled or Expired.
4.3.2. Message Series Filter

The messages of a domain will always be associated with a message series of that domain, which e.g. defines the message ID naming and numbering scheme, etc. As an example, an "NW" domain might have separate message series for local and coastal navigational warnings.
When applying the Message Series filter, the user gets to select which message series of the current domain to show messages for.
If a domain filter has been applied, as described in the previous section, the user can filter by the message series of that domain instead.
4.3.3. Text Filter

The Text allows the user to filter across all textual contents of a message, i.e. message title, details, areas, categories, charts, ID, etc.
The text filter supports a Google-like syntax, as described below:
| Type | Description |
|---|---|
"light buoy" |
Use quotes to filter on exact sentence matches. |
+light -buoy |
Use + for terms that must be included and - for terms that must be excluded. |
Københa* |
Use * for partial term matches. |
4.3.4. Type Filter

The Type filter allows the user to filter on one or more message types.
If the current domain supports Navigational Warnings, the types include Local, Coastal, Subarea and Navarea. Depending on the system configuration of the domain, only a subset of these types may be available.
If the current domain supports Notices to Mariners, the types include Preliminary, Temporary, Permanent and Miscellaneous. Depending on the system configuration of the domain, only a subset of these types may be available.
4.3.5. Status Filter

By default, the Messages page will display all published (in-force) messages of the current domain. The Status filter allows the user to select any combination of statuses to filter on.
As an important security constraint, only users with the editor (or admin or sysadmin) role can filter on all statuses.
Users with a User role, or indeed, users that have not logged in, can only filter on public statuses, defined as either Published, Cancelled or Expired.
4.3.6. Tag Filter

Message Tags plays an important role in Niord, as they may be used to persistently group sets of messages. A more detailed description can be found in the Message Tags section.
The Tags filter can be used to filter the search result to messages belonging to on one or more message tags.
Clicking the ![]() button will open the Message Tag dialog,
for easy selection of message tags.
button will open the Message Tag dialog,
for easy selection of message tags.
4.3.7. Publication Filter

Niord allows administrators to define publications such as weekly Notices to Mariners digests. These publications are based on lists of messages. The Publication filter thus allows the user to filter on messages belonging to one or more publications.
4.3.8. Promulgation Filter

Niord allows system administrators to define promulgation types, such as NAVTEX, SafetyNET and Twitter, which may be associated with messages. Please refer to Promulgation Editor Field. The Promulgation filter thus allows the user to filter on messages associated with one or more promulgation types.
4.3.9. User Filter

The User filter allows the user to filter messages on any of the registered users in Niord, and whether the selected user originally created a message, has ever updated a message, or indeed, is the last person to edit the message.
4.3.10. Comments Filter

The process of composing a new NW or NM message often involves multiple users that write up the message and proof-read it. To aid this process, users may submit new comments to a message, and acknowledge existing comments.
The Comments filter allows the user to filter on messages with different types of comments, such as comments that the user has submitted, unacknowledged comments, and unacknowledged comments by the current user.
4.3.11. Reference Filter

A message may be associated with a list of references to other messages. The references are typed to indicate if the message e.g. represents a "cancellation" of the referenced message, an "updated repetition", and so forth.
The Reference filter allows the user to search messages by reference hierarchies. The filter consists of a message ID field and a numeric Level field.
The message specified by the message ID will be the base message of the filter. With a level set to "0" only that particular message will be in the search result.
If the level is "1", all messages directly referencing the base message or directly referenced from the base message will be included.
If the level is "2", all messages referencing any of the level "1" messages or referenced from any of the level "1" messages will be included.
And so forth…
4.3.12. Chart Filter

The Chart filter allows the user to filter on messages that are associated with any of a list of sea charts.
4.3.13. Area Filter

Areas are defined in a hierarchical tree by administrators.
The Area filter allows the user to filter on messages that are associated with any of a list of areas including s-areas of the selected areas.
4.3.14. Category Filter

Categories are defined in a hierarchical tree by administrators.
The Category filter allows the user to filter on messages that are associated with any of a list of categories including sub-categories of the selected categories.
4.3.15. Date Filter

The Date filter allows the user to filter on date ranges. The date type menu has the following options:
| Date Type | Description |
|---|---|
Publish Date |
The publish date interval of a message must overlap the specified date interval. |
Publish From |
The message must have been published within the specified date interval. |
Event Dates |
The event date intervals of a message must overlap the specified date interval. |
Created Date |
The message must have been created within the specified date interval. |
Last Updated Date |
The message must have been last updated within the specified date interval. |
4.3.16. Clear Filter
The Clear Filter function of the Filter menu will clear any current filter.
4.3.17. Save Filter
The Save Filter function of the Filter menu will allow the user to save often-used filter combinations.
These saved filters will appear at the top of the Filter menu for easy access.
4.4. Message Actions
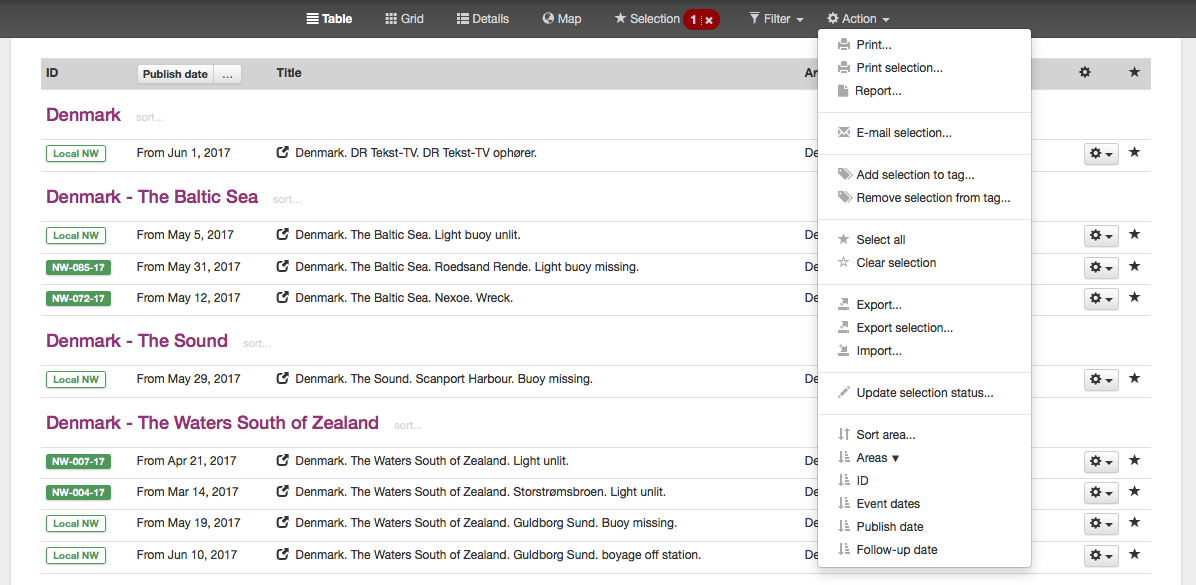
The Action menu lists the operations that can be performed on the current list of messages, or the current selection of messages.
The number of actions present in the menu depends on whether any messages are currently selected, and whether the user is an editor or administrator.
The actions will be detailed individually below.
4.4.1. Print Action
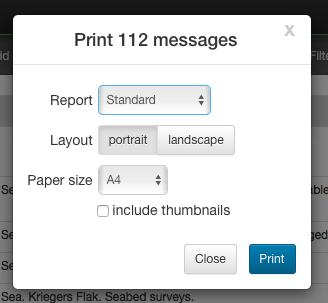
Enacting "Print…" will print the current message list. The print dialog allows the user to adjust page size and direction.
More importantly, it allows the user to select a print report from the Report menu. The set of available reports and their design is configured by a system administrator on a per-domain basis.
All domains include a "Standard" and a "Draft" report. The "Standard" report will print all details of the messages. The "Draft" report will print all language variants of all messages including additional fields, that makes the report useful for e.g. proof reading messages.
Additionally, a domain for Notices to Mariners will typically include reports for printing the NM list as a weekly NM digest, and a report for printing the active T&P messages.
4.4.2. Print Selection Action
Similar to the Print Action, except that only the current selection of messages get printed.
4.4.3. Report Action
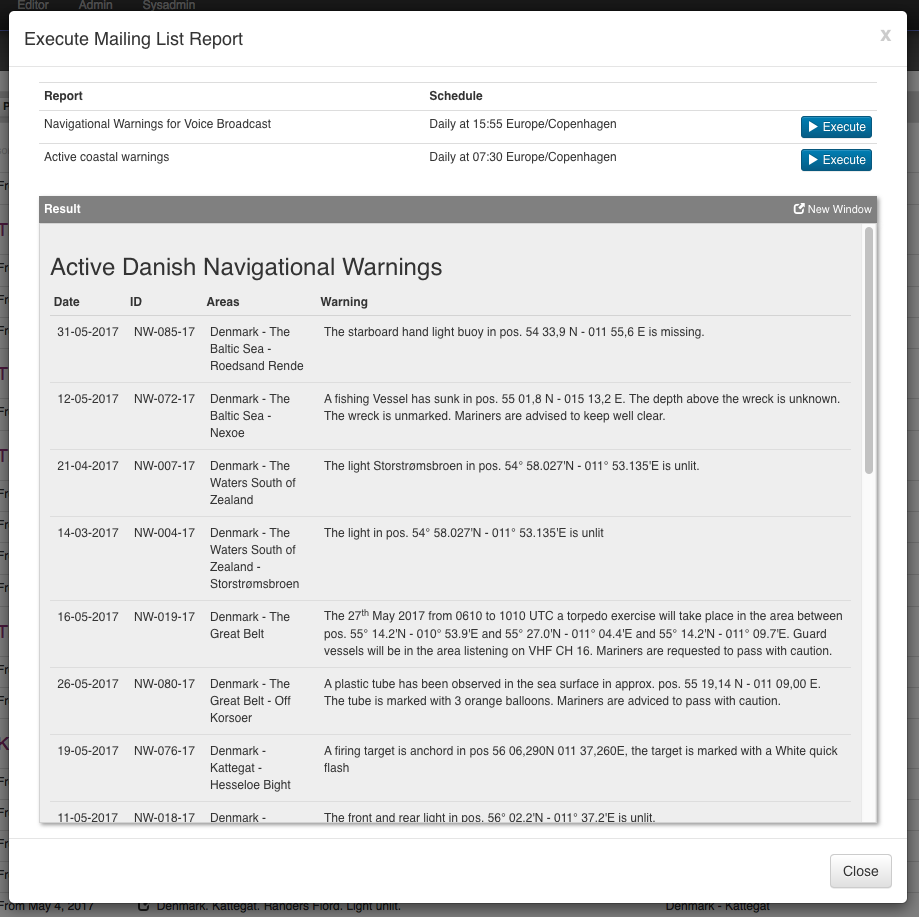
Niord can be configured to send reports on a scheduled basis to mailing list recipients - please refer to the Mailing Lists chapter.
Sometimes, however, it can be necessary to pull one such report outside its normal schedule. The Report action will open a dialog window with a list of all the mailing list reports that can be executed on-demand. The user can click the "Execute" button and see the result below.
If the result needs to be e.g. printed out, the user can choose the "New Window" function to open the result in a separate window.
4.4.4. E-mail Selection Action
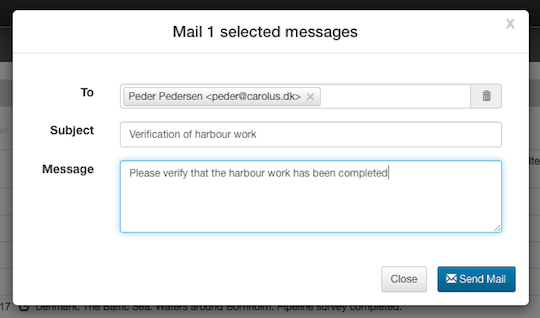
The E-mail Selection action is only available when one or more messages have been selected. A dialog will prompt the user to fill out the recipient, email subject and an optional message to the recipients.
When clicking Send Mail, a mail is constructed and sent along, that contains the details of the currently selected messages.
The function can be useful when e.g. following up on the work described in a Notice to Mariner.
4.4.5. Add Selection to Tag Action
The Add Selection to Tag action is only available when one or more messages have been selected.
It will open the Message Tag Dialog and allow the user to select a message tag the currently selected messages should be added to.
Message Tags are described in detail in the Message Tags section.
4.4.6. Remove Selection from Tag Action
The Remove Selection from Tag action is only available when one or more messages have been selected.
It will open the Message Tag Dialog and allow the user to select a message tag the currently selected messages should be removed from.
Message Tags are described in detail in the Message Tags section.
4.4.7. Select All Action
Will select all messages in the message list. Please refer to the Message Selection section.
4.4.8. Clear Selection Action
Will clear the current message selection. Please refer to the Message Selection section.
4.4.9. Compare Action
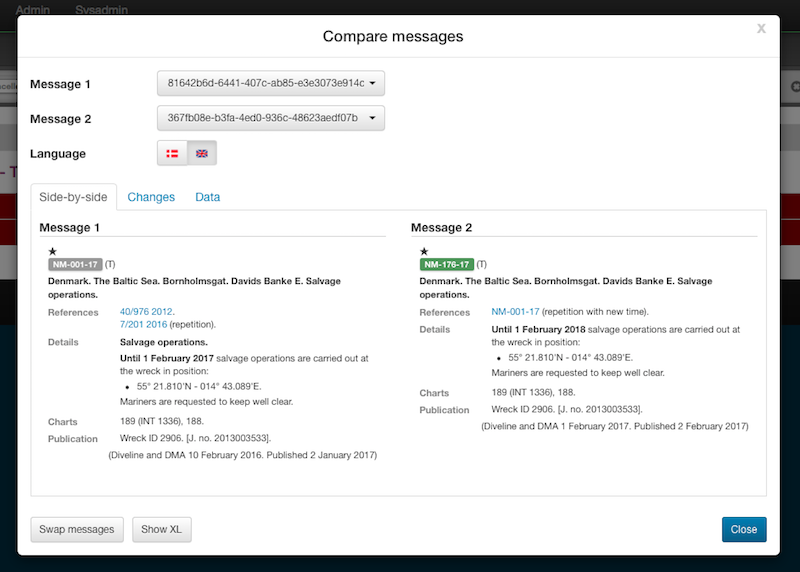
The Compare action is only available when precisely two messages have been selected.
The Message 1 and Message 2 fields allows the user to specify the ID of the two messages to compare. The ID may either be the short ID of the message (e.g. "NM-077-16") or the UID of the message (a system-specific UID that all messages have, even unpublished messages).
Next, the user may toggle between which language variant to compare.
By default, the details of the two selected messages are displayed side-by-side (see above). Alternatively, the user can choose to display the textual changes between the messages:
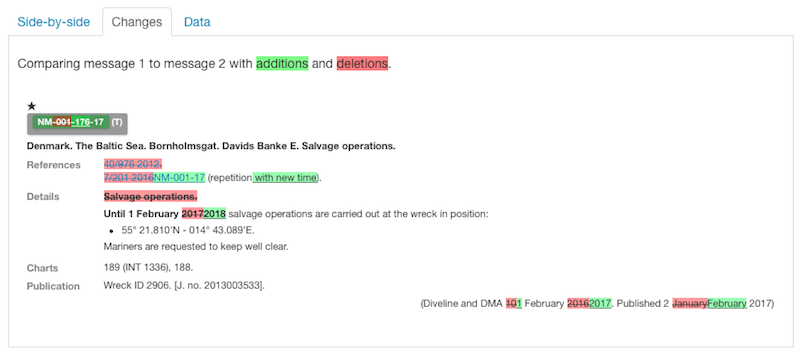
Colour-coding is used to flag additions (green) a deletions (red) between the two messages.
Lastly, the use can choose to inspect the changes of the underlying message data:

The data-comparison function is somewhat specialized, but also incredible useful, and targeted advanced users. Color coding is again applied to flag changed data (yellow), added data (green) and removed data (red) between the two messages.
4.4.10. Export Action
Enacting the Export action, will export the current message list as a zip-archive. The exported zip-archive has a format that is compatible with the Import function which is only available to administrators.
The exported data will include any files attached to the messages (used primarily by Notices to Mariners).
4.4.11. Export Selection Action
The Export Selection action is analogous to the Export Action except that it only exports the currently selected list of messages.
4.4.12. Import Action
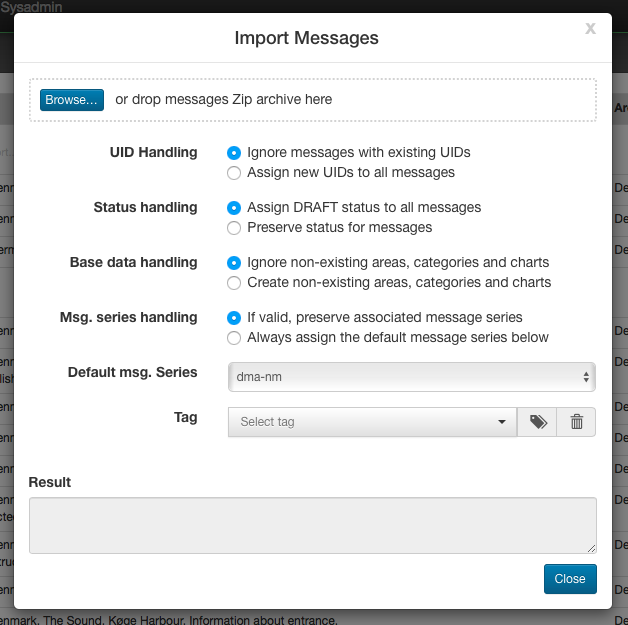
The Import action is only available to administrators, as it is quite advanced and disruptive. It imports a zip-archive, as generated by the Export Action.
The Import dialog options allows the administrator to adjust the behaviour of the import.
| Setting | Description |
|---|---|
UID Handling |
Either choose to assign new UIDs to the imported messages or preserve the UID of the imported messages, but ignore messages that have UIDs that already exist in the system. |
Status Handling |
Either force all imported messages to have a Draft status, or preserve their exported status. |
Base Data Handling |
If the imported messages reference base data (e.g. areas, categories or sea charts) that does not exist in the system, either create the base data, or ignore it. |
Message Series Handling |
Either choose to preserve the message series of an imported message (if it is valid for the current domain), or force imported messages to use the specified message series. |
Tag |
If a message tag is specified, all imported messages will be assigned to it. |
4.4.13. Update Selection Status Action
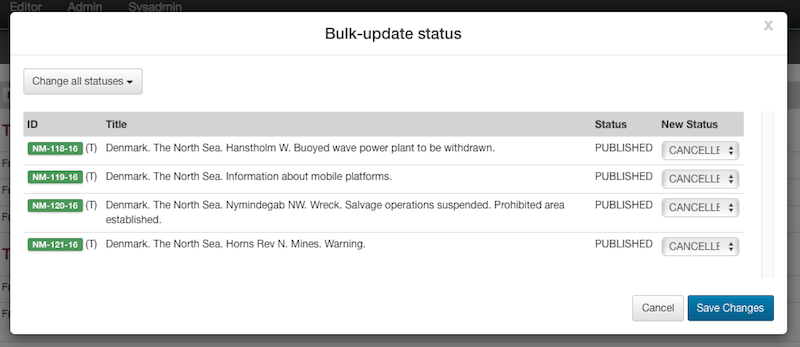
The Update Selection Status action is only available to administrators, and only if one or more messages have been selected.
The operation allows the administrator to perform bulk-updates of message statuses, that you can normally only perform message-by-message on the Editor Status page.
For all the selected messages, there is a New Status menu where the administrator can select any of the valid status transitions.
All status changes are applied when the "Save Changes" button is clicked.
4.4.14. Sort Area Action
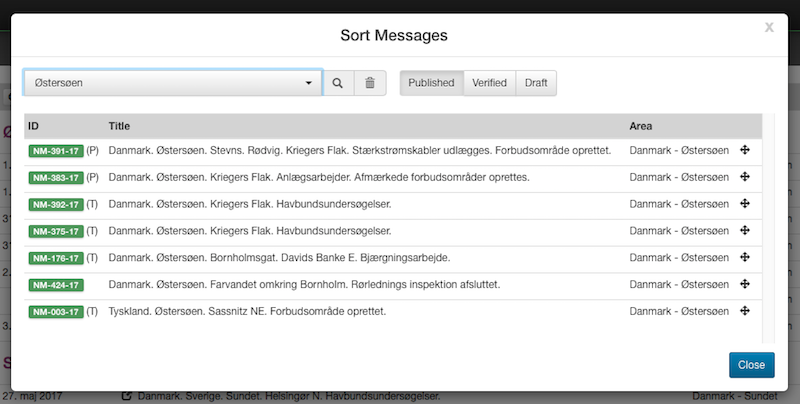
The Sort Area action allows the user to perform fine-grained persistent sorting of the messages of a certain area.
An alternative way of accessing the Sort Area dialog is by clicking the "Sort…" link next to the area name in the message list (when the messages area sorted by area):
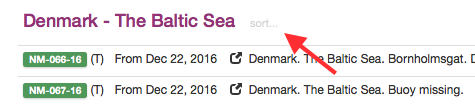
The sorting of messages by area is a fairly advanced topic. By default, messages adheres to the sorting of the area tree, as defined by an administrator:
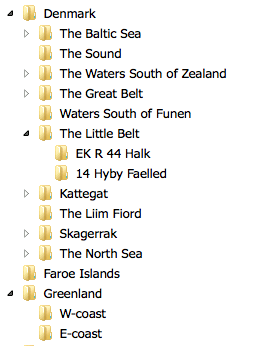
In this example, "Denmark" is sorted before "Faroe Islands", and within "Denmark", "The Baltic Sea" is sorted before "The Sound", etc.
However, it is possible to adjust this sorting administratively. So, for instance, all messages associated with "The Baltic Sea" or any of its sub-areas will be sorted clockwise around the position 54° 30’N - 012° 00’E starting at a bearing of 180°.
Similarly, all messages associated with "The Sound" or any of its sub-areas will be sorted North-to-South.
And so forth…
This automated sorting of messages by area can then be overridden manually by using
the Sort Area action.
Once an area has been selected, all the messages of the area can be re-arranged by dragging a
message to its proper position using the ![]() drag handle.
drag handle.
4.4.15. Message List Sort Selection
The last four items of the Action menu let the user select which message field to sort by. This include: Area, ID, Event Dates, Publish Date and Follow-up Date.
Choosing the same sort field multiple times, will toggle between ascending and descending order.
A small arrow will indicate the current sort field and whether ascending or descending order is used.
4.5. Message Details
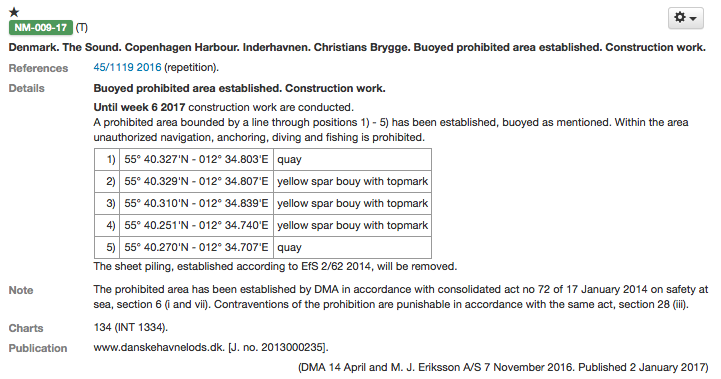
Messages on the Messages page can be inspected in the Message Details Dialog.
Depending on the current view mode, the user clicks the message title, the message thumbnail icon, or the message map symbol to open the details dialog.
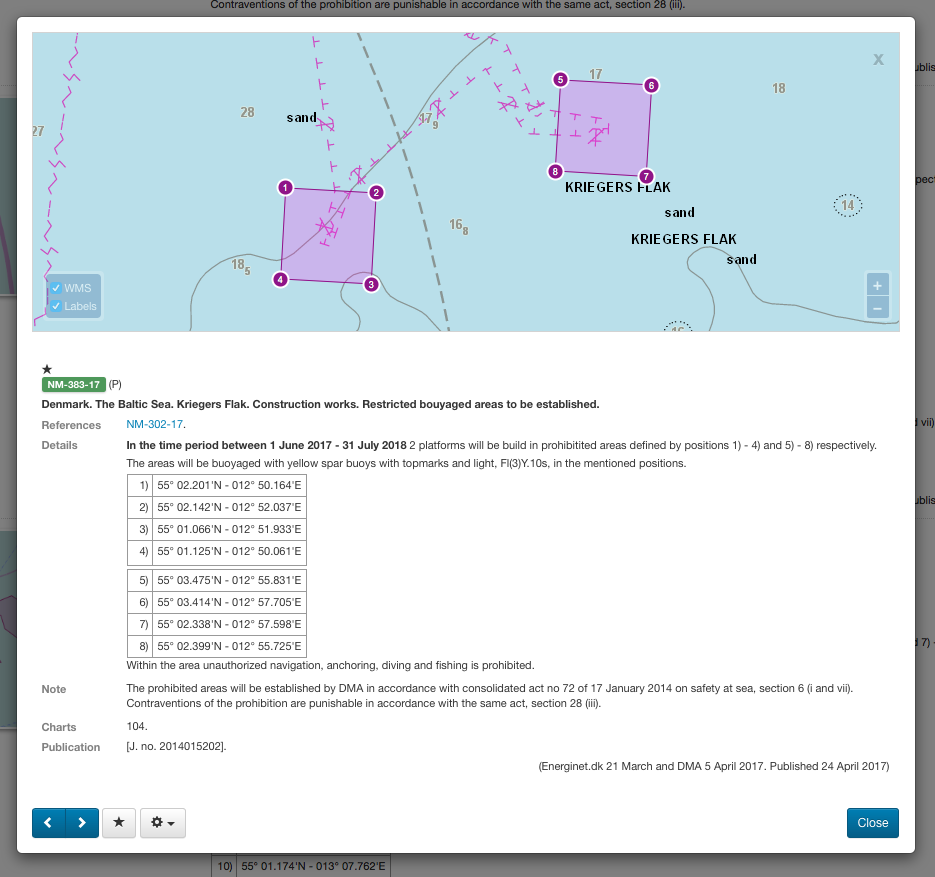
In the top of the details dialog, the user can inspect the message positions and areas on a map. Below that, the textual details of the message is presented. Bottommost, a row of buttons allows the user to navigate the previous/next message in the list, to select or de-select the message, and an action menu with message-specific actions.
If the user clicks on a referenced message in the message details, the clicked message will be presented instead, and the previous/next navigation buttons will change to a "Back" history button.
The Action menu will contain Edit and Copy actions, along with some of the actions detailed in the Message Actions section that are message specific.
4.6. Message Tags
Message Tags plays an important role in Niord, as they may be used to persistently group and name sets of messages.
The Message Tags are used many places, such as in the Tag Filter, the Import Action and
the Publications maintained by administrators.
Everywhere tags can be selected, the user may click the ![]() button to open the Message Tag dialog.
button to open the Message Tag dialog.
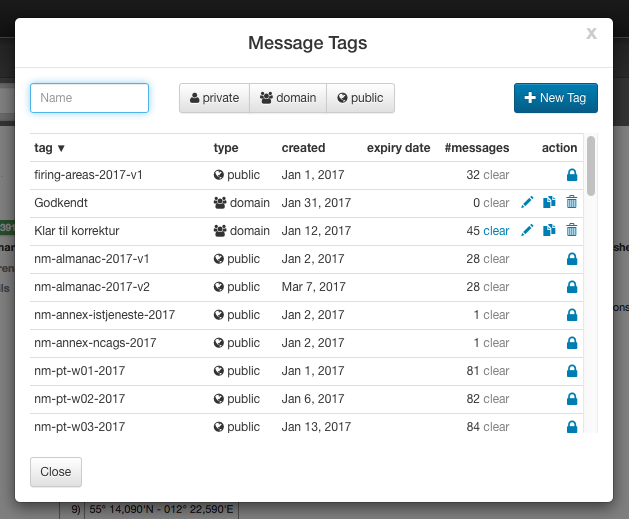
Message tags can be either Private, Domain-specific or Public. The Private tags can only be managed and used by the user that created them, the Domain tags can be maintained and used within the domain they belong to, and the Public tags are available to all domains.
Tags can also be time-limited. When the user creates a new tag, she can specify an expiry date of the tag, after which, the tag (but not the associated messages) will be deleted automatically.
Furthermore, a message tag can be locked or unlocked. As an example, the message tag used to group the NM messages of a weekly Notices to Mariners publication, should not be modified once the the digest has been published. Hence, editors should not be allowed to add or remove messages to and from the message tag. And this will be prevented by locking the message tag. Only administrators can unlock a locked message tag.
5. Editor
The Editor page of Niord is accessible for logged in editors via the main menu.
It contains sub-pages for creating and editing NW and NM messages, for managing the lifecycle of the messages and for submitting comments to a message.
5.1. Blank Editor Page
If the user enters the Editor page directly (as opposed to clicking Edit on a message), the Edit page looks similar to this:
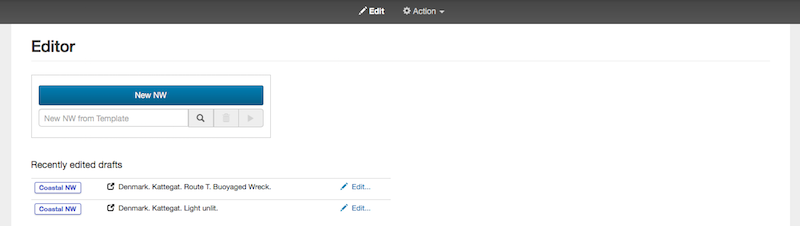
If the current domain supports Navigational Warnings, there will be a prominent "New NW" button for creating a new blank NW message.
Similarly, if the current domain supports Notices to Mariners, there will be a prominent "New NM" button for creating a new blank NM message.
Depending on how the current domain has been set up administratively, there may also be a template execution field. Navigational Warnings in particular often follow a very strict template for how to write the messages so that they adhere to the standards for MSI, NAVTEX, etc. The field thus allows the user to select and execute a template, such as "Light Unlit". Message Templates is an extensive topic, covered in greater detail in the Message Template Execution section.
Lastly, the blank editor page will list the draft messages that the current user has recently edited.
5.2. Edit Editor Page
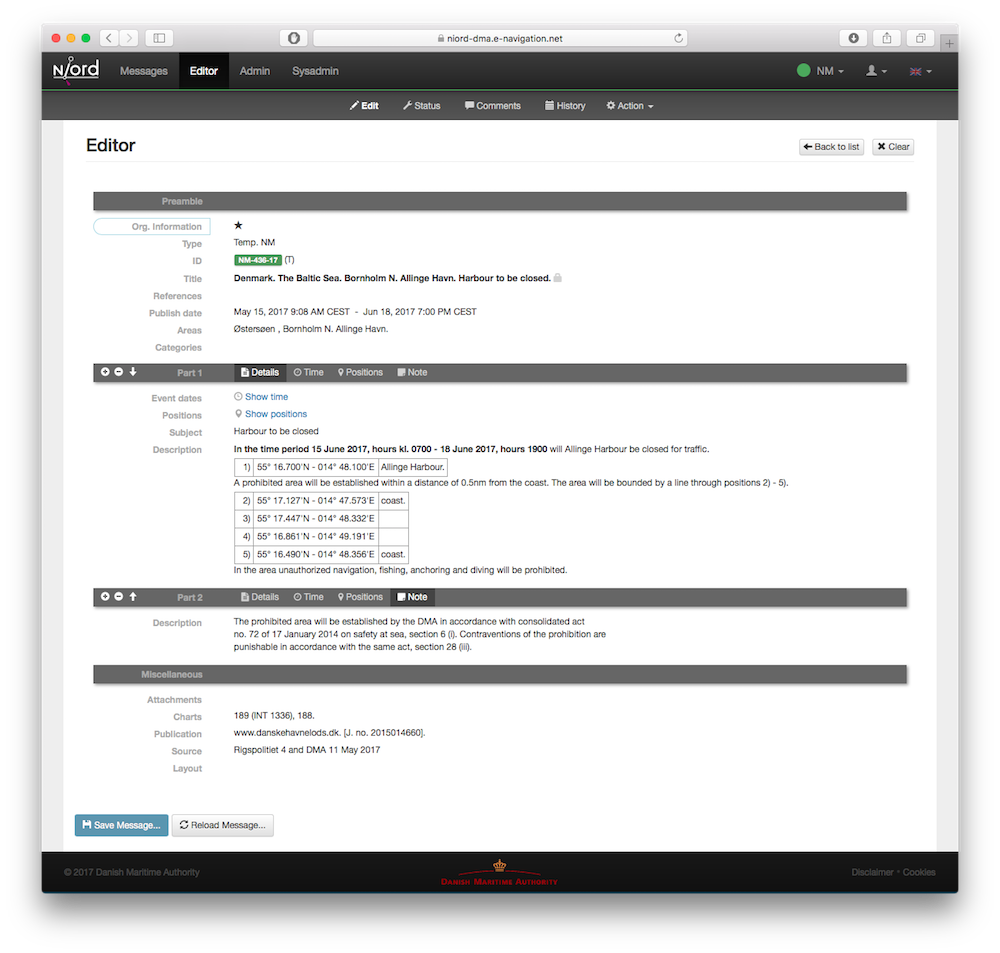
When the user has created a new NW or NM message, as described in the previous section, or if the user clicks Edit on an existing message, the user will enter the Edit editor sub-page, which is the main page for actually editing the fields of a message. See image in the beginning of the Editor chapter.
5.2.1. General Edit Page Controls
If the user enters the Edit editor page by clicking Edit on a message in the messages list, there will be a "Back to list" button that will return the user to the Messages page with the same message filter applied as when entering the Edit page.
The "Clear" button will cancel all changes and return the user to the Blank Editor Page.
If the currently edited message has any unsaved changes, there will be a red Save icon next to the "Editor" title:
At the bottom of the page, there is a "Save Message" button and a "Reload Message" button, which will respectively save any changes to the message and reload the message whilst discarding any changes.
The rest of the Edit page is dedicated to the list of field editors for all the fields that make the message being edited.
The list of fields is configured administratively per domain and message type. As an example, Notices to Mariners will support fields such as "original information", whereas Navigational Warnings may have a field for editing its NAVTEX promulgation.
In order to conserve space, all editor fields are "collapsed" by default, showing a read-only version of the field value in the currently selected language. However, clicking at the field title will expand the field and display the field editor in full. See example below withe the Areas editor field in collapsed and expanded mode:


The editor has extensive support for keyboard navigation. The user can use the arrow-up and arrow-down key to shift focus from field title to field title. Use arrow-right to expand the editor field currently selected, and arrow-left to collapse the field. Use tab, respectively shift-tab, to shift focus between the input fields of a field editor.
The remainder of this section will describe the individual editor fields one by one.
5.2.2. Orig. Information Editor Field

The Orig. Information editor field is typically only present when editing a Notice to Mariners. The editor field contains a toggle-button that can be used to flag if the message is based on original information or not.
5.2.3. Type Editor Field

The Type editor field allows the user specify the sub-type of the message.
For Navigational Warnings, the types include Local, Coastal, Subarea and Navarea. Depending on the system configuration of the domain, only a subset of these types may be available.
For Notices to Mariners, the types include Preliminary, Temporary, Permanent and Miscellaneous. Depending on the system configuration of the domain, only a subset of these types may be available.
5.2.4. ID Editor Field

All messages must be associated with a message series, which are defined administratively for each domain. The message series are used to group messages and define traits such as the format of the message short ID, and the numbering scheme. There are four possible types of numbering schemes:
| Numbering Scheme | Description |
|---|---|
yearly |
Every message will automatically be assigned a number when they are published. The number sequence starts at 1 every 1st of january. |
continuous |
Every message will automatically be assigned a number when they are published. The number sequence is never reset. |
manual |
The user manually assigns a number in the ID editor field. |
none |
The message will not be assigned a number. |
The ID editor field lets lets the user select any of the available message series for the current domain and message type. Often there will only be one to select from, in which case, it will be pre-selected.
If the numbering scheme of the selected message series is manual, the ID editor field will also have an input field for the user to fill out the message number.
Lastly, all messages will automatically be assigned a unique system ID, or UID, upon creation, which can also be found in the ID editor field. Although the UID is not very end-user friendly, it can be used to uniquely identify messages even before they are published.
5.2.5. Title Editor Field

The Title editor field allows the user to specify the main title of the message in all supported languages.
By default, the "Auto generate" option is checked, in which case the title fields are disabled and computed automatically, by concatenating the currently selected areas, vicinity and the subject fields of each message parts.
5.2.6. References Editor Field

The References editor field allows the user to manage a list of typed references from the edited message to other messages. It is mainly used for Notices to Mariners, but could also e.g. be used for cancellation references in navigational warnings.
Each reference must specify a message ID which may either be the short ID or the UID of the referenced message.
The reference type is one of reference, repetition, repetition_with_new_time, updated_repetition, cancelled, and signals the nature of the relationship between the messages.
Additionally, the user may add a reference description in all supported languages.
In end-user applications, references can e.g. be used to hyperlink between messages.
5.2.7. Publish Date Editor Field

Messages can either be scheduled for publication, or published and cancelled manually via the Status Editor Page.
The Publish Date editor field can be used for assigning a publish from and/or a publish to date. If a message has the Verified status, the system will automatically publish the message when the publish from date is reached. Similarly, if the publish to date is specified for a published message, the system will automatically expire the message when that date is reached.
The user can also specify a follow-up date in the Publish Date editor field. The follow up date can be displayed and sorted by on the Messages page.
5.2.8. Areas Editor Field
The Areas editor field can be used to assign one or more areas to a message. The areas to select from are created and managed by administrators in a hierarchical structure - please refer to the Areas admin chapter.
So, as an example, the firing area "EK D 371 Marstal Bugt" is a sub-area of "The Baltic Sea", which is in turn a sub-area of "Denmark".
Selecting an area in the Areas editor field will also implicitly select all parent areas.
In addition to the main area input field, the user can also specify a vicinity in all supported languages. This is used for the specific location of the hazard (such as a harbour name).
If the selected area has an associated geometry, the "Copy Locations" button will copy that geometry into the Positions Editor Field of the message.
Alternatively, if no area has been selected but a geometry has been defined for the message, then clicking the "Compute from Locations" will attempt to deduce the area from the geometry.
5.2.9. Categories Editor Field

The Categories editor field can be used to assign one or more categories to a message. The categories to select from are created and managed by system administrators in a hierarchical structure.
Some categories have been defined as executable message templates. If one or more of these
categories have been selected, the ![]() will be enabled and
allow for execution.
will be enabled and
allow for execution.
Navigational Warnings in particular often follow a very strict template for how to write the messages so that they adhere to the standards for MSI, NAVTEX, etc. The field thus allows the user to select and execute a template, such as "Light Unlit". Message Templates is an extensive topic, covered in greater detail in the Message Template Execution section.
5.2.10. Message Parts
A message consists of a set of common preamble fields and a list of Message Parts, where each message part conceptually defines the time, place and description of a hazard.
The option for one message to describe multiple message parts is mostly used for Notices to Mariners, not so much for Navigational Warnings, which typically only define a single message part.
Each message part is headed by a message part header panel:

Clicking the plus sign will add a new message part below, and clicking the minus sign will delete the given message part. If more than one message part are present, there will also be an arrow-up and an arrow-down button in the message part header panel, which may be used to re-arrange the message parts.
Lastly, the message part header panel allows for the selection of a message part type, such as "Details", "Time", "Positions" or "Note". The only effect of selecting a message part type, is to hide some of the message part fields. The type field can also be used to improve the end-user display of a message by providing custom titles for each message part. See the example below where the first message part is labelled "Details" and the second one is labelled "Note".
5.2.11. Event Dates Editor Field

Depending on the message part type, each message part can be assigned a list of event dates via the Event Dates editor field.
Whereas the publication date interval determines when a message is in-force, the event dates pertain to the underlying hazard, such as a future firing exercise.
For navigational warnings, though, the event dates are typically identical to the publication date. Hence, by default, the Event Dates editor field is not displayed for NWs. If needed, the editor field can be enabled from the Action menu.
If no event dates are specified when a message is published, an event date interval is automatically added to the first Details message part, thereby synchronizing the event date interval with the publication date interval. This interval is updated when the message is subsequently cancelled or expires.
The main purpose of event dates, is for clients to be able to use it in route planning, and so forth.
The event date intervals has an all-day flag that can be used to switch between specifying date-and-time or date only.
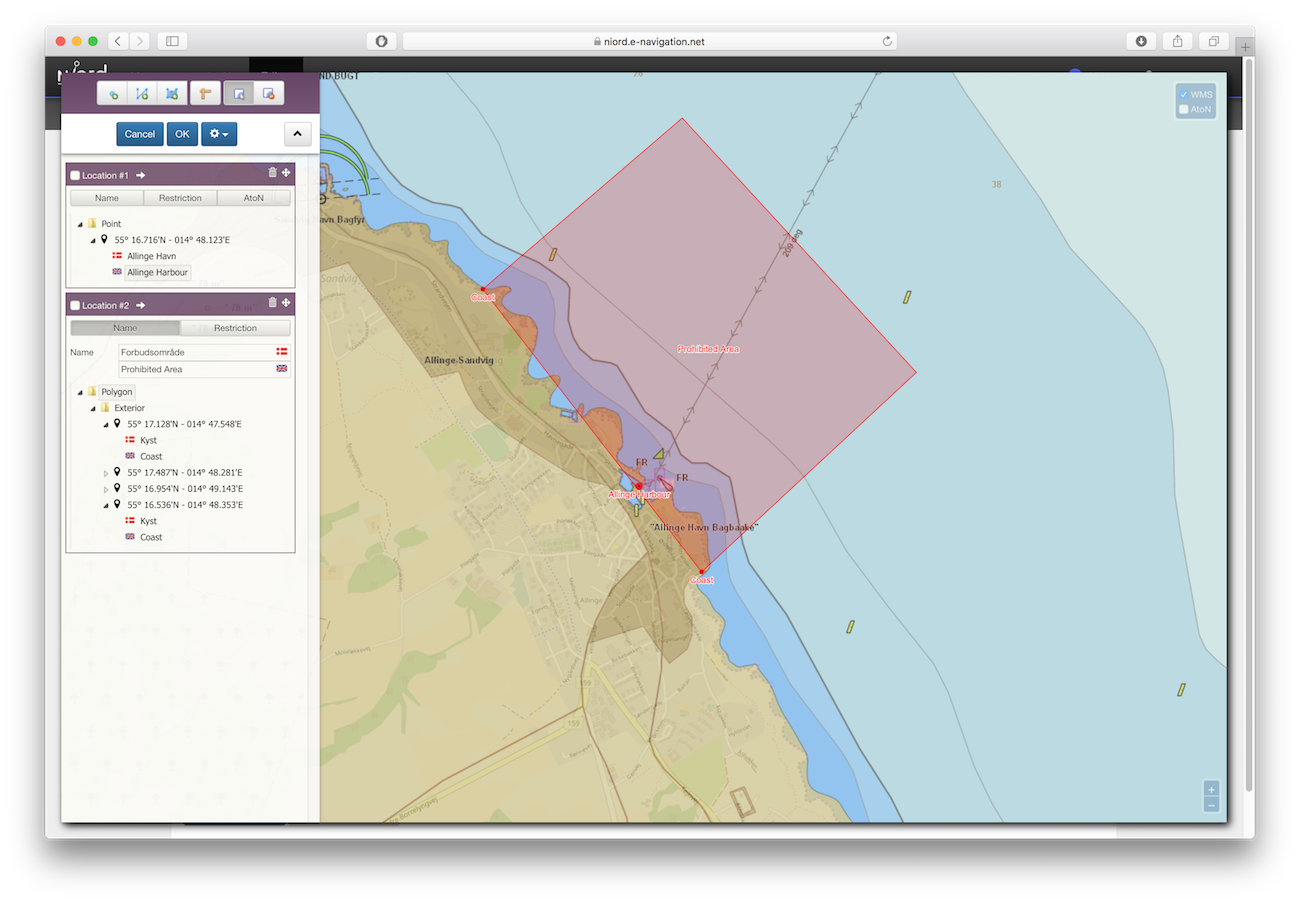
5.2.12. Positions Editor Field
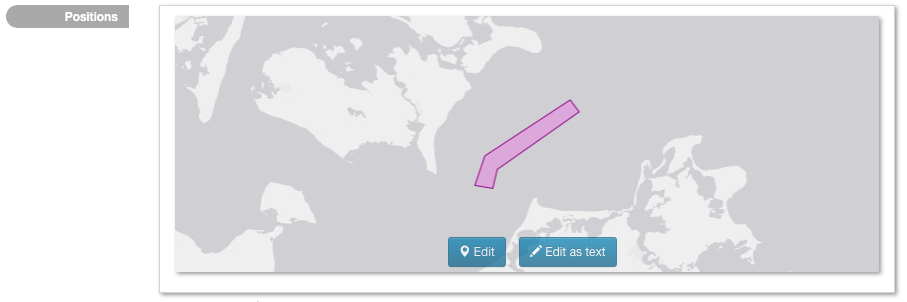
Depending on the message part type, each message part can be assigned a geometrical extent in via the Positions editor field.
The positions can either be entered as text of via a graphical editor. This is detailed further in the Position Editor chapter.
5.2.13. Subject Editor Field

Depending on the message part type, each message part can be assigned a subject, i.e. a short title for the message part in all supported model languages, via the Subject editor field.
When the full message title is auto-computed, as detailed in the Title Editor Field section, it will be assembled by concatenating the message area, vicinity and the subjects of all message parts.
The Hide Subject checkbox is used to indicate if the subject should be displayed as a heading for each message part, when rendering the message details. Since the subject of a message part is already likely to be part of the message title, there is often no reason to repeat the subject in the message body. However, if the message contains multiple message parts, it may improve the legibility, if each message part is headed by its subject. See example below:
5.2.14. Description Editor Field

Depending on the message part type, each message part can be assigned a rich-text description in all supported model languages, via the Description editor field.
Most of the editor tools are standard text editor tools for controlling e.g. the text style and color, alignment, bullet and numbered lists, etc.
However, some of the editor tools will be detailed further below.
 Fullscreen
Probably the single most important tool, is the Full-Screen tool. It will toggle between showing the editor in full-screen mode.
For marginally complex message descriptions, editing in the standard layout is plainly too cramped.
 Insert/edit Link and
  Insert/edit Image
Adding links and images to the rich-text description, ties in with the attachments added to the message via the Attachments Editor Field. If e.g. the user uploads a PDF or a photo as an attachment to the message, the user can subsequently add links to the file in the rich-text description, or indeed, insert the image directly in the text.
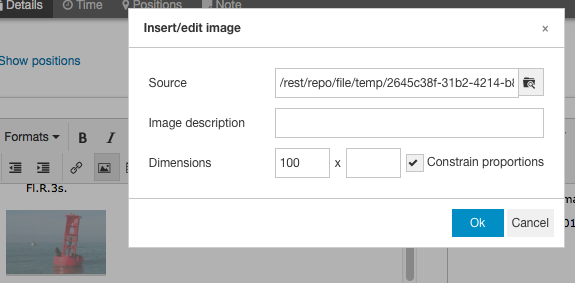
In the example above, the Insert/edit image tool was enacted, opening the image dialog.
Click the ![]() Source field button
to select the attached image to insert or edit.
Source field button
to select the attached image to insert or edit.
The same procedure applies when inserting links to attachments.
 Table
Table
The Table tool is fairly advanced, with lots of context-dependent functions. When the cursor is within a table many of these will be available via a table toolbar above the table. Even more options are available in the context menu, when right-clicking in a table. Of special interest are the Class options, which can be used to control the appearance of the table, rows and cells:
-
Table Properties: Select between the classes "None", "No border", "condensed", "No border + condensed", "Positions" and "Position table", to change the layout of the entire table.
-
Row Properties: You find the Row Properties in the right-click context menu. Select between the classes "None" and "Underline" to change the layout of the current or the selected rows.
-
Cell Properties: You find the Cell Properties in the right-click context menu. Select between the classes "None", "Underline", "Position" and "Pos. Index" to change the layout of the current or the selected cells.
 Insert Locations
The Insert Locations tool is a very useful tool that may be used to format and insert the positions defined in the Positions Editor Field in the rich text description. The generated text will adhere to the language of the description field.
Clicking the Insert Locations tool will open the Format Message Locations dialog:
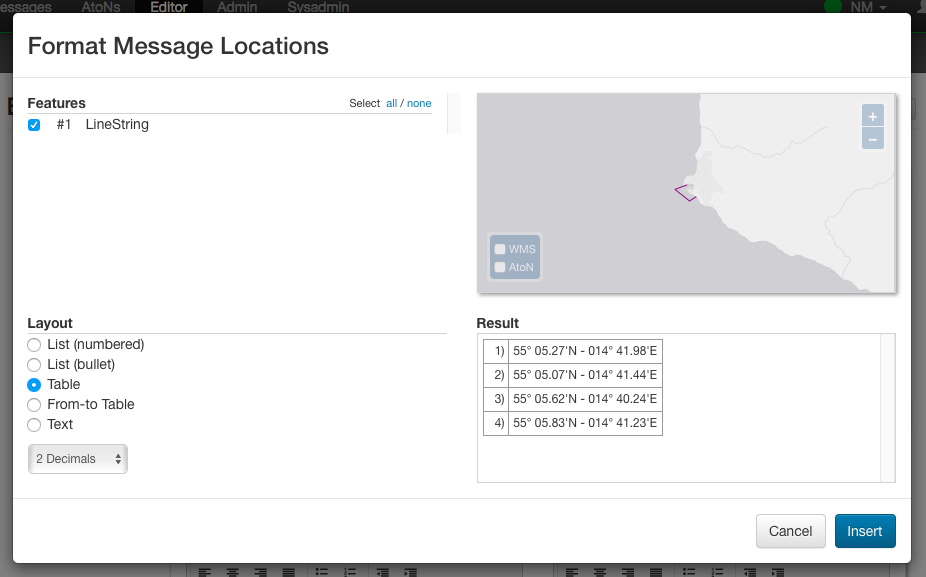
The Features panel allows the user to select which geographical feature to insert. Message positions are defined via geometrical features such as points, polygons, line-strings, etc, each of which will define a list of positions. The position list only contain the positions that makes sense in a textual description. So for instance, if the geometrical feature is a polygon with holes in, only the positions of the exterior ring is included.
The Layout panel is used to select a layout template used for rendering the positions, that is, if the list of positions should be rendered in a table, a bullet list or as text. The user may also select the position format, such as "NAVTEX", "Seconds" or various "Decimal" formats.
The Result panel will preview the result.
 Insert Time
The Insert Time tool may be used to format and insert the event time intervals defined in the Event Dates Editor Field in the rich text description. The generated text will adhere to the language of the description field.
Clicking the Insert Time tool will open the Format Message Time dialog:
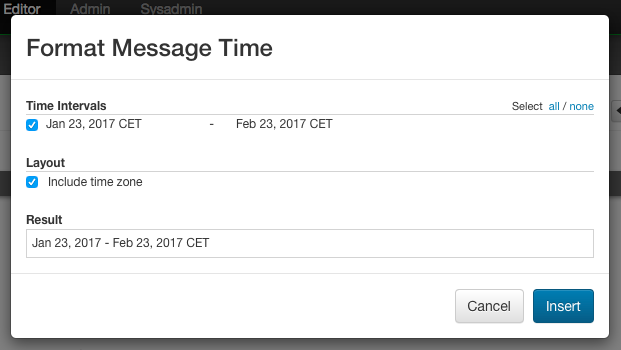
The Time Intervals panel allows the user to select which of the event date intervals to format and insert.
The Layout panel let the user select whether or not to include the time-zone in the formatted text.
The Result panel will preview the result.
5.2.15. Attachments Editor Field
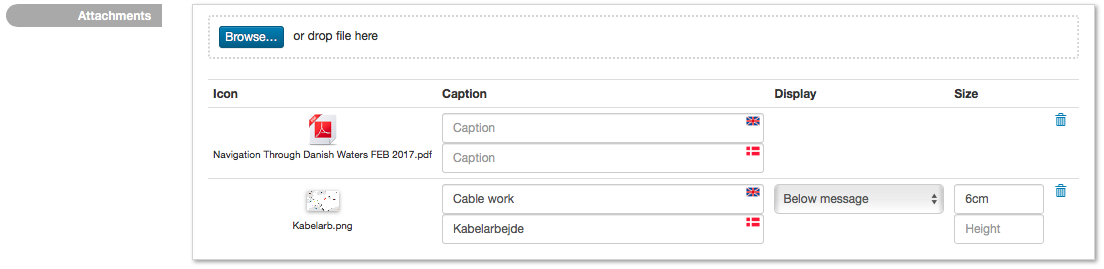
The Attachments Editor Field can be used to associate files, such as PDFs and photos, with a message.
If a message has an associated list of attachments, the attachments can be viewed and downloaded by end-users when viewing the message details. See example below:

Attachments can also be linked or inserted directly in the rich-text description field of a message part,
as described in the ![]() Insert/edit Link and
Insert/edit Link and ![]() Insert/edit Image sub-section.
Insert/edit Image sub-section.
A new file is attached to a message by clicking the "Browse…" button and selecting the file, or by dragging the file into the dotted-line panel surrounding the "Browse…" button.
An existing attachment can be deleted by clicking the trash icon next to the attachment.
An additional caption can also be specified for attachments in all supported model languages.
For embeddable attachments, such as images and videos, an extra Display option will be available:
| Display Value | Description |
|---|---|
Above Message |
If the Above Message option is selected, the attachment (i.e. image or video) will be displayed above the message when rendering the message details, or generating a print report. |
Below Message |
If the Below Message option is selected, the attachment (i.e. image or video) will be displayed below the message when rendering the message details, or generating a print report. |
Separate Page |
If the Separate Page option is selected, the attachment (i.e. image or video) will be displayed on a separate page when generating a print report. |
If either of the display options above is selected, the size of the embedded attachment can be specified in the Width and Height field. If only one of these fields is filled out, the embedded attachment will be scaled proportionally.
As part of the Width or Height values, the user must also specify the unit, which must be one of "em", "px", "%", "cm", "mm", "in", "pt" or "pc".
5.2.16. Promulgation Editor Field
For Navigational Warnings, there may be a need to promulgate specialized versions of a message to external channels. The availability of these promulgations is configured by system administrators on a per-domain basis.
Niord has a plug-in architecture for adding new promulgation types. By default, it supports distributing NAVTEX and SafetyNET versions of navigational warnings via mailing lists, and support for posting messages at Twitter upon publication.
Furthermore, the Danish version of Niord supports generating an Audio promulgation for navigational warnings. This will promulgate a verbose textual version of the messages, suitable to be read up on radio by non-maritime personal, to a mailing list.
In most cases, the user will create new Navigational Warnings by executing message templates - please refer to Message Template Execution. The templates will automatically produce the promulgations needed for a message.
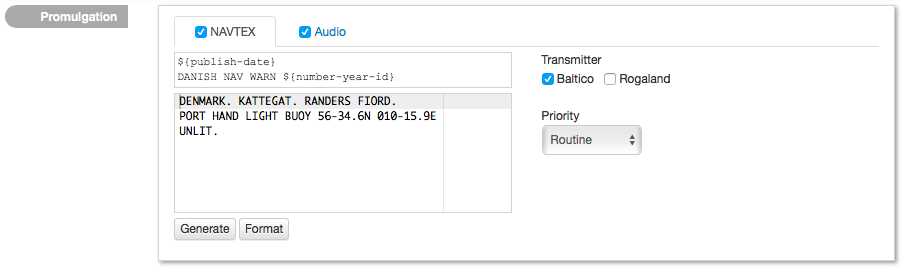
However, before publishing a message, the promulgations should be proof-read and updated as appropriate. The Promulgation Editor Field thus allows the user to choose which promulgation types to support (via a checkbox in the promulgation tabs), and to update the promulgation contents.
For the NAVTEX promulgation (see screenshot above), ensure that Priority and Transmitter selection is correct, and that the text adheres to NAVTEX standards.
Most promulgation types will have a "Generate" button, that can be used as a starting point if the message has not been created by executing a message template. This will create a crude starting point, that must subsequently be edited and polished.
The NAVTEX promulgation also contains a read-only field for the NAVTEX preamble. This may contain replacement tokens such as "${publish-date}" and "${number-year-id}" that will automatically be substituted upon publication of the message.
For any SafetyNET promulgation, ensure that Priority and Area selection is correct, and that the text adheres to MSI standards.
5.2.17. Charts Editor Field

The Charts editor field can be used to assign one or more nautical charts to a message. The charts to select from are created and managed by administrators - please refer to the Charts admin chapter.
If the "Sort" button is clicked, the current selection of charts will be sorted according to their scale.
If the "Compute from Locations" button is clicked, the charts field will be instantiated with the sorted list of all nautical charts whose geographical extent overlaps with the positions defined for the message will be included. This list should subsequently be verified by the user, since some of the charts may not actually contain the feature (say, a light) referenced by the message.
The Horizontal Datum field can be used to specify the horizontal datum, typically WGS84. The horizontal datum is not currently used anywhere in Niord.
5.2.18. Publication Editor Field
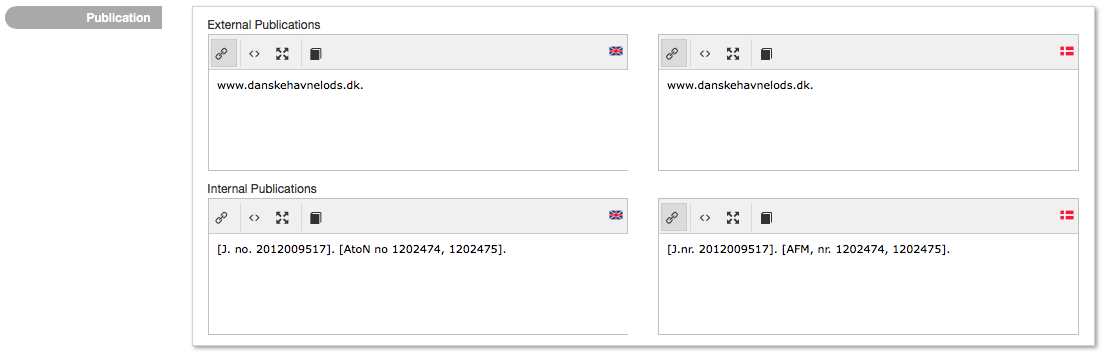
The Publication editor field is used to list the publications relevant to the message, such as the List of Lights, Aids to Navigation, the journal number for an associated case in a content management system, etc.
The publications are maintained in rich-text editor fields, mainly to facilitate hyperlinks to the referenced publications. There is one set of internal publication and one set of external publication fields for each supported model language. Only the external publications will be displayed to end-users, whereas internal publications will be viewable to registered users of Niord as well.
The user can use the ![]() tool to insert
one of the publications created and managed by administrators in Niord - please refer to the
Publications admin chapter.
tool to insert
one of the publications created and managed by administrators in Niord - please refer to the
Publications admin chapter.
When the Insert Publication tool is clicked, a dialog pops up that allows the user to add or edit a pre-defined publication:
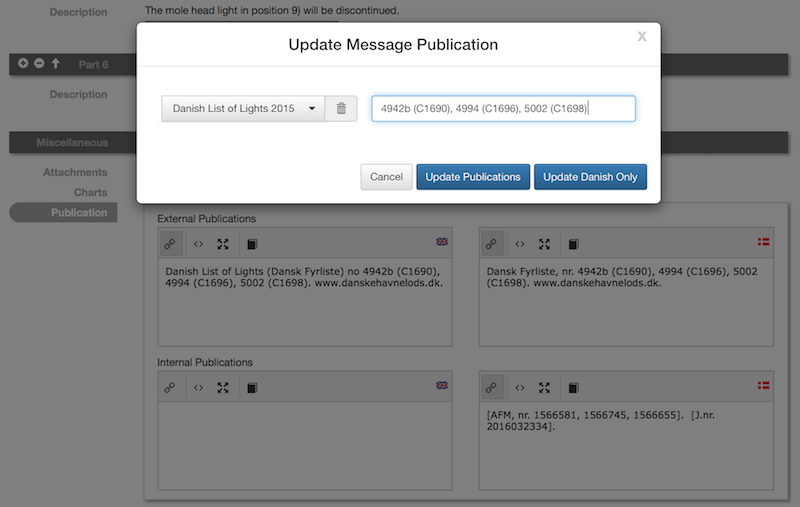
Some publications will display a parameter input field, where the user can specify additional parameters. This is typically used to e.g. specify relevant light numbers for the List of Light publication, etc.
The user can choose to update only the publication field where the Insert Publication tool was clicked, or update all language versions.
5.2.19. Source Editor Field

The Source editor field is used to list the sources of the hazard described by the message, such as a harbour authority, a Government department, etc. If a standard abbreviation exists for a source, this should be used to keep the information short and concise. Along with the source, the date of contact should be listed.
The user can click "Add sources…" to insert one or more of the sources created and managed by administrators in Niord - please refer to the Sources admin chapter.
Upon clicking the "Add sources" button, a dialog pops up that allows the user to select and add one or more of the pre-defined sources along with the date of contact:
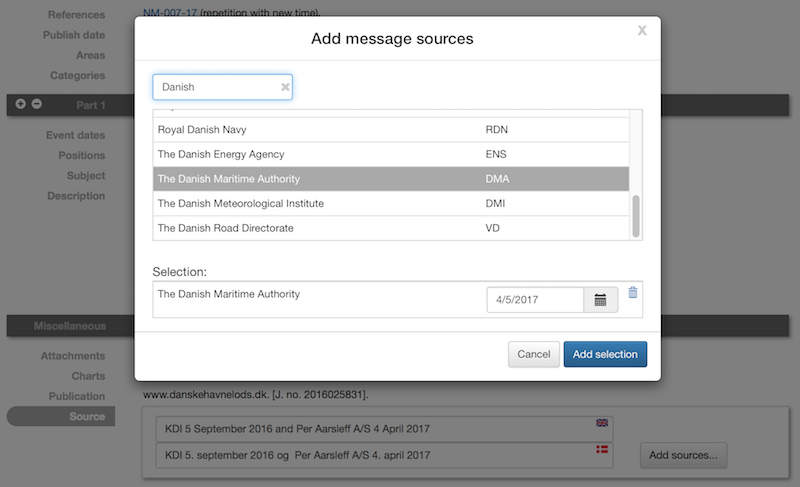
The Source field for all supported model languages will be updated with the selected sources.
5.2.20. Layout Editor Field
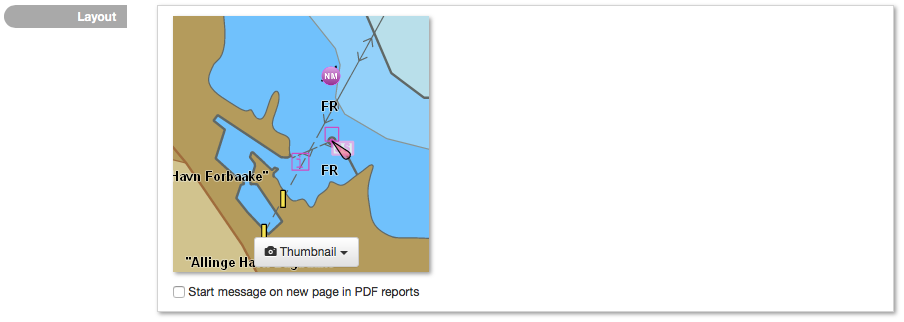
The Layout editor field is used for controlling the layout of message lists within Niord, and in print reports.
When working with messages in Grid View Mode or Details View Mode, each message will show a thumbnail image. By default, the thumbnail is automatically generated, but the user may specify a custom thumbnail image in the Layout editor field.
From the thumbnail menu, they can either chose to upload a thumbnail image, or generate one using the "Select thumbnail…" option. This will open the Thumbnail Selection Dialog:
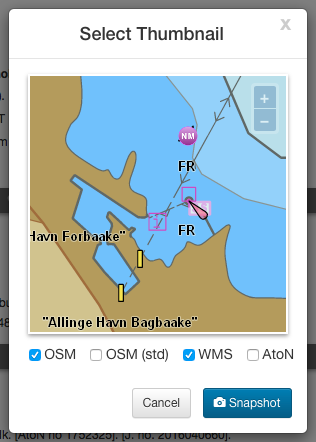
Here, the user can zoom and pan the map, and turn layers on and off, before taking a snapshot to be used as the message thumbnail.
The Layout editor field also has a checkbox option, "Start message on new page in PDF reports". If this option is checked, the message will be forced to start on a new page when printing a message list as PDF. This is particularly useful for long Notices to Mariners messages.
5.3. Status Editor Page
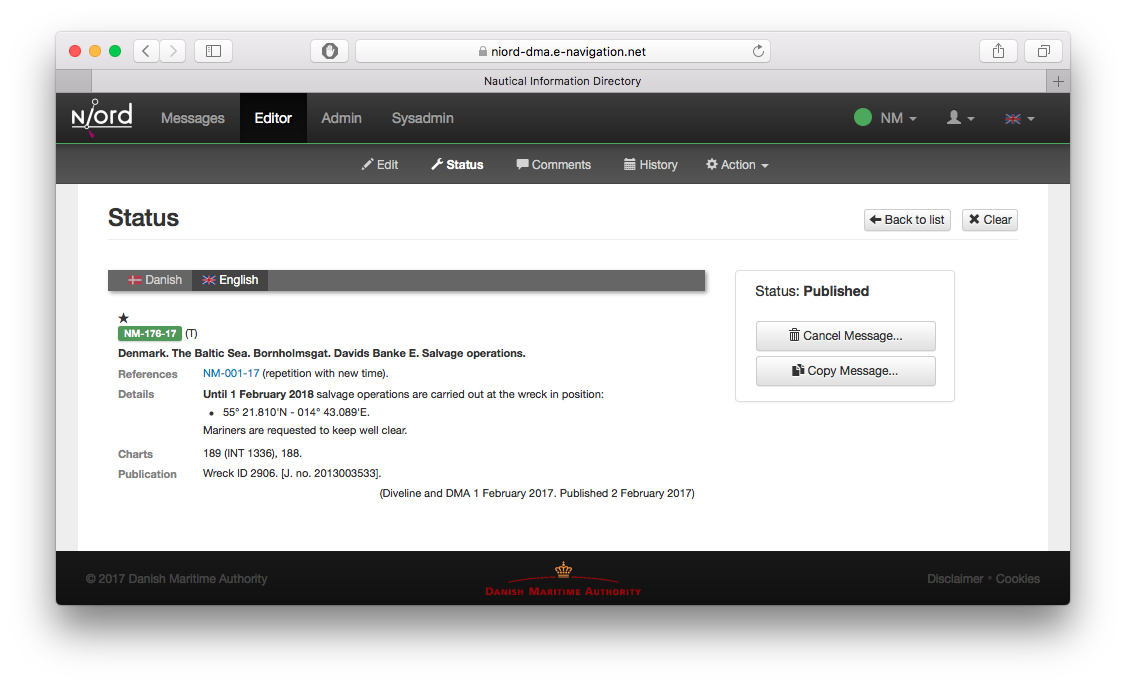
The Status editor page is where the user manages the status of a message.
At the left side of the page, the user may preview the message details in all supported model languages.
At the right side, there is a status panel listing the current status of the message, and buttons for manually changing the message status throughout the lifecycle of the message:
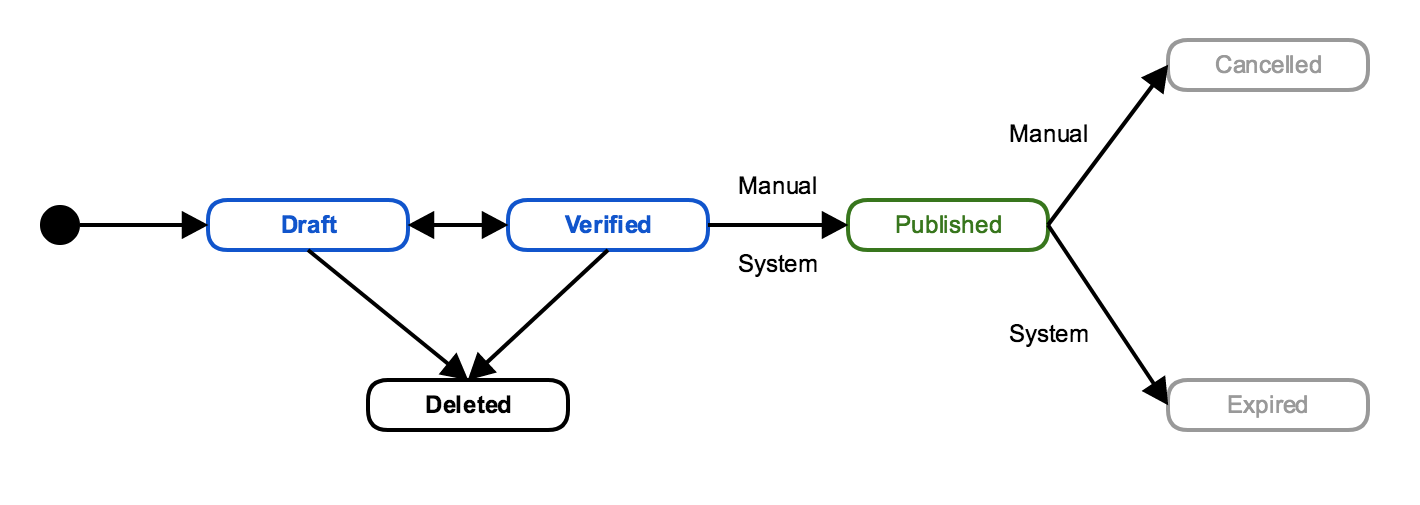
The valid status transitions are listed below. The state change buttons are only visible when they are valid.
| From Status | To Status | Description |
|---|---|---|
Draft |
Deleted |
A draft can be deleted clicking the "Delete Message" button. |
Draft |
Verified |
After proof-reading a message, it can flagged as Verified by clicking the "Verify Message" button, signalling that it is ready for publication. |
Verified |
Draft |
If a verified message is altered, it will automatically be re-assigned the Draft status. |
Verified |
Deleted |
A verified message can be deleted clicking the "Delete Message" button. |
Verified |
Published |
A verified message can be published manually be clicking the "Publish Message" button. If a verified message has a publish from date, it will automatically be published by the system upon reaching the publication date. |
Published |
Cancelled |
A published message can be manually cancelled by clicking the "Cancel Message" button. |
Published |
Expired |
A published message with a publish to date will automatically be expired by the system upon reaching that date. |
In addition to the state change buttons, there will always be "Copy Message" button, that may be used for creating an unsaved copy of the message and opening the copy in the editor.
When a verified draft is published by clicking the "Publish Message" button, and if the message contains cancellation-references to another message that is still published, the user will be given an option to automatically cancel the referenced message.
5.4. Comments Editor Page
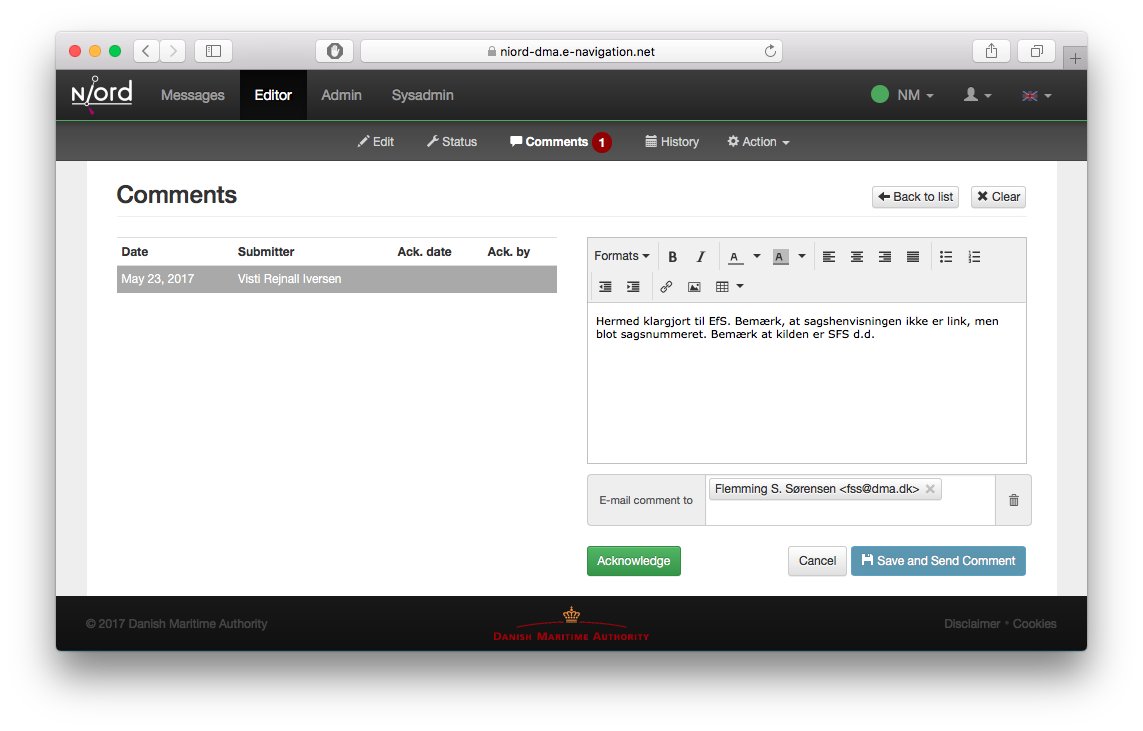
The Comments editor page is where users can submit comments to a message. Users, such as case officers, that do not hold the Editor role, may submit comments even if they cannot modify the message.
The Comments feature thus assists the process when a whole team of users are involved in writing and proof-reading messages.
The left side of the Comments page will list all submitted comments. When clicking on a comment, or if the "New Comment" button is clicked, the comment editor panel will be displayed in the right side of the Comments page. See screen-shot above.
When a comment is created or modified, if will be flagged as unacknowledged. The comment will stay in this state until the "Acknowledge" button is clicked. If there are any unacknowledged comments for a message, there will be a dark-red badge listing the number of unacknowledged comments next to the Comments link in the editor-page selection menu.
Lastly, the user can type a list of e-mail addresses along with a comment. When the comment is saved, all the specified mail recipients will receive an e-mail with the comment and a link to the message.
5.5. History Editor Page
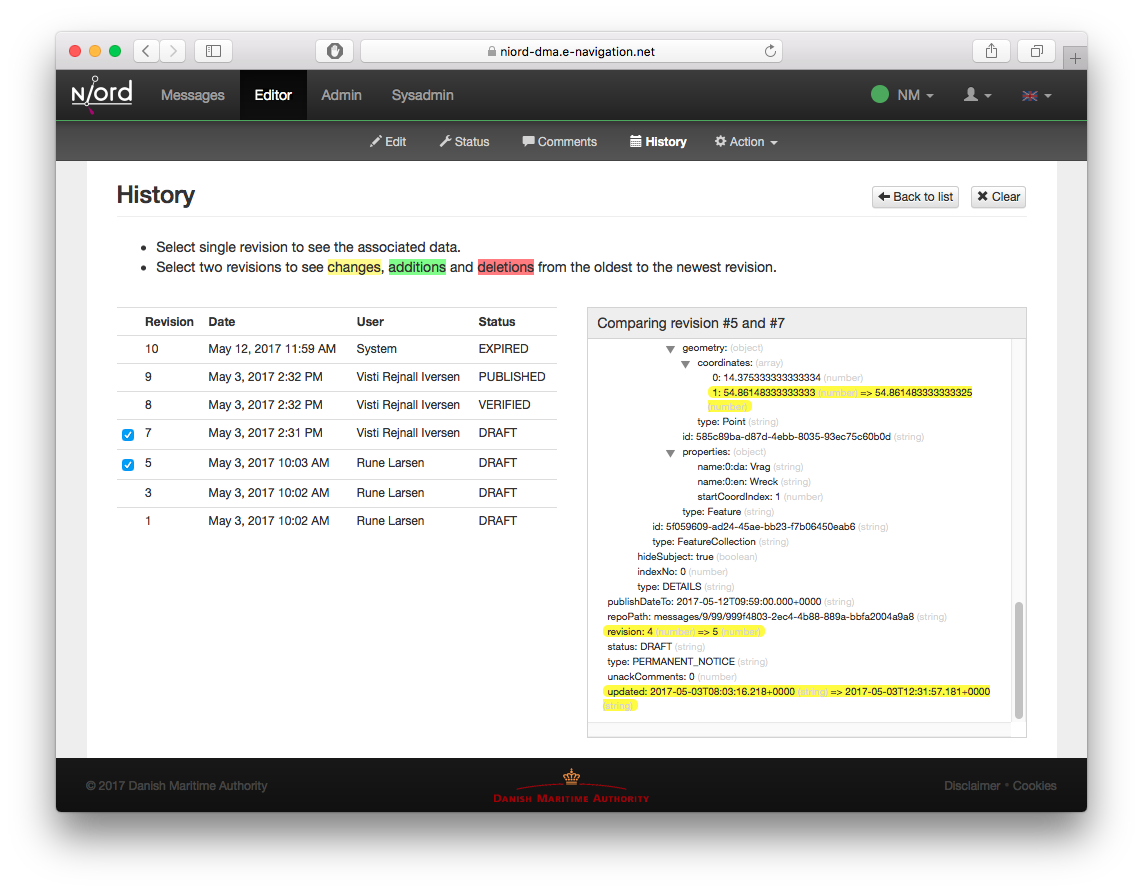
The History editor page lists the complete revision history of a message, and allows an advanced user to inspect the underlying data of a message for a particular revision, and indeed to compare revisions.
The table in the left side of the page contains the actual revision list, along with information about when the revision was created, the user who created it, etc.
There is also a checkbox next to each revision that allows the user to select the revision. If a single revision is selected, the revision panel in the right side of the page will list the underlying structured data of the revision. If there are any attachments for the selected revision, these are displayed at the bottom of the revision panel.
If two revisions are selected, the revision panel will again display the underlying data in the revision panel, and flag changes using color-coding: Yellow for changes, red for deletions and green for additions.
5.6. Editor Actions
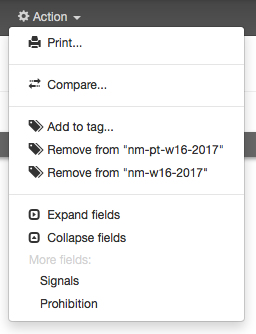
The Action menu of the Editor page contains the following actions:
5.6.1. Print Action
The Print action will print the currently saved version of the message being edited. Please refer to the Print Action action for message lists.
5.6.2. Compare Action
The Compare action will open the message comparison dialog with the currently edited message pre-selected. Please refer to the Compare Action action for message lists.
5.6.3. Add to Tag Action
The Add to Tag Action will add the currently edited message to a message tag via the Message Tag Dialog. Please refer to the Message Tags section.
5.6.4. Remove from "Tag Name" Actions
For each message tag that the edited message is assigned to, there will be a Remove from "Tag Name" action that will remove the message from that tag.
5.6.5. Expand Fields Action
The Expand Fields action is a short hand function that will activate (expand) all field editors on the editor Edit page.
5.6.6. Collapse Fields Action
The Collapse Fields action is a short hand function that will deactivate (collapse) all field editors on the editor Edit page.
5.6.7. More Fields Actions
As described in the General Edit Page Controls section, the set of editor fields displayed by default on the editor Edit page depends on the message type, and may also depend on the selected area, category, etc. For instance, the "Orig. Information" editor field will only be displayed for Notices to Mariners, not for Navigational Warnings.
However, in the bottom part of the Action menu, the user can choose to enable any of the editor fields not displayed by default.
6. Position Editor
The Position Editor is used for editing the geographical extent of various entities in Niord. Most prominently, the Position Editor is used to define the geographical extent of message parts - please refer to the Positions Editor Field section.
However, the position editor is also used by administrative users to define the geographical extent of e.g. charts and areas - please refer to the User Manual for Admins.
6.1. GeoJSON
Internally, Niord has adopted the GeoJSON format for position lists and geographical extents. Please refer to use of GeoJSON in Niord for more information.
The following geometry types are supported in the Niord Position Editor
| Geometry Type | Description |
|---|---|
Point |
A single longitude-latitude position |
MultiPoint |
A list Points |
LineString |
A connected list of longitude-latitude positions |
MultiLineString |
A list of LineStrings |
Polygon |
A polygon consists of an exterior ring, plus an optional list of interior rings that represents holes in the exterior ring. |
MultiPolygon |
A list of Polygons |
GeometryCollection |
A list of any of the geometry types described above. |
Feature |
A feature encapsulates one of the geometry types listed above, plus some extra attributes such as properties object. The properties object is used by Niord to store various auxiliary information, such as feature names, restriction flags, etc. |
FeatureCollection |
A list of Features. This is in fact the geometry type that all message parts are associated with. |
Of all these geometry types, the user will usually only deal with Points, LineStrings and Polygons.
6.2. Text Editor
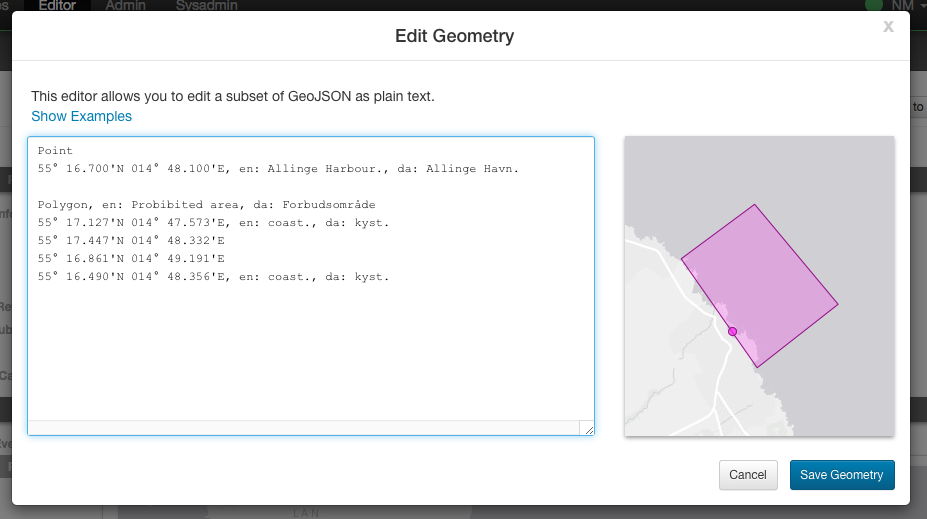
For relatively simple geometries, the user may choose to use the Text-based Position Editor (by clicking the "Edit as Text" button). The textual editor is also quite useful if the user wants to create a geometry based on a position list copied from a different source, such as an e-mail.
The main format of the textual representation is:
<<Feature 1 Geometry Type>>, <<Feature Name>>
<<Feature 1, Coordinate #1>>, <<Coordinate Name>>
...
<<Feature 1, Coordinate #X>>, <<Coordinate Name>>

<<Feature 2, Geometry Type>>, <<Feature Name>>
<<Feature 2, Coordinate #1>>, <<Coordinate Name>>
...
<<Feature 2, Coordinate #Y>>, <<Coordinate Name>>

...
So, each feature starts with a header line stating the geometry type (Point, LineString, etc). Next, there will be a new line for each coordinate of the geometry. If there are multiple features, each feature must be separated with one or more blank lines.
The feature names and coordinate names are optional, but may be useful when displayed as a label on a map. For instance, if the feature is a polygon that represents a restricted area, then it may be useful to display the buoy types that span the area on the map. The feature or coordinate names are defined by prefixing the name with a two-letter language code, e.g. "en: yellow spar bouy with topmark., da: gul stage med krydstopbetegnelse."
6.2.1. Examples
Create a simple point by simply typing a latitude-longitude position on a separate line. When no geometry type is specified, and only a single position defined, then it is assumed to be a Point:
56N 11 30.23ECreate a named polygon plus a line-string with named coordinates (the rather elaborate format of the positions in this example, is there to illustrate the flexibility of the text editor):
Polygon, da: ES D 139 Bornholm Ø., en: ES D 139 Bornholm E.
54° 54.967'N 015° 49.961'E
54° 54.969'N 015° 15.029'E
55° 03.006'N 015° 15.029'E
55° 19.930'N 015° 49.942'E
54° 54.967'N 015° 49.961'E

LineString
1) 54° 53.397'N 009° 53.071'E, da: kyst, en: coast
2) 54° 53.982'N 009° 52.170'E, da: kyst, en: coast
6.3. Graphical Editor
In order to create and manipulate more advanced geometries, than can feasibly be handled by the text editor described above, the user may use the Graphical Position Editor (by clicking the "Edit" button).
6.3.1. Graphical Editor Tools
The topmost row of tools are used for drawing and manipulating features directly on the map. The tools are detailed below.
No matter which tool is selected, the user can always pan the map by clicking and dragging directly on the map.
 Point Tool
When the Point Tool is selected, a new single-point position will be inserted every time the user clicks on the map.
 Path Tool
When the Path Tool is selected, a new LineString path will be inserted when the user clicks the map. The first click will place the first position of the path. Subsequent clicks will add a new segment to the path. The user must double-click at the map to place the last segment of the path.
 Polygon Tool
When the Polygon Tool is selected, a new Polygon will be inserted when the user clicks the map. The first click will place the first position of the polygon. Subsequent clicks will add a new segment to the polygon. The user must double-click at the map to place the last vertex and complete the polygon.
 Measure Tool
When the Measure Tool is selected, the user can insert a temporary measurement path, similarly to the way a normal path is created using the Path Tool. Whilst adding the measurement path, the total length of the path (in meters, kilometers and nautical miles) will continually be displayed in a tooltip:
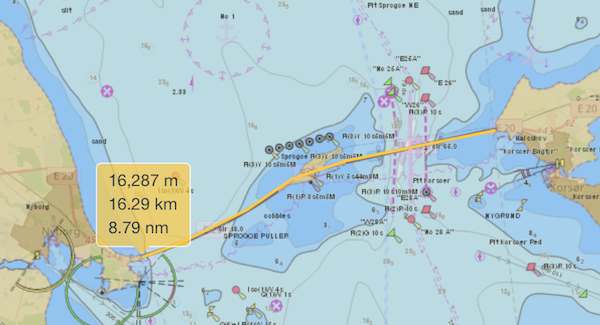
The measurement paths are not persisted and will disappear whenever the editor is closed or if another graphical editor tool is selected.
 Modify Tool
When the Modify Tool is selected, the user can select and manipulate existing features directly in the map.
A single click directly on a feature will select the feature. If the shift key is pressed, the feature will be added to an existing selection.
If the user keeps the shift key pressed and drags the mouse, all features within the bounding box will be selected.
Otherwise, if the user clicks and drags the mouse on top of a feature, the feature will be moved.
If the user clicks a segment of a selected LineString, or the border of a selected Polygon, a new point will be inserted at that position.
If the user keeps the shift key pressed and clicks on a vertex of a selected LineString or Polygon, then that vertex will be removed from the feature.
 Delete Tool
When the Delete Tool is selected, the user can quickly delete all the features that the user clicks on in the map.
6.3.2. Action Button Panel
The next row of buttons is for various actions. Clicking the "Cancel" button will cancel all changes and close the editor.
Clicking "OK" will update the underlying graphical model and close the editor.
Clicking the ![]() Show/Hide Features
toggle button will alternately show and hide the Features Panel.
Show/Hide Features
toggle button will alternately show and hide the Features Panel.
6.3.3. Action Menu
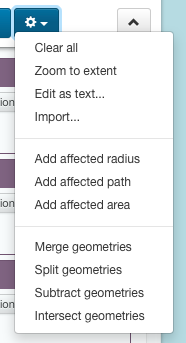
The Action Menu contains a multitude of functions for manipulating the features of the Position Editor.
The actual list of functions in the menu depends on the current feature selection.
Clear All Action
The Clear All action will clear the editor.
Zoom to Extent Action
When enacting the Zoom to Extent action, the editor map will pan and zoom so as to include all the features of the geographical model.
Edit as Text Action
The Edit as Text option is only available when the no geometry has been defined, or the geometry is sufficiently simple.
The edited geometry will be opened in the Text Editor described in a previous section.
Import Action
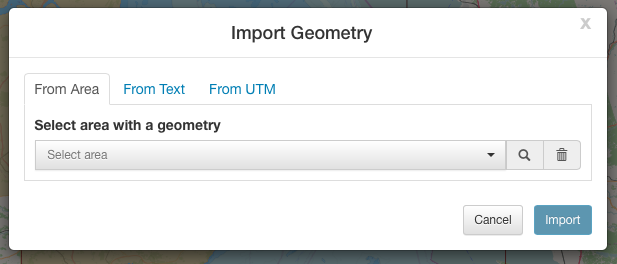
The Import action will open a dialog and allow the user to import a geometry from one of the following sources:
-
From Area: Areas may be administratively defined with a geometry. This tab will allow the user to select the area to import a geometry from.
-
From Text: Allows the user to import a geometry specified in plain text, as described in the Text Editor section.
-
From UTM: Allows the user to import a list of positions specified in the Universal Transverse Mercator (UTM) coordinate system.
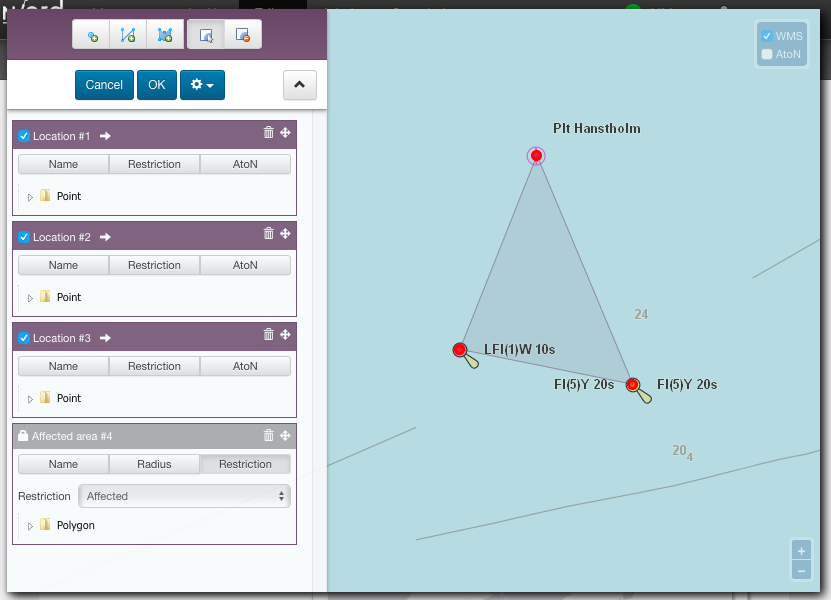
Add Affected Radius Action
If one or more features are selected, the user can enact the Add affected radius action to add an affected area with a certain radius around the selected feature(s).
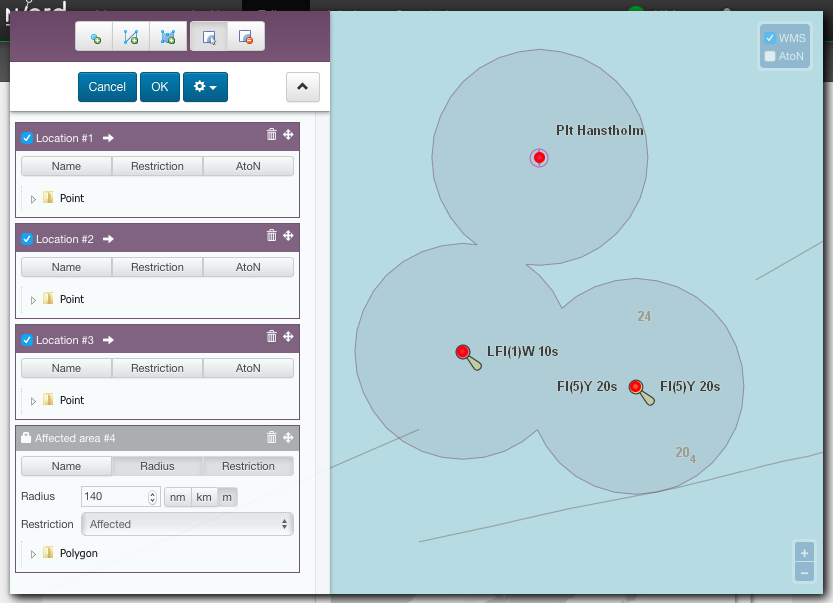
The affected radius feature is tied to the features it was created from (its parent features), so, if the user moves or modifies any of the parent features, the affected radius feature will be re-computed.
The user can also update the radius distance of the affected radius feature, whereupon its geometry will be re-computed.
Lastly, the user can select the type of restriction that applies to the affected area. By default the value is "Affected". However, the user can choose "Restricted", "Speed restricted", "Prohibited" and "Stopping prohibited" as well.
Add Affected Radius Action
If two or more Point features are selected, the user can enact the Add affected path action to add an affected path as defined by the points in the order they appear.
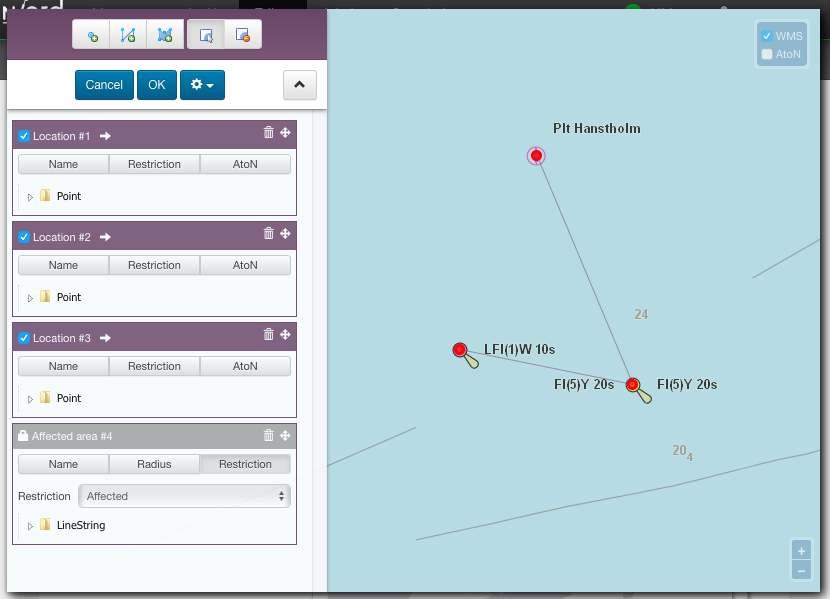
The affected path feature is tied to the points it was created from (its parent features), so, if the user moves any of the parent features, the affected path feature will be re-computed.
The user can also select the type of restriction that applies to the affected path. By default the value is "Affected". However, the user can choose "Restricted", "Speed restricted", "Prohibited" and "Stopping prohibited" as well.
Add Affected Area Action
If three or more Point features are selected, the user can enact the Add affected area action to add an affected area spanned by the points in the order they appear.
The affected area feature is tied to the points it was created from (its parent features), so, if the user moves any of the parent features, the affected area feature will be re-computed.
The user can also select the type of restriction that applies to the affected area. By default the value is "Affected". However, the user can choose "Restricted", "Speed restricted", "Prohibited" and "Stopping prohibited" as well.
Merge Geometries Action
If two or more features are selected, the user can enact the Merge Geometries action.
The merge function will attempt to be intelligent, depending of the type of the selected features.
-
If all the selected features a of type Point or MultiPoint the resulting feature will be of type MultiPoint.
-
If all the selected features a of type LineString or MultiLineString the resulting feature will be of type MultiLineString.
-
If all the selected features a of type Polygon or MultiPolygon the resulting feature will be of type MultiPolygon.
If none of these criteria applies, the resulting feature will be of type GeometryCollection.
Split Geometries Action
If one or more features are selected, the user can enact the Split Geometries action.
The split function will attempt to be intelligent, depending of the type of the selected features.
-
A MultiPoint feature will be split into separate Point features.
-
A MultiLineString feature will be split into separate LineString features.
-
A MultiPolygon feature will be split into separate Polygon features.
-
A GeometryCollection feature will be split into its individual geometries.
-
A LineString feature will be split into separate Point features.
-
A Polygon feature will be split into separate Point features.
Subtract Geometries Action
If two or more Polygon features are selected, the user can enact the Subtract Geometries action. The resulting polygon will be identical to the first selected polygon, but with all other polygons subtracted (i.e. leaving holes).
Convert to LineString Action
If a MultiPoint or a Polygon feature is selected, the user can enact the Convert to LineString action. The resulting LineString feature will form a path between all involved coordinates.
Convert to Polygon Action
If a MultiPoint or a LineString feature is selected, the user can enact the Convert to Polygon action. The resulting Polygon feature will form a polygon spanned by all involved coordinates.
Convert to MultiPoint Action
If a Polygon or a LineString feature is selected, the user can enact the Convert to MultiPoint action. The resulting MultiPoint feature will contain all involved coordinates.
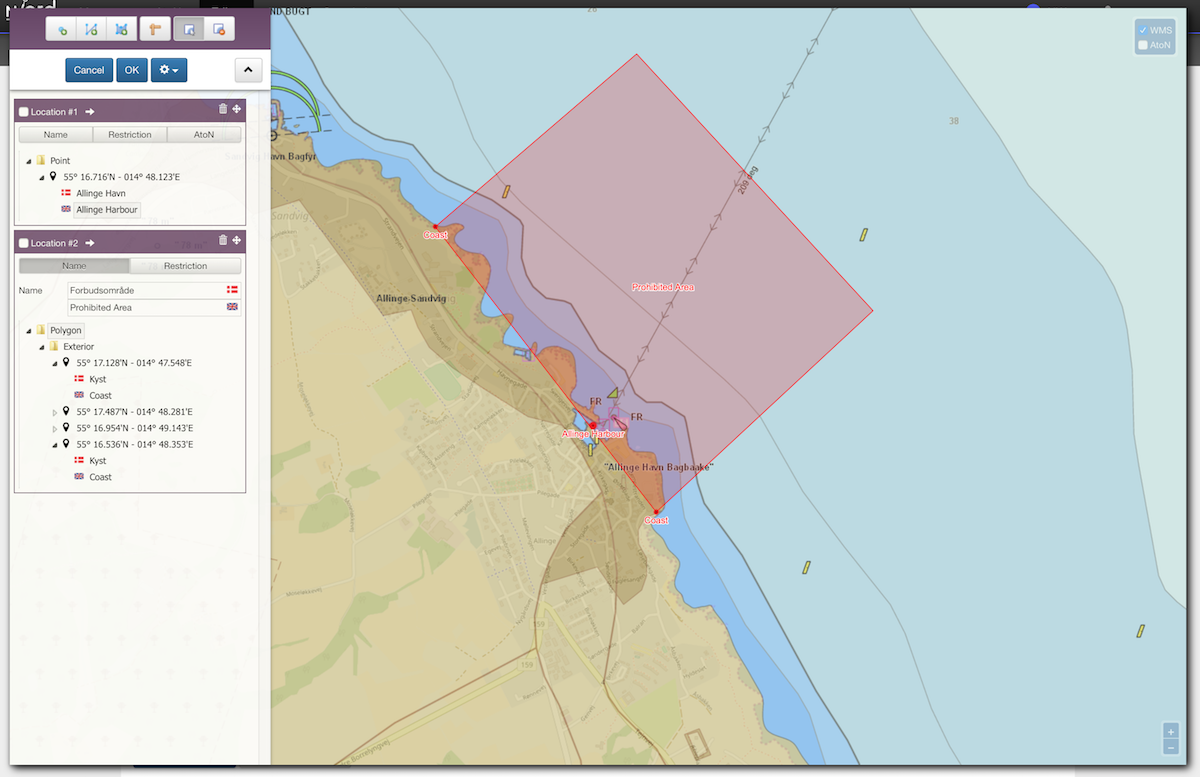
6.3.4. Features Panel
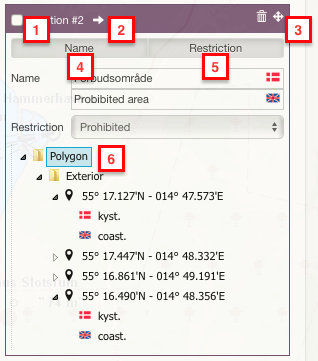
When the Features Panel is visible, it will list a Feature Panel for all defined features.
-
The feature selection checkbox will toggle the selection state of the feature.
-
The zoom-to-extent arrow will pan and zoom the map to the extent of the given feature.
-
The trash icon will delete the feature, and the drag-handle icon can be used to re-arrange the features in the Features Panel.
-
When the Name toggle-button is pressed, there will be feature name input fields for all supported model languages. A client (e.g. an ECDIS-client) may chose to display the label at the center of the feature.
-
When the Restriction toggle-button is pressed, there will be a restriction menu for selecting a restriction that applies to the feature. Possible values are "Affected", "Restricted", "Speed restricted", "Prohibited" and "Stopping prohibited". A client (e.g. an ECDIS-client) may chose to use the restriction flag to drive portrayal or have an effect in route computations, etc.
-
The geometry tree will allow a user to inspect and modify the coordinates and coordinate names of the actual feature geometry. The geometry tree can be navigated using the mouse or keyboard keys such as arrow-up, arrow-down, arrow-left (collapse node), arrow-right (expand node), F2 or enter (start editing coordinates or coordinate names) and enter to submit changes. The coordinate names, nested below each coordinate, and available in all supported model languages, may be displayed by a client (e.g. an ECDIS-client) next to the actual position on a map. To a certain extent, the user can also add or remove coordinates by clicking the plus or minus sign displayed next to a selected coordinate.
7. Message Template Execution

The Message Template Execution feature is set up and configured per domain by a system administrator.
The overarching idea is to allow the user to select and execute a message template for a specific hazard, such as "Light Unlit". The user will be asked to fill out a few standard template-specific parameters, and then a message will be composed and opened in the Edit Editor Page with most of its fields filled out in a standardized manner.
This mechanism is particularly suitable for generating Navigational Warnings, since they are mostly short and concise, and follow very strict guidelines for how to formulate the messages so as to adhere to the standards for MSI, NAVTEX, etc.
Notices to Mariners are much less suitable, since they are often longer, more varied and written in a more free prose.
A Message Template is actually just another name for a category that can be executed as described above. Categories are assigned to a message in the editor, as described in the Categories Editor Field section, and they are created and managed by system administrators. Please refer to the System Administrator Manual.
7.1. Template Selection Dialog
The most direct way to commence executing a message template, however, is from the template field of the Blank Editor Page (in domains that support template execution):

If the user knows in advanced which template to execute, she can type it directly into the field.
If the user does not know in advance which template to execute, she can click the
![]() selection button
in the template field, thereby opening the Template Selection Dialog:
selection button
in the template field, thereby opening the Template Selection Dialog:
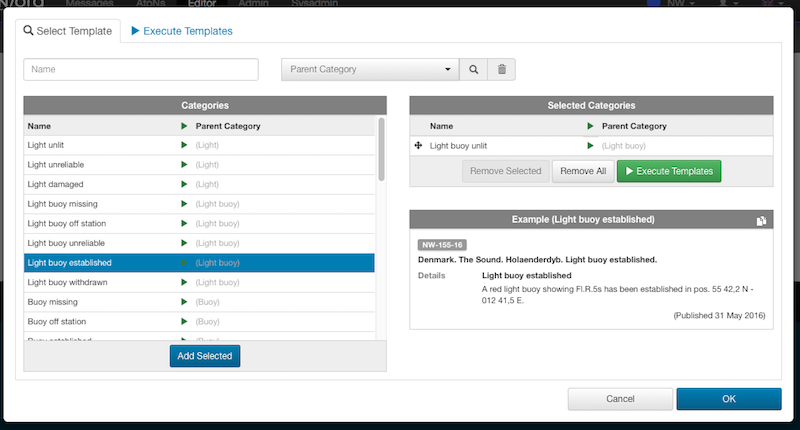
The main panel, "Categories", in the left side of the dialog, lists all available executable categories (templates). The user can select one or more of the categories in this list, and click the "Add Selected" button below to add these to the "Selected Categories" panel in the right side of the dialog.
For many of the categories, an example message will be displayed in the bottom-right side of the dialog to assist the user.
Most often, only a single template will be executed, but it is actually possible to execute multiple template at once, which will produce a message with one message part per templates.
Above the "Categories" panel, there are a couple of fields to filter the available set of categories. A "Name" input field that may be used to filter categories by name, and a "Parent Category" field that will restrict the categories to a specific parent category (e.g. "Buoy").
Once the selection is complete, the user can either click "OK" and return to the Blank Editor Page with the updated template selection, or the user may progress directly to the actual template execution, by clicking the "Execute Template" button or tab.
7.2. Template Execution Dialog
As mentioned above, the user can enter the Template Execution Dialog directly from the
Template Selection Dialog. Alternatively, the user can click the
![]() execution button
in the template field.
execution button
in the template field.
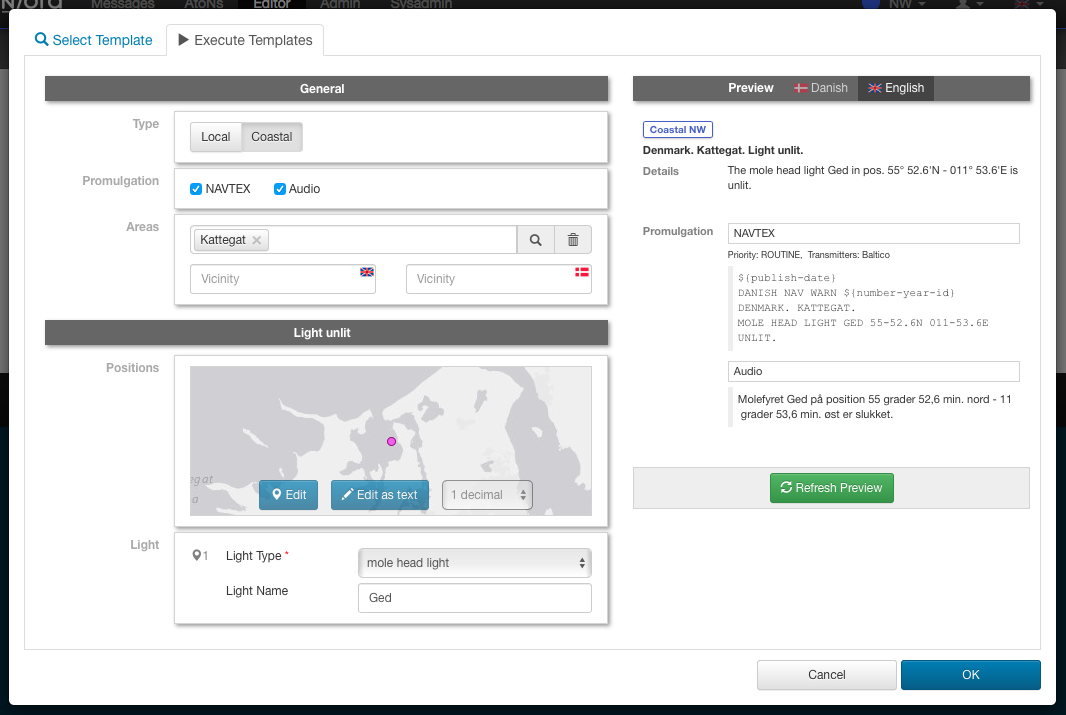
The dialog is divided into three main sections: The general template parameter panels and the template-specific parameter panels, both at the left side of the dialog, and the preview panel at the right side of the dialog.
The user must first fill out the parameters, typically in a top-to-bottom fashion, in the parameter panels. At any point of time, the user may click the "Refresh Preview" button to actually execute the template, and inspect the result in the preview panel in all supported languages.
When the user is satisfied with the result, she can click "OK", upon which, the generated message will be opened in the Edit Editor Page - still unsaved. Here, the user should polish the remaining fields and eventually save the message as a new draft.
Most of the general template parameters are (sometimes simplified) versions of the corresponding editor field described in the Edit Editor Page chapter.